In this latest issue Alex Mustard dives into his thoughts on the newly released Fisheye Conversion Port.
Want to read more UwP Magazine issues? Subscribe here.


In this latest issue Alex Mustard dives into his thoughts on the newly released Fisheye Conversion Port.
Want to read more UwP Magazine issues? Subscribe here.
Below is a setup guide for the Nikon Z8 in the Nauticam NA-Z8 housing for use in capturing underwater wide-angle and macro still images based on my personal experience with the camera. Images are from Komodo, the Banda Sea and Raja Ampat in Indonesia. For wide-angle, the optics are either the WACP-C or WWL-C paired with the Nikkor Z 24-50mm f/4-6.3 Lens. Macro is shot using the Nikkor Z MC 105mm f/2,8 VR S Macro lens with the N120 Macro Port 80 and the SMC-1 & 2 for super-macro. Lighting was provided by a set of Sea & Sea YS-D3 Duo strobes for wide-angle and Backscatter MF-2 strobes for macro paired with the OS-1 snoot.
One of the great benefits of the latest mirrorless cameras is the ability to customize so many aspects of their operation and interface. I'm sure others have had success setting their camera up a different way. This setup works well when using the Nauticam NA-Z8 housing but may not work well with other brands that don't allow for the same level of access to camera controls.
Please treat this as a starting point to develop your own "Best Settings Guide" that match your shooting style.

Whaleshark photographed near a bagan in Saleh Bay, Indonesia. Shot using the WWL-C in Auto ISO with highlight protection metering and an EV compensation of '-1'.
The AF-C 3D Tracking is amazing, especially for macro and even super-macro. I exclusively shoot using back-button autofocus by which exclusively holding down the 'AF-ON' button triggers autofocus. On the Z8, as opposed to other mirrorless systems, the camera will not show a review after the shot if you continue to depress the 'AF-ON' button while releasing the shutter. Instead, the camera will only show the review when the 'AF-ON' button is released. This, combined with zero blackout from the electronic shutter, allows for capturing the best moment of action or movement. So you can shoot, review, continue focusing and continue shooting without interruption until the action has passed.

This pair of robust ghost pipefish were gently moving across the bottom feeding. Locking autofocus on the eye and foregoing image review after the first shot by holding down the 'AF-ON' lever, the camera was able to the track the eye so I could focus on aiming the snoot and composition.

Even with subjects that are fairly stationary, not having to worry about the subject being in focus really allows more time for composition and creative lighting. The camera locked onto the eye/face of the goby and held it while I recomposed and lit the subject with the snoot.
To set this up, first remove the triggering of auto-focus from the shutter by navigating to the 'a' 'Focus' menu > 'a6 AF Activation' > 'OFF'. Autofocus will now only be activated when the 'AF-ON' button is depressed.
Set the camera to continuous autofocus by pressing the dedicated 'Focus Mode' button on the front left of the camera/housing and use the main control dial on the rear of the camera to cycle between 'AF-S', 'AF-C', and 'MF' focus modes. Use the sub-command dial to change the focus type area to '3D'. Additional focus menu settings that should be set are disabling the 'a12 Built-in AF-assist illuminator' > 'OFF' as it will not function inside the housing and just drains battery. 'A13 Focus peaking' is incredibly useful for macro and should be set to 'ON'. You can then choose the color you prefer as well as the sensitivity in the same 'a13' menu. I found 'Yellow' for the color and '2 (Standard)' for the 'Focus peaking sensitivity' to be most useful for me. Also, 'a1 AF-C priority selection' should be set to 'Release' so that the cameras will fire even if the subject isn't in focus. The camera features "Subject Detection' whereby the camera attempts to identify certain subject types in the frame and allow you to focus on that subject (and track it when in '3D Tracking'). You can choose which types of subjects it will look for in the 'Photo Shooting Menu' > AF Subject detection options'. I turn them all off, I prefer to place my focus point atop where I want to track and the activate AF.

No-blackout shooting, alongside the ability to block review via 'AF-ON' means choosing the right part of a subjects behavior even easier.
To see the image review after taking a shot, this must be enabled in the 'Playback Menu' > 'Picture review' > 'ON'. To cycle through the different review modes, press the 'Disp' button. To limit which review modes are available, you can choose to enable as many of the options as you like in 'Playback menu' > 'Playback display options'. I usually only use 'None (Picture only)' and 'RGB Histogram'.
A wonderful Nikon feature that is continued in the Z8 is the ability to quickly adjust the focus of the lens manually (if you have the optional focus gear installed) without having to switch the camera into manual focus. Moving the manual focus gear will also cause the focus peaking to engage (if it hasn't occurred during autofocus). Focus peaking can be set in 'a13 Focus Peaking'.

Sea Snake (L): Even with wide-angle subjects, the ability to shoot without blackout lets you continue to shoot a scene without loosing track of your subject. The difference is bigger than you'd think so don't knock it until you've tried it.
Octopus (R): Focus peaking makes determining critical focus even easier, especially important when shooting shallow depth of field images
The EVF of the Z8 is one of the best for underwater use due to it's customizability. The settings below will help alleviate one of the biggest pain-points for underwater shooters using a mirrorless camera, the color of the scene as it appears through the EVF.
Unlike some other mirrorless cameras, the appearance of the scene in the EVF is independent of the metering when in the 'Adjust for ease of viewing' mode. In this mode the camera attempts to enhance the ability to view all elements of the scene (the foreground).
The EVF's other mode 'Show effect of settings' will display the scene as it would look with any exposure and profile settings applied. In high-contrast scenes such as a backlit reef, the foreground may appear too dark to allow for effective composition. Switching between the two modes helps balance judging background exposure and composition and foreground composition. The Z8 makes this process extremely simple and quick. First a note on customizing the 'Adjust for ease of viewing mode' before detailing the setup of switching the viewing modes.

Capturing backlit foreground subjects with a dynamic background such as schools of fusiliers makes being able to quickly switch between viewing modes essential and the Z8 does an exceptional job.
This particular customization is one of my favorite functions of the Z8. With most EVF cameras, the scene will appear overly blue or green as the color temperature cannot be adjusted without also effecting the way a captured image appears on review. With the Z8, the color temperature and tint of the viewfinder can be adjusted manually in the 'Adjust for ease of viewing' mode.
Custmize this in 'd8 View Mode (Photo Lv) > 'Adjust for ease of viewing' > 'Custom' > 'White Balance' with the values below.
PRO TIP: Setting the color temperature to the maximum value of 10,000K as well as full red (A-B value of A5. 5) and full magenta (G-M Value of M5. 5) values allows for a more Optical-Viewfinderesque shooting experience. When switching to the 'Show Effects of Settings' mode, there is no distracting on-screen notification and the switch is extremely fast.

Reef Scene (L): Soft corals and reef fish off Seraua island. By having the colors in the scene appear more lifelike in the EVF allows for easier composition and more DSLResque experience with all the benefits of an EVF.
Reef Scene (R): Soft corals cling to rock beneath the small rock next to Boo Windows in Misool. Instant review helps insure you can adjust your lighting without pulling your eye away from the viewfinder and the scene.
The best way to setup the switching between viewing modes is to assign the record button to switch the modes. So in 'f' Menu > 'Controls' > 'Custom Controls (shooting)' > 'f2 Video Record Button' is assigned to 'View Mode (photo Lv)'. This will then switch between the two modes when the 'Record' button is pressed. As it's on the same thumb lever on the NA-Z8 as the 'AF-ON' button, it's easy to switch quickly when trying to compose a backlit wide-angle subject or to see how your background will look with the current settings.
The best way to maximize the potential of the EVF is to install one of the Nauticam Full Frame Viewfinders. I prefer the angled 40º 0.8:1 version with a lower magnification, allowing me to see the entire EVF corner-to-corner.
The dedicated Monitor/Viewfinder switch button on the cowling of the EVF means not having to use a button that could be customized for another purpose. In order for this to properly function as only switching between manual selection of the viewfinder and manual selection of the monitor, the other modes must be disabled. This can be done in the 'Setup Menu' > 'Limit monitor mode selection' where only 'Viewfinder Only' and 'Monitor Only' should be checked, all other options disabled.

A group of trevally chasing a school baitfish in Misool, Raja Ampat. Being able to see exactly what your background will look like is an incredible feature when shooting dynamic bluewater scenes.
What overlays you see in the Viewfinder can also be customized. By pressing the 'DISP' button, you can cycle through the various modes. You can disable or customize these modes in the 'Custom Settings Menu' > 'd18 Custom viewfinder shooting display' menu. You can set up to four displays that can be cycled through. I prefer to have only two. One features only the 'SIMPLE' and 'DETAIL' shooting info while the other features only the 'SIMPLE' data. I also enable 'd19 High fps viewfinder display' to give a more optical viewfinder feel to the EVF.
 Pelagic critter (L): No-blackout is incredible for blackwater creatures as you don't lose sight of it as the shutter comes down.
Also, in the settings menu, the 'Auto temperature cutout' should be set to 'HIGH' to prevent the camera from preventing shooting when the camera temperature increases. I also prefer to disable 'Touch controls' as they don't work in the housing anyway and can cause you to accidentally change something when taking the camera out of the housing or installing it. I left the 'Energy Saving (photo mode) turned 'ON' and didn't find it caused to large a delay. I would simply half-press the shutter as I brought the camera up to my eye and it would be fully awake by the time I got my eye situated.
To save battery, switch the camera into 'Airplane Mode' as the wireless functions are not useful underwater anyway. This can be done in the 'Network' Menu. To further save battery, in the 'c Controls' Menu > 'c3 Power off delay' you can set the camera timeout for 'Playback', 'Menu', 'Picture Review' and 'Standby timer'. The options for 'Playback' and 'Picture Review' will also affect how long the image persists after the shot is taken before going away. You can also always, half-press the shutter to exit review/playback.

When trying to include light rays into a shot, seeing how they'll appear before you even press the shutter is incredibly helpful. These anemone fish cruise over a perfect hard coral garden in Banda Neira.
In the 'Metering/exposure' Menu it's helpful to set the 'ISO sensitivity step value' to '1/3' and 'EV steps for exposure control' to '1/3' as well to be able to fine tune aperture, shutter speed and ISO in 1/3-stop increments.
It's helpful to customize the camera's 'i-menu' as it can be used to quickly access certain functions such as white balance, release mode, metering and flash controls. This can done in the 'f Controls' Menu > 'f1 Customize i menu'. I like the first available slot to be 'Flash Mode'. This allows me to quickly turn on and off the flash trigger when I want to shoot a silhouette or natural light image without having to turn off my strobes. I assign 'White balance' to the second slot and 'Metering' to the third slot.

Another situation where having more of a "what you see is what you get" ability is incredibly helpful. The waves crashing would change the background exposure dramatically as I waited for a snake to show up. Being able to see it before I shoot, I was able to adjust the shutter speed to keep up.
Also, in the 'f Controls' Menu is 'f6 Release button to use dial' which I set to 'ON'. This means that when you press the button for 'ISO', you don't need to hold it down while using the main/sub command dials to adjust the settings. Simply press the button once, then adjust the setting and either press the 'OK' button or half-press the shutter to leave that setting. This is especially useful when the camera is inside the housing as pressing and holding a button and simultaneously turning a dial can be difficult and will likely just result in an unintended setting such as aperture or shutter speed being changed.
Again, please use this as a starting point to setup the Z8 according to your needs. The menu system is vast and nearly every button is customizable. Customizations can be saved and recalled using the 'Custom Settings Banks' for items contained in the 'Custom Settings Menu' and the 'Shooting Menu Bank' for photo shooting and video recording menu options. You can save the settings mentioned in the article to these Banks for future recall.

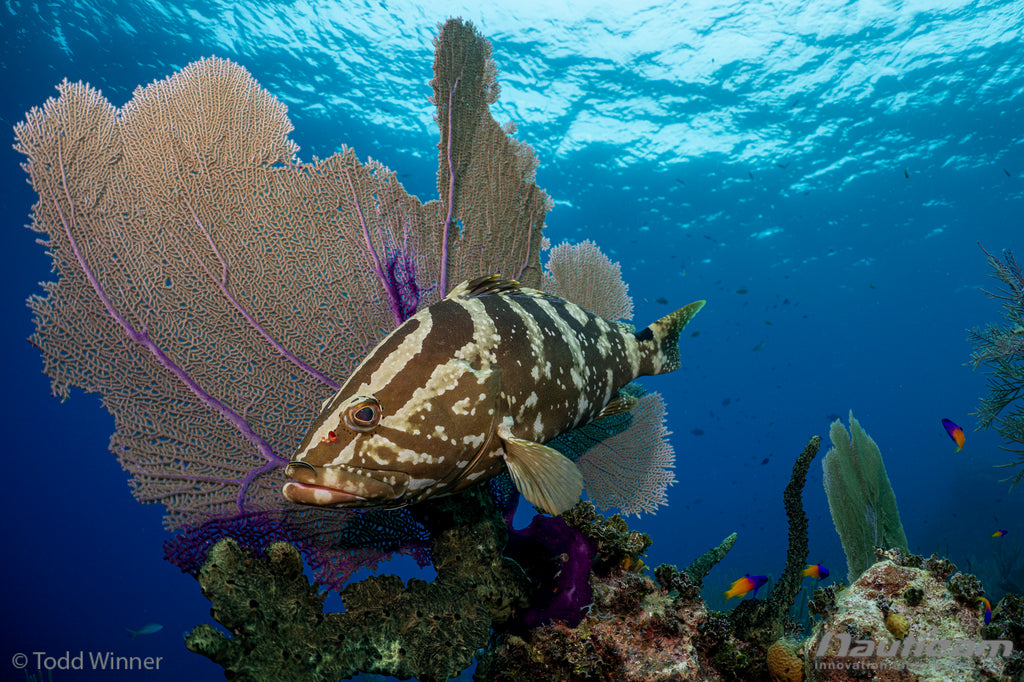
Moray eels sharing a cleaning station. The small diameter and zoom capabilities of the WACP-C allows you to get close and bring your lighting in to light the subject just the way you want.

The Z8 is an incredible tool for both wide-angle and macro still imaging and the interface will feel familiar to those coming from previous Nikon offerings. Through setting the camera up to accommodate your shooting style, you can leverage the features to help you capture the action that presents itself to you.
]]>This setup guide is derived from field notes using the Sony ⍺1, A7SIII, A7IV and A7RV cameras in both still and video modes underwater in their respective Nauticam housings. This article is designed for those that want to use these cameras as truly hybrid systems, shooting both still and moving images, however, even those looking to use it for a dedicated purpose will hopefully find the recommended settings helpful. As with all settings related articles, if you ask ten different people you get ten different answers. I have used all of these systems extensively and so far this seems to be an effective setup. I would love to hear how others have chosen to set up their systems as I’m always looking for a better way.
The naming of the menu items and options is current as of 9/17/23. Future firmware updates may cause these to vary. I’ll do my best to update this as that happens. These cameras are not completely identical in their features & controls and I've done my best to address the differences.
Please treat this guide as a starting point to develop your own "Best Settings Guide" that match your shooting style.
You'll also find links to previous articles on the individual systems throughout this setup guide.
First things first, always set the date and time and make sure you adjust this when you get to a new location as it will help you find images chronologically later on. You'll also want to set up a custom naming system for the image and video files. I am constantly shooting different cameras, often by the same manufacturer (that's why I'm writing this article on all those Sony cameras as I've used all of them on trips) and you don't want to risk duplicate file names. This can be accomplished in:
'IMAGE Shooting' menu > 'File' > 'File/Folder Settings' for still images and 'File Settings' for video.
I also choose to disable the touchscreen functionality of the camera as it's not usable underwater and can lead to accidentally changing settings when installing or removing the camera from the housing. This will also train your brain to navigate the menu using the dials and buttons as you will have to do underwater. This can be done in:
'SETUP' tab > 'Touch Operation' > Touch Operation and turning this 'OFF'.
Underwater I also want to manually decide between using the EVF or the LCD (this is necessary as the eye sensor doesn't work underwater). To switch between the two underwater we need to disable the automatic switching and assign a custom key to toggle between the two. To do this, we need to navigate to:
'SETUP' > 'Finder/Monitor' and set this to 'Monitor (manual)'. NOTE: We choose 'Monitor' for now, otherwise you'll have to do the rest of this step while looking through the EVF.
Next, we'll assign the toggle control to the 'C3' Button which is easily accessible with your left hand on the rear of the housing. Navigate to:
'SETUP' > 'Operation Customize' > 'IMAGE Custom Key Settings' > and assign 'C3' to 'Finder/Monitor'.
In the 'Finder/Monitor' menu you can also set the brightness, color, quality and frame rate of the EVF. I prefer to maximize quality and frame rate and generally leave the color and brightness as is.
NOTE: we will be customizing several buttons and controls. In the Sony 'Custom Key Settings', you can set a button to have different functions in IMAGE, MOVIE or PLAYBACK roles. Make sure you are in the correct mode when assigning the button.

Especially in warm tropical waters (or very warm/hot topside environments), these cameras don't dissipate heat as well so it's important to adjust some other settings to prevent the camera from shutting down due to high operating temperatures. NOTE: this may cause very hot camera/card conditions and may affect the life of the camera/card.
In 'SETUP'>'Power Setting Option'>'Auto Monitor Off' I set this to 'OFF" as I prefer the monitor/EVF don't turn off as I don't want to miss any action as it starts up again. I've found the battery life to be quite good across the sony lineup and easily get two dives out of a battery.
The same goes for 'Power Save Start Time'. If you want to try and eke some more time out of your batteries you can activate these features. I prefer to just change batts more often. The critical setting is the 'Auto Power OFF Temp.' Which I prefer to set to 'High'. As mentioned above and in the camera manual this can make the camera and/or card very hot so be aware when removing the camera from the housing and let it breathe.
Since we are telling the camera to operate at high temperatures it is also a good idea to enable 'Auto Pixel Mapping' in:
'SETUP' > Setup Options> 'Auto Pixel Mapping'. This will perform pixel mapping occasionally when the camera is turned off to insure there aren't "bright pixels" in recorded footage, similar to Black Shading Calibration on cinema cameras.
To further save battery life, we need to place the camera into 'Airplane Mode' similar to a smartphone to disable bluetooth and Wi-Fi. If you plan to use the network functions of the camera, don't enable this mode. Under:
'NETWORK' tab > 'Network Option' > 'Airplane Mode' set this to 'ON". NOTE: Topside, the ability to use a smartphone or laptop to remotely control the camera is awesome so if you are using the camera out of the water, dig into this menu.
All the models feature what Sony calls "Registration Recall Modes" which we would all call "Custom Modes" which can be accessed directly by the 'Mode Dial' atop the camera. Most camera settings (see note below) accessed by the camera menu or dials can be registered to one of the 3 custom modes. Additional saved modes can be saved to a memory card as well, however, this is far less user friendly.
This is also one of using Sony cameras for video's biggest pain points. Sony does not allow registering a new custom white balance in a Custom Mode. This makes these custom modes unusable for underwater video where a custom white balance is desired. You could use one for macro video where the white balance is set to the video lights or left on auto. For video, you must use the Manual Mode setting.
Therefore, I would utilize the custom modes in the following configuration:
C1: Photos (Full Manual)
This setting will be used for both wide and macro still imaging using strobes. All exposure functions are controlled by the user.
C2: Photos (Auto ISO)
This setting will be used for natural light still imaging. The shutter speed and aperture will be set by the user while the camera will control the ISO, within a specified range to determine proper exposure without overexposing the highlights (which are less easily recovered in post). This mode is also excellent for dynamic situations such as dolphins, whales or other shallow moving subjects.
C3: Topside Photos (Aperture Priority)
When shooting the vast majority of topside scenes, I tend to use aperture priority and use the exposure compensation to dial in exposure. As this isn't a topside photography article, I won't go into depth on this setting. There are lots of resources out there for this kind of imaging.
In order to use the C1-C3 custom modes, you must first set the mode dial on the camera to 'M' when setting the camera up for still-image custom modes (C2-C3) and 'Photo' when setting
'Shooting' Menu > 'Shooting Mode' > 'Exposure Mode'. Set this to 'Manual Exposure'
PRO TIP: You actually get one extra easily accessible "custom mode" as you can use the 'M' dial position in Photo. Just remember that these settings cannot be 'reset' as they are in a Custom Mode when you turn the camera off and back on again, any changes you made will remain.
NOTE: Custom Controls are not included in the C1-C3 custom modes so, for example, you cannot have a button perform a different function in C1 vs. C2.
Once you have set everything and are ready to assign that to a Custom Mode, this can be done by going to:
'Shooting' Tab > 'Shooting Mode' > 'MR Camera Set. Memory' and choose C1-C3. Press the center of the control wheel to confirm the selection. Turn the mode dial to the assigned mode and double check the settings were assigned properly.
Note: M1-M4 are stored on the memory card and are less useful.
Another way to minimize endless menu scrolling and frustration is to register frequently used menu items, such as the 'FORMAT' media option to the 'My Menu' portion of the camera menu. These systems feature three 'My Menus'. Each 'MyMenu" can handle a large number of Menu Items.
Regardless of system, I recommend adding the following to the MyMenu. The settings for each of these menu items will be discussed in following sections, simply add these to your MyMenu for now:
'Shooting Tab' > 'Image Quality' Menu Items
Set to RAW, this will maximize image quality. You can also shoot JPEG/HEIF simultaneously but I find this invariably just leads to wasted memory card space and the possibility for lost images when JPEGS are copied over instead of the RAW file.
Set this depending on your needs and memory card sizes, uncompressed is preferable and avoid Lossless Comp (M) and (S) as that will actually reduce image size.
I strongly advocate always using the 'Back Button' Focus method regardless of shooting situation. This method removes the autofocus function from the shutter button and only activates the chosen autofocus mode when the 'AF-ON' button is depressed.
This focus method gives the shooter the most control over the image's focus, especially when recomposing. While some people use this only for macro, I use it for both macro and wide. Foremost because I find it more accurate and also because that way you don't forget when switching that there's no focus on the shutter. Muscle memory is key in photography and having as much the same as possible is helpful.
To set this up on these cameras the process is the same:
Navigate to the 'AF/MF' tab > 'AF/MF' > 'AF w/ Shutter' and set to this to 'OFF'. This decouples autofocus from the shutter.
Next, navigate to
'Setup' tab > 'Operation Customize' > 'IMAGE Custom Key Setting' Menu.
Make sure it is not the MOVIE Custom Key Settings' as the Sony cameras allow for distinct custom button setting for IMAGE, MOVIE and PLAYBACK modes. Select the 'AF-ON' button and make sure it is set to 'AF-ON'.
The camera will now only engage the chosen autofocus mode when the 'AF-ON' button on the rear of the camera is depressed.
I prefer to work in 'AF-C' in which the camera will continue to focus as long as the button is pressed. Within this mode, you can enable tracking which will "follow" the selected subject and adjust focus continuously as long as the camera can detect the subject and the 'AF-ON' button is depressed.
NOTE: The A1 features an external dial to set the Focus Mode to 'AF-C' on the top of the housing beneath the 'Drive Mode' Dial. On the A7IV, A7SIII and A7RV this is done in the menu 'AF/MF Focus' tab > 'AF/MF' > 'Focus Mode'.
The autofocus capabilities of these cameras are nothing short of incredible. While this may have been a less reliable method on older cameras, I haver found it to be incredibly reliable on these systems. To setup tracking, navigate to:
'AF/MF Focus' tab > 'Focus Area' > 'Focus Area' > and set it to either 'Tracking: Spot S' or 'Tracking: Spot M'. This will then allow you to move the either small (Tracking: Spot S) out medium (Tracking: Spot M) focus box around the frame with the joystick pad on the rear of the housing.
Once you depress the 'AF-ON' lever the camera will then attempt to focus on the subject inside this box and as long as the lever continues to be depressed will track it as it moves within the frame, either through recomposition, camera movement or subject movement.
You can set the tracking sensitivity for still imaging under the 'AF/MF Focus' Tab > 'AF/MF' > 'AF Tracking Sensitivity'. I prefer to set this at '3' and find that works well for most macro and wide subjects.
This setup allows me to choose the subject by placing the focus box over the subject and depress the 'AF-ON' button to begin continuous autofocus. If I continue to hold the button and recompose, the camera will still maintain focus on the subject and I can watch the frame to insure it's correct. If I so choose, I can also just release the 'AF-ON' button and recompose with the focus now locked-in.
I prefer to choose my subject as opposed to having the camera choose it for me. The A series allows you to have the camera attempt to detect certain subject types within the frame such as animals, humans, birds, planes, etc. and give you the option to focus on that subject but this requires having AF-ON tied to the shutter release so I avoid it for STILL imaging underwater. I find these modes to be less accurate than just having it focus on the part of the image that I designate. Don't feel that you are missing the benefits of the camera's stellar autofocus by not using these auto-detect modes as you are still relying on the incredible processing capabilities by using the AF tracking function.
We also want to disable to the 'Focus Illuminator" which will not work underwater anyway and just uses battery life. This can be done in:
'AF/MF Focus' Tab > 'AF/MF' > 'AF Illuminator' menu. Set it to 'OFF;'.
NOTE: you definitely want this turned on if you use the camera for topside.

One of the biggest benefits of the mirrorless system is that you can view the scene in your viewfinder in two different ways, one in which the camera attempts to show you entire scene as it would appear in an optical viewfinder or as it would appear with the chosen camera settings (ISO, SS, and Aperture) applied.
For Wide-Angle still imaging I prefer the following setup which allows me to quickly switch between the two options (NOTE: this feature is not available when shooting video and would not be useful). The rationale for this differs for macro and wide-angle but the setup is the same, more on that shortly.
For wide-angle, the main limitation of an EVF becomes clear fairly quickly in that with a strong backlight (sunball, moderate backlighting) the camera is unable to clearly display both the foreground (ex. Reef) and background (ex. Blue water with fish) with the 'Settings Effect' OFF (simulating an optical viewfinder mode) as it lacks the dynamic range. This usually results in not being able to properly compose your background subject while it gives a clear representation of the foreground subject. Toggling the settings effect 'ON' will now show you what the image would look like with the chosen settings applied. The background now looks EXACTLY like it will in your final image, however, the foreground is now most likely dark as we rely on strobes to provide our foreground exposure and the camera can't simulate that. The good thing is we now know before we push that shutter how our water is going to look. The bad thing is we sometimes can't see our foreground well enough to compose. This is when it's time to quickly toggle back and forth. In many situations, leaving 'Settings Effect' ON is fine but being able to toggle back and forth, even just to check your background exposure when conditions change is incredibly helpful.
NOTE: Even with Settings Effect set to 'OFF", the camera chooses the overall brightness balance of the image (as well as how much to open up the shadows and darken the highlights) based on the metering setting of the camera. Choosing a more evaluative model such as 'Multi' can help. I find that 'Center' works best when shooting backlit reef scenes where the subject will be fairly centered in the frame.
NOTE: If you only use the electronic shutter, you can enable the setting 'Flash Effect dur. Sht' under 'Shooting' Tab > 'Shooting Display' > 'Live View Display Set'. With this enabled the camera will mimic a 'Flash Effect' to brighten the foreground. I find this to be unrealizable and not of much benefit which may be due to the flash triggers not be recognized as a Sony flash which disables the feature.
PRO TIP: assigning this to the 'MOVIE' button (the RECORD button atop the camera and accessed by the other right side thumb lever on Nauticam Sony housings) is also possible and is what I do, as I use the shutter release to begin video recording in video mode anyway. So for me, this extremely convenient thumb lever is going unused when shooting still images so I assign 'Live View Disp. Select' to it. However, if you want the 'MOVIE' button to retain its functionality, assign it to another button that is easy to access. More on using the shutter for video recording later in the video section.
For macro, the default setting for me is leaving the settings effect 'OFF'. As I'm generally running the shutter speed near it's X-Sync speed, I don't necessarily need to check my background exposure (unless I am including blue-water and using slower shutter speeds). It would also most likely just show me black frame as the only thing exposing my subject is my strobes which aren't firing yet. Macro is truly where the mirrorless camera's EVF shines. With the settings effect turned 'OFF', the camera will adjust the brightness of the on-screen image. This means, no more focus lights (in most situations where there is a normal amount of ambient light, night time and really dark conditions are obviously different). Not having to use a focus light for either composition or autofocus (the newer autofocus systems work well even in super macro) makes life much easier for both you and your subject. Less gear, less battery changes, and less stress for the animals.
NOTE: Sometimes the 'Settings Effect: ON' is useful when snooting and using the focus light of the strobe to position the snoot. With the Effect Off, the camera will sometimes overcompensate and overexpose the subject lit by the focus light, making the judging of critical focus difficult.
You can set which of the 'Display Modes' are available to you when you are shooting. You can cycle through these modes by pressing the 'DISP' button on the rear of the camera. This menu option is not easy to find if you're scrolling the menu.
'SETUP' tab > 'Operation Customize' > 'DISP (Screen Disp.) Set' > 'Monitor' or 'Finder' > then check the displays you want to see.
This can be independently set for the EVF or the LCD. I normally leave all active except 'Level' as I'm not concerned with this underwater.
Now that we can see our scene and we've set our autofocus, let's discuss switching between auto and manual focus for macro. This situation is yet another example of why mirrorless cameras are the undisputed leaders in macro imaging. While Sony does offer a "dynamic manual focus" or DMF mode, I find it's essentially unusable with the 'Back Button' focus method, unless you have another arm handy. DMF allows the user to manually focus the lens WHILE autofocus is active. In the case of back-button shooting this would mean pressing the AF-ON lever with your right hand while then using your left hand to work the manual focus gear and then also use that right hand to push the shutter at the right time. I have normal sized hands and find this to be a challenge. Instead, I choose to switch the camera briefly into manual focus 'MF' mode as that also has another amazing benefit, focus peaking. Again, it's time to assign custom key setting. Under 'IMAGE Custom key Setting' assign the 'AEL' key to 'Toggle AF/MF'. This means that pressing the 'AEL' button will switch the camera between AF and MF as opposed to simply momentarily activating AF as we did with the 'AF-ON' button.
NOTE: this can be confusing as when using the back-button focus mode, even though AF isn't active while we are not pushing the AF-ON button, the camera is still in AF mode. Focus peaking and manual focusing of the lens are only possible when the camera is in MF mode.
Now it's time to set up Focus Peaking. Focus Peaking is a false color overlay mode in which the camera overlays a certain part of the image in the viewfinder with a color of your choice to highlight a particular feature, in this case focus.
In the 'AF/MF' Menu tab, head to 'Peaking Display' > 'Peaking Display'. Here you can turn this feature 'ON'.
Head to to the next menu item 'Peaking Level'. Sony's help guide is fairly vague on what the difference is. I have found that 'Mid" works best for macro as it seems to set the threshold for what the camera feels is acceptably sharp. 'High' seems to highlight to large a region of the depth-of-field.
We now need to set the color that we want these sharp textures in our image to be highlighted with. This is in the next menu 'Peaking Color'. I like yellow, my eyes find it easy to distinguish but go your own way and try them all.
So now, when you switch the camera to 'MF' using the 'AEL' button, peaking is enabled and the optional manual focus gear (which you need to install on the lens and is not available for the Sony 50mm macro) becomes active. A handy focus distance guide is also displayed (which is sometimes annoyingly in the way) that tells you where in the focus range you lens is currently set (close or far). This is incredibly helpful when shooting super macro, which is usually when I would switch to manual focus anyway as it helps to insure you are at the maximum magnification (closest focus distance) of the lens. As you move the manual focus gear you will see this graphic change. You can now fine tune your focus on the subject by either using the manual focus gear (if installed) or by simply moving the camera toward or away for the subject in tiny increments until the critical focus area is sharp. Again, the focus peaking really helps, especially for those that have trouble judging critical focus anyway due to less than perfect eyesight. Focus peaking is one of the menu items I place in the 'MyMenu' as sometimes you may want to disable it if it becomes annoying.
You can take this to another level by using the 'Focus Magnifier' function in the same menu group. This allows you to zoom in the on-screen image in the EVF. I find this to be too much to manage and prefer to check the critical focus by magnifying the image in the review mode but we still need to address this menu.
Under 'AF/MF Focus' Manu > 'Focus Assistant' > 'Auto Magnifier in MF' you can turn this feature on or off.
I prefer 'OFF'. If set to 'ON', the camera will automatically zoom in your view of the on-screen image (NOT cropping the resulting image or somehow magically giving you more optical magnification in your resulting image) to the percentage set in one of the next menu items 'IMAGE Initial Focus Magnification'. You can then set the duration this magnification will be automatically displayed in the 'IMAGE/MOVIE Focus Magnify. Time' setting.
You can also choose to assign the magnification feature to a custom control. 'C3' is going to be assigned to a critical function later so don't use that if you choose to do this. The setting you would use is 'Auto Magnifier in MF'
The next great feature that always elicits a 'wow' from first time EVF users is the ability to have the camera automatically show you the image review in the EVF immediately after you take the shot which means no more maneuvering your head & camera to see the LCD after a shot. All super-macro subjects rejoice at no longer being accidentally crushed into the lens or strobe of someone reviewing their image on the LCD by moving the camera forward, not their head backward.
This auto-review feature can be enabled in 'SETUP' > 'Display Option' > 'IMAGE Auto Review' and can be set for 10s/5s/2s or disabled entirely with 'OFF'. I have this particular setting also in the 'My Menu' as I like to be able to disable it in certain situations and the image can always be displayed by pressing the 'PLAYBACK' button. In the review you can also zoom into the image by pressing the 'Zoom/+' button to check critical focus (also much easier on an EVF than on an LCD with glare). You can return to viewing the full image by pressing the 'PLAYBACK' button again or move the magnified portion around the frame with the joystick pad.
Pressing the 'DISP' button during review it will switch between the various review modes to display a Histogram or just the image with no information overlayed.
You can change which functions that the front and rear command dials control. You can also reverse the direction of the dials to match what you are used to. I prefer to have aperture control (Av) on the rear main dial. This comes from when shooting topside where I often use Aperture Priority mode and find adjusting the back dial with my thumb frees up my forefinger for pressing the shutter release. This means shutter speed (Tv) will be on the front dial. You can reach this setting via:
'SETUP' tab > 'Dial Customize' > 'Av/Tv Assign in M' and the direction with the 'Av/Tv Rotate' in the same menu.
I leave the second rear control dial as 'ISO' or 'EV' (Exposure Compensation). EV for when using 'Auto ISO' or ISO when shooting all manual still images. This is set the same as assigning a custom button in the 'SETUP' Tab > Operation Customize > either Image or Movie 'Custom Key Setting' as it can be assigned different functions to each shooting mode.
NOTE: The A1 features a fixed 'EV' dial on the back as opposed to an assignable dial
For 'Custom Mode C2', full-manual shooting, the ISO is set by adjusting the custom dial we assigned above or by pressing the ISO button and dialing in the correct value on the A1. For 'Custom Mode C3', we need to set the camera to 'AUTO ISO'. This can be done the same way as choosing an ISO value, one end of the scale is simply 'AUTO'. When shooting in this mode, we need to tell the camera what values we find acceptable for the ISO by setting a maximum value. This is done in the 'Exposure/Color' Tab > 'ISO Range Limit'. The camera will then select the correct value based on the metering and exposure compensation you choose.
The metering mode can be set in 'Exposure/Color' Tab > 'Metering' > 'Metering Mode'.
Unless the camera is selecting an exposure value (such as Aperture Priority or Auto ISO) the meter is only effecting how the camera brightens/darkens the EVF when "settings Effect' is turned OFF. As mentioned previosuly, I keep the metering set to 'Multi' or 'Center' unless I'm shooting Auto ISO in which case I find that the 'Highlight' mode works best as it tries to prevent blowing out highlights in the entire image. As those are the hardest to repair (if not impossible) in post, it seems worth protecting them. You may find that the meter is giving either too bright or too dark results in a given situation. In that case, you need to adjust the exposure compensation, I tend to start with it at '-1 EV'. On the ⍺1, this is done with the dedicated EV dial. For the other models, assign the second rear control dial to be the 'Exposure Compensation' dial. It's always important to take some test shots to see if the correction is accurate.
This is really dependent on which flash trigger system you are using so follow the instructions that came with the trigger to ensure proper setup.
To set the white balance, simply access it via the 'My Menu' to which you assigned it. We'll discuss Custom White Balance in the video section.
The 'D-Range Optimizer' only affects JPEG or HEIF files so I turn it off as I don't shoot in those formats and it could skew the image review results. 'Creative Look' and 'Picture Profile' change how the image appears. I find that 'Standard' or 'Neutral' Creative Looks generate a result that allows for easy and accurate judging of the image when using playback in the camera.
For shooting stills, you want to set this to 'PP2' which is a "Stills Gamma". We will go more in depth with this for video as it becomes significantly more important.
I find this to be too distracting for still imaging and turn it off. If you choose to use it, you can set the brightness value at which you want it to display the zebra pattern overlay. This is useful for seeing if the highlights in your image are over a certain luminance (brightness) value

In this section we will cover how to setup the system for internal recording in addition to using an external monitor or an external monitor/recorder.
This setting applies to the compression level and type that the camera uses to record the video file to the camera's media card (HDMI Recorders will be discussed later on). The setting you choose will be determined by a combination of memory card type and your editing workstation setup.
XAVC uses the H.264 compression algorithm. XAVC S-I uses intra-frame recording which means each frame shot is recorded in its entirety and then compressed. XAVC-S uses Long GOP (Group of Frames) recording in which one complete frame is recorded in its entirety (compressed) and then the next few frames are only recorded as the elements in the image that differ from the reference image. Long GOP recording requires more work when viewing in editing software as additional work is necessary when viewing one of the non-reference frames. The file, however is significantly smaller. Intra-frame is preferable when editing is necessary while Long GOP will generate smaller files.
XAVC-HS uses H.265 compression which is more efficient than H.264 and results in smaller file sizes but requires a computer able to handle the additional work of the heavier decompression. This is also a Long GOP recording format, which adds to the workload.
The Bit Rate (amount of information megabits 'Mb' captured per second) for Intra-frame recording is higher and therefore a faster media card is necessary. For all the A7 systems listed, a V90 SDXC or CFExpress A is necessary for recording HD or higher in XAVC S-I.
Consult the online user manual for each camera to see the various available resolutions, frame rates & quality levels available for each setting.
I recommend recording in 4K 60p which allows for slowing down footage and will also increase individual frame sharpness when shooting with a 180º shutter angle of 1/125sec (a shutter speed of twice the frame rate). The highest quality is XAVC S-I 4K 60p on each camera that results in a very high 600M Bit Rate and 4:2:2 10-bit color sampling. The A1 is capable of recording 8K but only at a maximum of 30p in the XAVC HS compression profile.
I like to keep this menu option in the 'My Menu' section as occasionally it may be worthwhile filming in 8K or a more compressed format such as when attempting higher frame rates such as 4K at 120p on the A1. To accomplish this requires choosing the XAVC S recording profile which results in a 4:2:0 10-bit Long GOP recording. For a variety of fast moving subjects, this higher compression and lower color sampling may be worth the sacrifice for the ability to either slow down the action even more or simply use a higher shutter speed (1/250 for 180º) to maximize individual frame sharpness.
It's possible to shoot in the 'S&Q' mode which allows for setting separate Shooting and Recording Frame Rates. For example, if the 'Rec Frame Rate' is set to 60p and the 'Frame Rate' is set to 30p, there will be two seconds of footage for every 1 second shot as the camera will create clips that only contain 30 frames per second. This is an "automatic" way of slowing down the footage in-camera. Whether to use this setting or slow down the clips in post is really personal preference. The only real limitation for this type of recording (and not a deal breaker for underwater) is that audio cannot be recorded. If you frequently use the same camera to film both underwater and topside on a trip, this an easy way to trip yourself up and fail to record audio and should be avoided.
I also prefer to watch my clips at actual speed after import and then add a rate change if I feel it improves the clip in the edit instead of watching already slowed down footage (especially if shooting at 120fps).
I prefer, if they are necessary for your workflow, to generate them on import into your NLE. You can, however, have the camera simultaneously generate these for you. This will also either reduce your overall recording time as they take up space on the card or require using a second card.
Audio recording can be turned on or off in the 'Shooting' Tab > 'Audio Recording' > 'Audio Recording' section. I turn this off as nothing is worse than listening to bubbles or having to extract the audio from your clips in post.
The timecode settings can be important for the functionality of an external recorder. Consult the User Manual for the recorder to properly set these values. More on this topic later in the Recording Monitors Section.
The ⍺ series cameras feature incredible IBIS (In-body Stabilization) that works in conjunction with in-lens stabilization on many lenses. This greatly helps remove some of the inherent shake found in underwater video. You can enable Steady Shot (a lens must be attached to the camera when setting this) by going to 'Shooting' Tab > 'Image Stabilization' > 'Steady Shot' and turning it 'ON'.
NOTE: When using Nauticam Wet Optics such as the WACP or WWL or EMWL it is important to set the focal length manually as the camera uses the focal length of the attached lens to determine the corrections. You can do this by turning the 'Steady Shot Adjust' to 'Manual' and then heading to the next menu 'Focal Length' and choose one more appropriate to the lens such as '16mm'.
If you are planning to work in an aspect ratio other than that of the file format you choose such as '2.35:1', you can have the camera show you gridlines in the EVF or LCD demarcating this aspect ratio. This can be set in 'Shooting' > 'Marker Display' > 'Aspect Marker'. NOTE: This marker will not be output to external HDMI monitors. If using an external monitor, this must be setup on that device.
Being able to quickly take a custom white balance is essential to successful underwater video. The first step is assigning the 'White Balance' function to a custom button, in this case 'AEL' button. To make sure we are not overriding what we assigned to the 'AEL' button for stills, we need to make sure that we navigate to 'Setup' Tab > 'Operation Customize' > 'MOVIE Custom Key Setting' and assign it to 'White Balance'. From there we need to press the button and select one of the 'Custom White Balance' banks. At this point, setting the custom white balance is fairly straightforward. Press the joystick 'right' onto the 'SET' option, aim the camera at the white balance target (make sure the camera is properly exposed on this target and that it is being lit by the primary light source, not in your shadow) and press the center button of the joystick to take the white balance and then again to accept the result. A quick half-press of the shutter will exit the menu.
PRO TIP: You can also assign this to the 'REC' button if you will only use the shutter release to start and stop recording video as described below.
Also on the 'Operation Customize' menu is the 'MOVIE REC w/ Shutter' setting, make sure to turn this on. This will allow you to use the shutter button to begin and end recording vide in MOVIE mode in addition to the dedicated REC button on the rear of the camera.
PRO TIP: Again, I trust my muscle memory here. I push the same button to take a photo or record video. I also don't shoot stills and video on the same dive. I believe you will most likely end up with mediocre video AND mediocre stills. Focus on one and hopefully get excellent photos OR excellent videos. Just my two cents.
It's helpful to have an emphasized record display which places a red box around the frame when recording. This can be enabled in the 'Shooting' Tab > 'Shooting Display' > 'Emphasized REC Display'.
With Sony cameras there is no way to do true 'Back Button Autofocus' in Movie mode as we do with still imaging. There is however an easy workaround and that is instead, having the 'AF ON' button toggle autofocus on and off. We still want to be in 'AF-C' (On the ⍺1, regardless of what the Focus Mode Dial is set on, in MOVIE mode or S&Q it the camera will switch to 'AF-C'). We then need to reassign the 'AF-ON' button to toggle AF/MF for MOVIE modes. 'Setup' Tab > 'Operation Customize' > 'MOVIE Custom Key Setting' and assign the 'AF-ON' to toggle AF/MF.
You can fine tune the speed at which the autofocus will react under the 'AF Transition Speed' setting in the 'AF/MF Focus' Tab > 'AF/MF' menu. I prefer a middle of the road value such as '4', the same goes for the 'AF Subj. Shift Sensitivity' which is under the same menu. This means that the camera will only shift focus to a new subject once it really feels the original subject has departed the scene and will slowly shift focus when it does.
I prefer to have the 'Focus Area' set to 'Spot: M' which allows me to move the box using the joystick to the subject I want to focus on, or simply place the subject in the center of the frame, achieve focus, and then toggle the focus mode to 'MF' and begin shooting. I prefer not to have autofocus running continuously while shooting as there is a chance that it loses focus during a scene. If the subject does get too close or distant for the chosen focus, I can re-engage the autofocus by pressing the 'AF-ON' button even while recording.
If you prefer to have the camera decide what to focus on and want to let it run continuously, you can select the 'Wide" Focus area. I tried this with bull sharks in Fiji on the A7S III and was pretty impressed with the results but it did still adjust focus at times that made a scene unusable. If you do choose this method, make sure to adjust the 'AF Transition Speed' and 'AF Subj. Shift Sensitivity' settings to see what works best for your subject type.
These two settings require some decisions on your part as to how much post processing you plan on doing. In general, you can choose to set the camera in such a way that "what you see is what you get" or "what you see is what you will get after post processing and also there's more wiggle room too".
There are basically two options, shooting in the ITU709 standard (suitable for standard dynamic range 'SDR' projects) or one of the various Log Profiles that maximize the dynamic range and color information captured baked into the file (suitable for both SDR and High Dynamic Range 'HDR" projects). Shooting in a Log profile does require some color management and grading/correction in post, however it also gives you more latitude to correct exposure or color issues that may be present in the footage.
If you choose to shoot in the ITU709 standard, set this in 'Exposure/Color' Tab > 'Color/Tone' > 'Picture Profile' to either 'PP1' which is the "Movie Gamma", 'PP3' which is the "Natural Color Tone ITU709 gamma" or 'PP4' which is the "Faithful color tone ITU709 gamma".
If shooting in a Log profile, there are several options to choose from. I have always used whichever is the latest Log version as they tend to improve the available dynamic range with each iteration. As of this writing that is S-Log3. S-Log3 is proprietary to Sony, hence the 'S'. Other manufactures have their own Log profiles (C-Log for cannon, etc.). I prefer 'PP9' which uses S-Log3 and the S-Gamut3 color mode. This maximizes color and dynamic range of the captured image.
If shooting in the ITU709, the 'Gamma Display Assist' function is not necessary, however when shooting in a Log profile, the image on the screen will appear flat and desaturated. We would like to see, however, an approximation of what a "normalized" version of the footage will look like so we can make the appropriate exposure decisions. To see this normalized version, we can employ the camera's 'Gamma Display Assist' feature found in 'Setup' Tab > 'Display Option' > 'Gamma Display Assist'. Turning this on will apply a LUT or "Look Up Table" that corresponds to the Picture Profile chosen to show a normalized version of the scene on the screen as opposed to the flat and desaturated Log version that is being recorded. In the following menu 'Gamma Disp. Assist Type' you can either have the camera automatically assign the profile or choose yourself. Auto is a solid choice here.
NOTE: if you are using an external monitor, most of them allow you to apply a custom LUT to the display. If you choose to do this, make sure to turn off 'Gamma Display Assist'.
When using an external monitor, which is an excellent idea for video, some additional settings are required and can be found under the 'Setup Tab > 'External Output' menu. 'HDMI Resolution' can be set to auto whereby the camera will attempt to recognize what the connected display is capable of. I prefer to just manually set it for the max resolution of the connected device.
This setting basically mirrors the LCD screen of the camera onto the external monitor which is helpful if you wish you see shooting information such as settings. This is also useful for those using the external monitor for taking still images as it basically becomes a giant viewfinder.
The most important panel is the 'HDMI Output Settings'. Te first option is to 'Rec. Media dur. HDMI Output'. This says that the camera will record internally as well as output the signal over HDMI. This must be set to 'ON' when using a monitor only and is always a good idea when using a recording monitor as well for backup.
'4K Output Set' will allow you to set the frame rate for the output and color resolution (bit depth) of the signal.
'RAW Output' can only be used with a compatible recording monitor. When this is turned on, it will automatically assign the appropriate output resolution. The frame rate is set in the 'RAW Output Setting' section and the Color Gamut is set under 'Color Gamut for RAW Output'. Again, I like 'S-Log3/S-Gamut3'.
'REC Control', when used with a compatible recording monitor, will send a start/stop signal from the camera to the recorder. This can be turned on or off. For this to work on some devices, you will also have to adjust the Timecode settings of the camera and this function will not work at all if 'Timecode Output' is Off. Consult the manual that comes with the recorder as we will not cover that here as it is model specific.

The Nauticam Extended Macro Wide Lens, or EMWL, is actually a set of interchangeable objective lenses that are paired with a relay and focusing unit that truly changes how we capture macro images. For this article, the EMWL was paired with the Sony ⍺1 in the Nauticam NA-⍺1 Housing using the Sony FE 90mm f/2.8 Macro G OSS Lens behind the N100 Macro Port 105 with the M67 to Bayonet Mount Converter II.

The EMWL with the 130º Objective Lens in the pool at sunset at Alam Batu Beach Bungalow Resort in Bali
The EMWL is made up of three components, the focusing unit, the relay lens, and the objective lens. The focusing unit is determined by the camera model used, in this case Focusing Unit #3. The relay lens is the same across all versions as are the four different objective lenses, three of which were available for this article.

The EMWL installed on the NA-⍺1 housing on the tender boat of Alam Batu Beach Bungalow Resort in Bali alongside two NA-A7RV housings and Mt. Agung in the background.
The possible use cases for the EMWL are expansive and this article only scratches the surface and applies mostly to using the EMWL to capture video of traditional macro subjects. Close-focus wide-angle macro, macro-wide, super-macro; the terminology for the types of images that can be captured with this setup are lacking and don't accurately describe what can be achieved. I'll do my best to describe and show the true benefits of using this system while highlighting the initial challenges and giving some field notes on practical use considerations.
Bali is a spectacular destination for the EMWL with an incredible array of macro creatures both on the larger and microscopic end of the size scale with generally good visibility and easy dive conditions. On this particular trip we often had strong wind that often resulted in surge which made shooting macro video even more of a challenge than it already is. These challenging conditions, however, did helped us develop some of the field notes that will hopefully help others looking to use the EMWL is less than ideal conditions.
The Sony ⍺1 was in the Nauticam NA-⍺1 Housing alongside the Atomos Ninja V+ housed in the NA-NinjaV. The housing was equipped with the optional Mounting Ball Set for Tripod Legs kit to which were mounted the INON extendable tripod legs. Lighting was provided by either a set of Keldan 8XR video lights or a set of Backscatter MWL-4300 lights with Bold Color Filters.
Setting up and balancing this kit is the foremost consideration when using the EMWL. The lens is quite long and heavy which places a good deal of weight out front of the housing. In order to light the subject, our lights must also be placed at the same distance as the objective lens. Using Nauticam Carbon Fiber Float Arms, it's possible to easily offset both the weight of the lens and position the lights appropriately. In this case, we used a total of 5 arms. On both the right and left handle mounts, we used a combination of 70x300mm and 70x250mm arms on each side, paired with a Long Multipurpose Clamp with Shackle (allows the arms to sit parallel during transport) to mount the lights and also carry the system via a 27mm Lanyard with Snap Hooks. Attached to a Strobe Mounting Ball for Cold Shoe atop the macro port, we also used a 70x300mm Carbon Fiber Float Arm, which would be placed parallel to the EMWL during the dive and upright during transit (see image below) and could also hold a third light if necessary. The EMWL is easily removable, even underwater, via the bayonet mount system, and we did not travel to or from the dive boat with the lens attached. I would back-roll holding the lens and only attach it once I was handed down my housing. Because of the extra lift necessary for the EMWL, the housing without the lens attached was buoyant, so I wasn't concerned with the housing sinking before I was able to attach the lens.
Each segment of the system (focus unit, relay and objective lens) is removable underwater via the bayonet system. Once at depth and clear of the boat, I would remove each section and use my hand to clear any remaining air bubbles. A rotating collar at each junction allows you to close that section off to prevent new bubbles from entering if you swim through a bubble stream. There is also a optional Water-jacket Kit that can prevent water flow between the segments (we didn't have this as it was still in pre-production). As you will see in the video at the end of the article, because of the amount of surge we had, oftentimes small debris would work its way in between the elements and become clearly visible in the resulting image. The water-jacket kit would prevent this from happening.
While it is possible to switch objective lenses underwater, I chose to only carry one lens on each dive. It would be easy to carry an additional lens in a pocket.
The most challenging aspect of using the EMWL is learning what each objective lens can accomplish. That and having almost two feet of lens sticking out in front of the housing. Until you have experimented with each lens and built up a mental library of what each can do, it's difficult to know the type of shot you can pull off. This was one of the reasons I chose to use only one lens per dive so as to force myself to really understand each lens.
Some practical considerations for diving with the EMWL. Even with the added flotation, the system as we had it setup was still slightly negative at the objective lens end and nearly neutral at the housing end. When swimming with the system, I would turn the system around so the objective lens was facing me and hold the EMWL with one hand the housing with the other. I chose this orientation to prevent myself from damaging the objective lens through accidentally running into things. It's also easier on your wrists.

The easiest way to swim with the EMWL underwater in calm conditions as demonstrated by my buddy. In current or surge, I also place one hand on the housing.
The 130º objective lens, which gives the most "close-focus wide-angle macro" look also features the largest, most exposed and therefore most easily scratched front element. To prevent myself from carelessly damaging the lens, I would position one of my front mounted INON legs underneath and parallel to the EWWL, with the o-ring of the foot's ball resting against the bottom of the Objective Lens. This would prevent me from accidentally scratching the bottom section when setting up a shot as one of the benefits of this lens is being able to get extremely low angles of approach to the subject and having the lens resting on or just above the substrate. I would only move the arm if I was certain I would not be in danger of damaging the glass (such as when using the tripod as an actual tripod and not as a bumper).

My buddy demonstrates using the EMWL with 130º objective lens to film a ghost pipefish in tripod configuration.
The Sony ɑ1, along with most most other cameras that one would pair with the EMWL, have exceptional stabilization. The camera determines the amount of stabilization by looking at which lens is attached. When using the EMWL, the camera bases it's stabilization on the 90mm macro lens. Unfortunately, this is not representative of the field-of-view we are actually getting with the EMWL. This can lead to very jerky and unpredictable results. Luckily, Sony lets you instead choose a focal length manually. I found that choosing 16mm or thereabouts yielded far more manageable results (this also applies to other Nauticam optics such as the WACP and WWL, which use a 28-60mm lens).
Positioning the camera and lens takes longer that for a traditional shot but as with anything else, the more you do it, the more second-nature it becomes. Understanding the working distance of each lens also takes time.
The 130º Objective Lens generates the most unique look that most would associate with a classic close-focus wide-angle macro image and is exceptional for slightly larger subjects. The real power of this lens comes from the relay lens, which allows you the extra distance from the subject to place the lens at or below the subject's level. As it is also a true wide-angle lens, the large depth of field is evident in the shot.

Rhinopias filmed using the 130º objective lens on the EMWL. Using colored filters on the lights enhances the surroundings. The incredible depth of field and sharpness of the lens is evident in this image.

Shrimp riding a nudibranch filmed with the 130º objective lens. The low angle of approach is one of the coolest features of the EMWL allowing the viewer to be on the same plane as the subject.
The small front element of this lens means it can get into spaces and closer to subjects that other traditional lenses. With so many macro subjects of the smaller variety in Bali, this lens proved to be one my favorites. It is a true workhorse, able to capture more wide-angle scenes as well as traditional macro simply by varying your distance to the subject by a relatively small amount. This allowed for capturing a variety of shot types of a single subject without compromising image quality.

A ghost pipefish filmed with the 100º objective lens.

The same ghost pipefish, also filmed with the 100º objective lens but at a closer distance. The incredible range of this lens and the unobtrusive nature of the EMWL with the relay lens makes filming skittish subjects so much easier and definitely less traumatic for the animal.

A juvenile and mostly translucent spearing mantis shrimp in its burrow filmed with the 100º lens. Approaching and filming this subject with a standard macro lens is not nearly as easy. Colored lights help enhance the subject's otherwise pale appearance.

A lizardfish tries to swallow its victim. The 100º objective lens lets you get close to the action without scaring off the subject.
This lens definitely feels the most like a traditional macro lens but allows for that extra distance from subject afforded by the relay lens. It has three set points of various focus distances that can be changed underwater allowing for true super-macro performance. Again, being able to place the lens at the level of the subject makes for more engaging images.

A nudibranch crawls along a hydroid. Being able to film super-macro creatures while maintaining your distance is so much better than having to be less than three inches away with your entire system.

Super macro algae shrimp with eggs. Again, shooting super macro with the housing more than a foot away is a game changer.
Note: The 160º lens was not available on this shoot but also delivers a true "close-focus wide-angle macro" look with more barrel distortion associated with fisheye lenses as opposed to the rectilinear look of the 130º.
Lighting the EMWL is a breeze. The small front elements make it easy to light both super-macro and wider subjects with little difficulty. For wider scenes, moving the lights back towards the housing and away from the front element and converging the beams as the subject helps avoid backscatter in silty conditions.
The video below only scratches the surface of possible shot types. In more creative hands, the results are sure to be nothing short of amazing. Even traditional macro imaging is made easier with the EMWL given the additional distance the housing and diver are from the subject coupled with the extremely low angle of approach and the impressively small front elements. Macro imaging will never be the same once you've used an EMWL.
Author: Kevin Palmer
Title image: Hergen Spalink
The Z8 is arguably the most hotly anticipated full-frame mirrorless camera from Nikon and the first to feature the '8' series badging. For many still photographers, the Nikon D850 has represented the nicest all-around DSLR for underwater photography ever made. And while the Nikon Z6, Z7 and the mark II versions are certainly nice mirrorless cameras, they were not really nice enough to inspire an upgrade from a D850 for most shooters. The D850 was introduced back in 2017. Many shooters have been waiting for Nikon to release a mirrorless version comparable to the D850. The Z9 certainly fit that bill but the full size pro body and higher price tag were not for everyone. The Z8 gives us pretty much everything the Z9 has in a smaller body and beats most of the D850 specs! So is the Z8 your new mirrorless camera?

Nikon Z8, 24-50mm, Nauticam Fisheye Conversion Port
When rumors started circling that the Z8 would deliver most, if not all, of the Z9s impressive performance spec, it was easy to be a bit skeptical. But Nikon did not hold back and most of what makes the Z9 special has somehow been stuffed into camera body that is smaller and lighter than a D850. That is especially good news for us underwater photographers who have been waiting for a reason to move to a mirrorless interchangeable lens format that is clearly the future of cameras in general.

Nikon Z8, 24-50mm, Nauticam Fisheye Conversion Port
A quick specs review:
Nikon Z8
46MP – Just about perfect for underwater resolution and a subjectively beautiful file
30 FPS – More than any of us really need
8K 60P & 4K 120P Recorded internally in N-RAW or ProRes RAW. Nikon finally takes video seriously!
CF Express B for enough speed to handle the serious video capability. UHSII for the second slot
Max sync speed 1/200 unless shooting HSS
EVF 3,686,400 pixels
Same EN-EL15C battery as in D850/D500
No mechanical shutter
Much expanded AF menu of capabilities

Nikon Z8, 24-50mm, Nauticam WWL-C
Switching to a Mirrorless
Like most things that are new to us there is a bit of an adjustment period and learning curve when switching to a mirrorless from a DSLR. One of the biggest learning curves for many people is going from an optical VF to Electronic VF. EVFs do not perform well when shooting strong backlit scenes like sunballs. This is getting better as new cameras are released but for now when shooting into the sun and if you have something like a boat or diver silhouetted in the background you will probably not see the detail in the EVF. In these circumstances I suggest shoot, review, and make adjustments. This can all happen very fast because you can review your images right on the EVF without ever removing your eye. Once you get comfortable with reviewing your images through the EVF display, you will never want to go back. I like to turn off auto review and use the playback lever that is conveniently accessed with your left thumb. EVFs also allow you to preview exposure simulation. As you make adjustments to ISO, shutter and aperture you will see the image getting darker or lighter. This can be useful in wide angle but in macro where images are generally 100% strobe lit you will want to turn this off. This feature is turned off automatically if the camera recognizes that a strobe is attached but many of the manual triggers that we use underwater are not recognized by the camera. Another note on manual triggers, if the camera does not recognized there is a strobe attached, you can set the shutter faster than the max sync speed of 1/200. In this case the strobe will not sync correctly and you will get incorrect exposures. Nikon’s popularity in stellar photography inspired them to offer a “Starlight View”. This is a very useful tool for night dives and especially for blackwater dives. This lowers the AF sensitivity to about -8.5EV which is an amazing accomplishment and makes it easier to view tough subjects. The data displays also turns red to help preserve your night vision. There is already talk that the Z8 will be “THE” blackwater camera and feedback from the field looks good.

Considering all the benefits of utilizing the viewfinder, I think every Z8 owner shooting primarily stills should consider one of Nauticam’s new Full Frame Enhanced Viewfinders. These new viewfinders were designed in response to the ever-increasing size of the EVFs coming out that demanded a whole new optic design. Even on traditional DSLRs, using the new FF viewfinders show just how much sharper and defined the optics are.

Nikon Z8, 24-50mm, Nauticam WWL-C
AF and 3D tracking
I have always found Nikon cameras to generally be better auto focusing still cameras than most. This is particularly true when it comes to low light and challenging macro fish portrait photography. The Z8 lives up to that tradition and then some. But getting the most out of the camera does require some experimenting to find what works best for each individual’s style. There are a lot of AF options including different shapes and sizes of AF area and various tracking and animal recognition features. It pays not to just pick the same old focus size you have always used in the past, but rather take advantage of the new menu of tools at your disposal. The 3D tracking works particularly well and I believe one of the highlight of this camera.
Nikon Z8, 24-50mm, Nauticam WWL-C
Battery Life
The good news is that the Z8 uses the tried-and-true EN-EL15 battery (in updated form) that many Nikon shooters already have in their kit from many previous camera iterations. The downside is the Z8 and all mirrorless cameras are much more power-hungry than traditional DSLRs. The real world results are that if you are shooting a modest amount of still photos, you can likely get through two dives without issue. If you are shooting a lot of stills or shooting video, you may want to change batteries for each dive. With the Nauticam housing, the whole process only takes a couple of minutes including pulling a vacuum. If you prefer to not open the housing you can add the new USB-C bulkhead allowing battery charging between dives with an external USB-C battery. Make sure to turn off features that you will not be using underwater, like wifi, to preserve battery.

Nikon Z8, 24-50mm, Nauticam WWL-C
NA-Z8 Housing
The NA-Z8 offers everything we have come to expect along with some nice new features that are very useful. When looking at the back of the Z8 camera, it is easy to see that all the controls the DSLR shooters have grown used to finding on the rear left side of the camera are no longer there. But thanks to some beautiful internal engineering, our left hands have still been given plenty to do when operating the housing. Our left thumb now controls switching the EVF and LCD monitor displays, operating the Playback and the Display function which I find of great use in both the EVF and LCD, rather than my right hand having to find the button. Also on the left-hand side is the very useful Focus Mode lever and a dual lever for Function Buttons 1 & 2 which are physically located on the front right-hand side of the camera. Of course, the Zoom/Focus knob is also on the left. I really appreciated being able to spread the workload out a bit between left and right hands, an idea long overdue.
Whether using Z-lenses or the FTZ adapter, loading the camera, changing lenses and swapping batteries and media is pretty effortless in typical Nauticam tradition. As with the Z7 housings, the lens release functions with F and Z lenses and all existing port and gear configurations for F-Mount lenses will function on the NA-Z8 exactly as they worked on the Nauticam DSLR housings. For those wanting to load up their housing with extra lights, monitors and GoPros, the top of the housing is now capable of supporting a total of six ball mounts without any extensive modifications – another nice improvement for gear intensive folks.

NIKKOR Z 24-50MM F/4-6.3
Part of what makes the current Nikon Z cameras awesome for underwater is the unfolding new lens line-up. In particular, the Nikkor Z 24-50MM F/4-6.3. This little walk around lens should be in all Z8 owner’s camera bag for wide angle and blue water pelagic shooting thanks to what a powerful small package it creates when mated with Nauticam’s WWL-C water contact optic on an extremely tiny flat port. It can also be used in the WACP-1 and WACP-C with some vignetting at 24-25mm.

Nikon Z8, 24-50mm, Nauticam Fisheye Conversion Port
Shutter Sync Speed
Some may find the 1/200 synch speed a little disappointing – but so far it has not seemed too limiting. For those wanting a higher sync speed, there are HSS compatible TTL converters and strobes available to make that possible.

Nikon Z8, 24-50mm, Nauticam Fisheye Conversion Port
CF Express B Cards and Video
For shooting stills, most name brand cards will function fine. When it comes to video, the Z8 is capable of generating very data intensive high bit-rate files. It has become pretty clear that certain manufacturer’s cards will overheat quite quickly. Sandisk and Lexar seem especially prone to this. Delkin cards seem to perform much better and some other brands seem to be surfacing that also work well. This will no doubt be a moving target and needs to be assessed at the time of purchase based on the latest findings. Nikon’s “approved media” list does NOT mean it will successfully record all video formats.

Nikon Z8, 24-50mm, Nauticam Fisheye Conversion Port
Final Thoughts on shooting the Z8
As most photographers realize, there is no perfect camera made today, but they are getting closer all the time. As a long time DSLR shooter, the Z8 joins just one or two other mirrorless cameras that I find really fun to shoot the way I like to use a camera underwater. And as a long time Nikon shooter, I was pleased with how much seemed familiar, but also how much better this camera performed in several categories than its DSLR predecessors. It's few weak spots (like battery life and sync speed) are really not deal breakers and both issues have solutions. If you are a Nikon shooter who enjoys shooting video or wants to learn video, it is a no-brainer. This camera will blow away any Nikon you have ever shot video on and is worth taking advantage of.

Nikon Z8, 105mm macro
]]>HS: Joel, please tell us about the setup you used and where you captured the footage.
EMWL Macro Photo Configuration:
Macro Video Configuration:
HS: Compared to a standard macro lens, what advantage did you find using the EMWL when capturing more traditional macro images
JP: My favorite thing about shooting with the EMWL vs. a traditional macro lens, is how many of the underwater subjects are not as afraid of the smaller optics getting close to them, vs. trying to stick a 120 macro port with an SMC right up against them. They also aren’t scared by my regulator exhalations as much because of extended distance away from them. I also appreciate how I can go for a close focus wide angle style of framing in my compositions without having to setup with a traditional wide angle configuration. I love being able to get extremely close to a critter while still being able to show them in their environment.
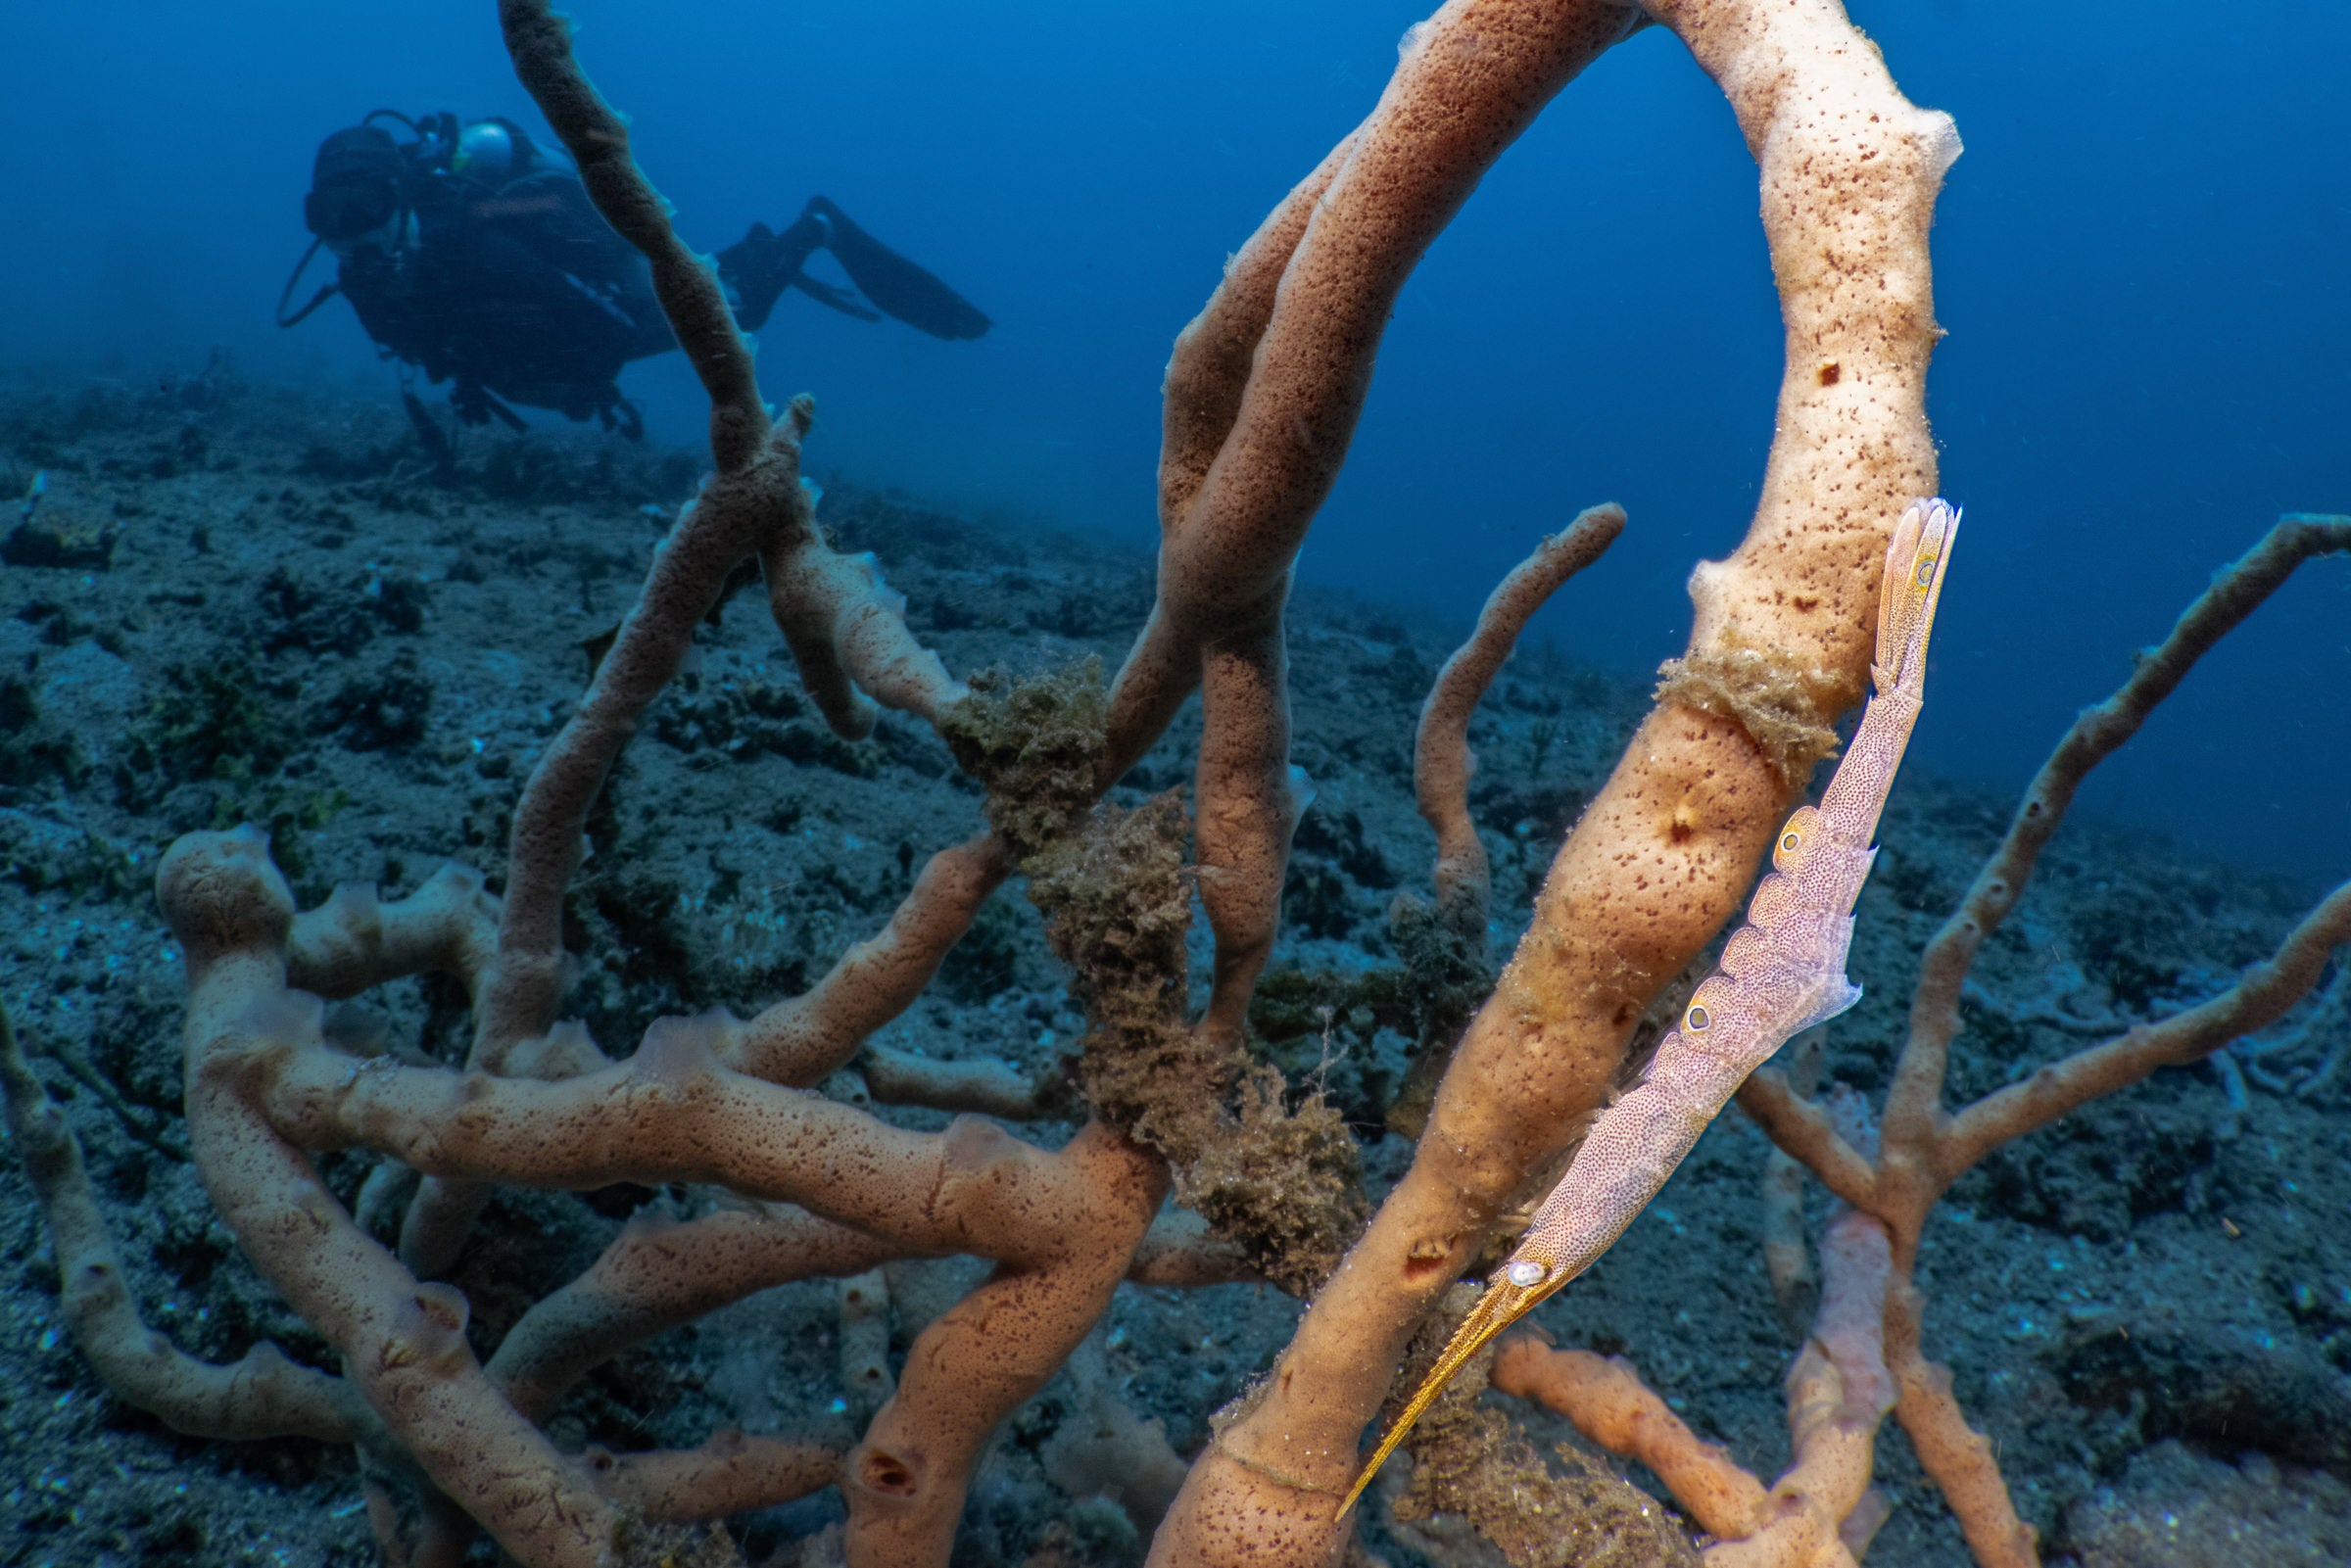
HS: The EMWL is incredibly versatile and aims to not only give the benefits you mentioned above to the process of capturing traditional macro images, it also opens up a variety of creative pathways. The next few questions will target those special lenses in the 100º-160º field-of-view category.
The look of each of these lenses is unique, can you distill from your experience which subjects or scenarios seemed best suited to each lens and if possible, reference those scenes in your video?
JP: Many of the wider shots (that shows the critter in their environment) were shot with either the 130˚ or 160˚ Objective Lens. Right out of the gate, the first two clips (00:00 – 00:09), the octopus in the Fanta bottle (00:36 – 00:40), and the coleman shrimp on the urchin (01:02 – 01:07) utilize the 130˚ or 160˚. Additionally, the Nemos sequence (03:00 – 03:17) were all shot with the 130˚. These Objective lenses seem best for subjects that are on the larger side of macro subjects you’ll see in Lembeh. Something that’s the size of a small orange or larger. I love the look of these objectives, as they allow me to shoot CFWAM. (close focus wide angle macro).

These Objective Lenses focus right up to the glass, so you can really get the critter large enough in the frame. I prefer to use manual focus with focus peaking on the monitor to make sure I’m getting critical focus on the critter while showing it in it’s environment. One of the challenges to the 130˚ is the additional front end weight vs. the 160˚. I found as I used them more and more, I leaned towards using the 160˚ as it was lighter and allowed me to more easily maneuver the rig to get good stable shots.

Many days in the water I setup with the 100˚ Objective Lens and carried the 60˚ in a protective pouch in my thigh pocket.
Some of the subjects that worked well with the 100˚ were medium to small like frogfish. The Hairy Frogfish clips (01:38 – 01:55) were shot with the 100˚.
The 60˚ allowed me an even tighter field when framing the subject. The Yellow Juvenile Frogfish (01:55 – 02:00) were as close as possible. This thing was really tiny as can be seen by the large grains of sand. Also, the sequence with the Candy Crab, Tiger Shrimp, and Tozeuma Shrimp (01:24 – 01:33) were shot with the 60˚ Objective and almost come across from a similar functionality to using an SMC.

HS: Using the relay lens adds a good deal of distance to the subject, can you describe your underwater workflow when setting up on a subject? Did you use a tripod and/or buoyancy arms to compensate for the weight of the system?
Flip Holder for EMWL Lens
Xit404 Tripod Plate with INON Carbon Fiber Tripod Legs
Really Right Stuff BH-55 Ball Head
I think the Nauticam Buoyancy Arms would be very helpful to help balance the system. You need it lighter, but you don’t want it too light, otherwise the slightest amount of current or surge will make the camera platform wobble or even worse, tip over.
When shooting with the EMWL, the relay lens along with the 130˚ Objective Lens, I had about 18 of the large Stix Floats on the underwater camera system.
Next time I use the EMWL I’d like to try using the Objective Lenses without the Relay Lens and flip the image in my video monitor. Even though there’s a downside of seeing the Record Light, and all camera controls displayed upside down, the benefits of having a lighter system and a shorter lens setup may outweigh the awkwardness of the OSD being upside down.
EDITOR'S NOTE: Since this article, Nauticam now produces special "Reversed' Full-frame Viewfinders especially for using the EMWL without the relay lens portion.

HS: 8K 60p Canon Cinema RAW Light files are still a pretty heavy file to work with and require more post-processing and storage which can be challenge, especially in the field. Can you briefly touch on how you worked with these and why you chose to use that format?
JP: This is a great question. When planning to go to Lembeh and shoot with the Canon R5C, I really wanted to shoot the camera in its highest resolution format with the benefits of 60fps for this trip. You can only capture 8K 60p on this camera if using the Canon Cinema RAW Light Format. I had previously shot the camera in 8K 60p RAW, and really appreciated the elastic latitude of the file format when performing color correction and grading in post.
Regarding the heavy files…I knew the RAW video clips were going to be very large. To say I underestimated how much storage I might need is a fair assessment! For example, when capturing macro behavior, you end up filming and filming until the behavior happens. Unfortunately, if you’ve wanted to keep the RAW video file, you need to keep the whole two minute clip, to retain the last 10 seconds where the frogfish yawns! I calculated what I thought would be enough hard drive space for the trip. 20TB of primary drives, and 20TB of backup drives. In the field, I had two hard drive failures, and immediately had to come up with a makeshift workaround, using some of my backup drives as primaries. I then was lucky enough to have someone visiting the resort a week later, that brought 16TB more of storage!
HS: What would be your top 5 tips for those looking to capture unique underwater macro scenes with the EMWL?
HS: Which features of the R5C/NA-R5C or specific Nauticam Accessories for the NA-R5C did you find most helpful for this particular shoot?
JP: The greatest thing about what Nauticam has done with the NA-R5C housing is create space for a large external battery underneath the camera. I was able to get three dives on one battery, but would usually need to swap memory cards after two dives, so at that point, I would simply change everything.
The ergonomics on this housing are perfect. I never had any issue with any of the buttons, levers or dials, while on the entire trip. All of my existing ports worked with the housing, and my Nauticam housing for my video monitor also performed flawlessly.
The Canon R5C doesn’t have any overheating issues, and is a reliable workhorse, even when capturing 8K 60fps with no limit. Combine that reliability with the workhorse durability of the Nauticam housing, Small HD housing, Ports and accessories, you’ll experience a worry free capturing system for the demanding underwater professional.
Connect with Joel at newmediasoup.com


The NA-A7RV with the Nauticam WACP-C and NA-NinjaV in front of Mexico's San Benedicto Island
For this shoot we took the NA-A7RV to Raja Ampat & Bali in Indonesia as well as to Mexico's Revillagigedo Archipelago. In Raja and Bali we shot a combination of video and stills while in Mexico we focused on video to thoroughly get a feel for the camera's autofocus flexibility with pelagics.
Video was filmed in 4K 60p which meant having a 1.24x crop. To avoid a crop would have meant filming in either 4K 30p or 8K 24p. With the exceptional field-of-view achieved using the Nauticam WWL-1B or WACP-C (130º), the minor loss caused by the crop was not a big loss and worth the tradeoff for more frames. Opting for a quicker workflow the color profile used was Rec.709, in this case 'Picture Profile <PP3>'. The WACP-C and WWL-1B were used with the Sony SEL 2860 28-60mm f/4-5.6 lens. Macro was filmed using the Sony 90M28G 90mm f/2.8 Macro G OSS.
Below are both videos. Note that the macro scenes in the Raja Ampat video were filmed in Bali which is mentioned in the credits.
Raja Ampat scenes were mostly filmed with a pair of Keldan 8X Video lights using the Ambient Filter system while Socorro was almost entirely natural light. In both cases a custom white balance was used to achieve accurate and realistic color. The process for this is simple on the A7R V and can be done quickly. By assigning <WB> to the 'C4' button on the rear of the housing, a quick press of the button brings up the White Balance options menu. Select the Custom WB bank and press the center button on the multipad twice, once to capture the balance and once to confirm. When using the Ambient Light Filter System, better results are achieved by turning off the lights during the custom white balancing to insure the ambient light is exclusively what is being measured by the camera.
The A7RV features a metering mode that chooses the exposure value that prevents highlight clipping. A similar mode exists on other cameras such as Nikon's 'Highlight Protection' metering. As an unintentionally blown highlight, especially in video can ruin a clip, this mode is quite practical. For these videos the camera was setup to streamline the exposure adjustment process. As shutter speed would remain constant at 1/120sec. as were filming exclusively in 60fps we only needed to be concerned with aperture and ISO. The camera was placed in Manual 'M' mode and ISO changed to 'AUTO'. The metering was set to 'Highlight' mode with an exposure compensation of '-0.3EV'. As the aperture value changed, the camera selected the appropriate ISO value to prevent clipping of the highlights in the image. To add some more flexibility to this arrangement, the REC button, which is has a dedicated thumb lever on the NA-A7RV was assigned to toggle 'AE-L'. Pressing this button would lock the exposure value so if the metering system seemed to be choosing a value that was over or under what was desired, simply pointing the camera toward the surface or the bottom would cause the camera to choose a brighter or darker exposure. This could then be locked in by pressing the 'REC' lever. This also prevents or allows the camera to make exposure changes while shooting, such as when a manta swims overhead through the sun. This can be toggled on and off while shooting which is not possible if 'AE-L with Shutter' is set. The drawback is that it does require the shooter to remember when it is/isn't engaged which can also be seen on the screen's overlay. As with the back-button autofocus method, it quickly becomes second nature and is faster than manually choosing an ISO value using a dial.
While the autofocus of the A7R V is amazing, in certain situations it's still easier to lock the focus and shoot such as in Socorro where there are smaller fish that will pop-up in front of the camera blocking the main subject and possibly causing a focus shift. While the camera is able to handle quick pass-throughs, a more fool-proof method is to simply lock the focus. For video autofocus, the 'AF-ON' button, which is the complimentary thumb lever to the 'REC' button that was assigned to 'AE-L' on the NA-A7RV housing is assigned to 'Toggle AF/MF'. This allows easy activation or deactivation of the autofocus system, even while shooting. By adjusting the value of the 'AF Transition Speed' the speed with which the camera changes/achieves focus can be controlled to make it appear smoother.
Starting with the Sony A7S III, the Sony A series has had much improved color using custom white balance underwater and the A7R V looked similar to the A7S III, α-1, and A7IV. Footage captured at higher ISO values such as the deeper scenes in Socorro showed more noticeable noise than the A7S III would in similar conditions but that is not surprising considering the A7R V is also a 60MP still camera.
For still images, the A7R V was a similar shooting experience to the α-1 in that the 9.44M dot 0.6" viewfinder is a huge improvement over Sony's previous EVFs and those of other systems. As with all EVFs the biggest benefit is a more WYSIWYG experience as the 'Exposure Preview' mode can show you what the scene will look like after you press the shutter. Unless, that is, you are relying on strobes or LED lights to provide your foreground exposure. In these cases, the only way to "see" your foreground subject in the viewfinder is to disable the 'Shot Result Preview' mode, especially in very backlit situations, which is a large proportion of underwater wide-angle scenes. While the dynamic range of the A7R V's EVF is incredible, it's still not quite enough for those strong backlit scenes. Assigning the 'C3' button to toggle 'Shot Result Preview', it's possible to quickly move between checking your background exposure/composition and that of the foreground. This is especially useful when you have schooling fish or other background elements whose position is constantly changing.

Manta Rays near Manta Sandy in the Dampier Strait. The compact size of the NA-A7RV paired with the WACP-C is ideal for snorkeling with pelagics.

Lionfish swimming over Chicken Reef in the Dampier Strait. Tacking autofocus is great for moving subjects and performed well despite the strong backlight.
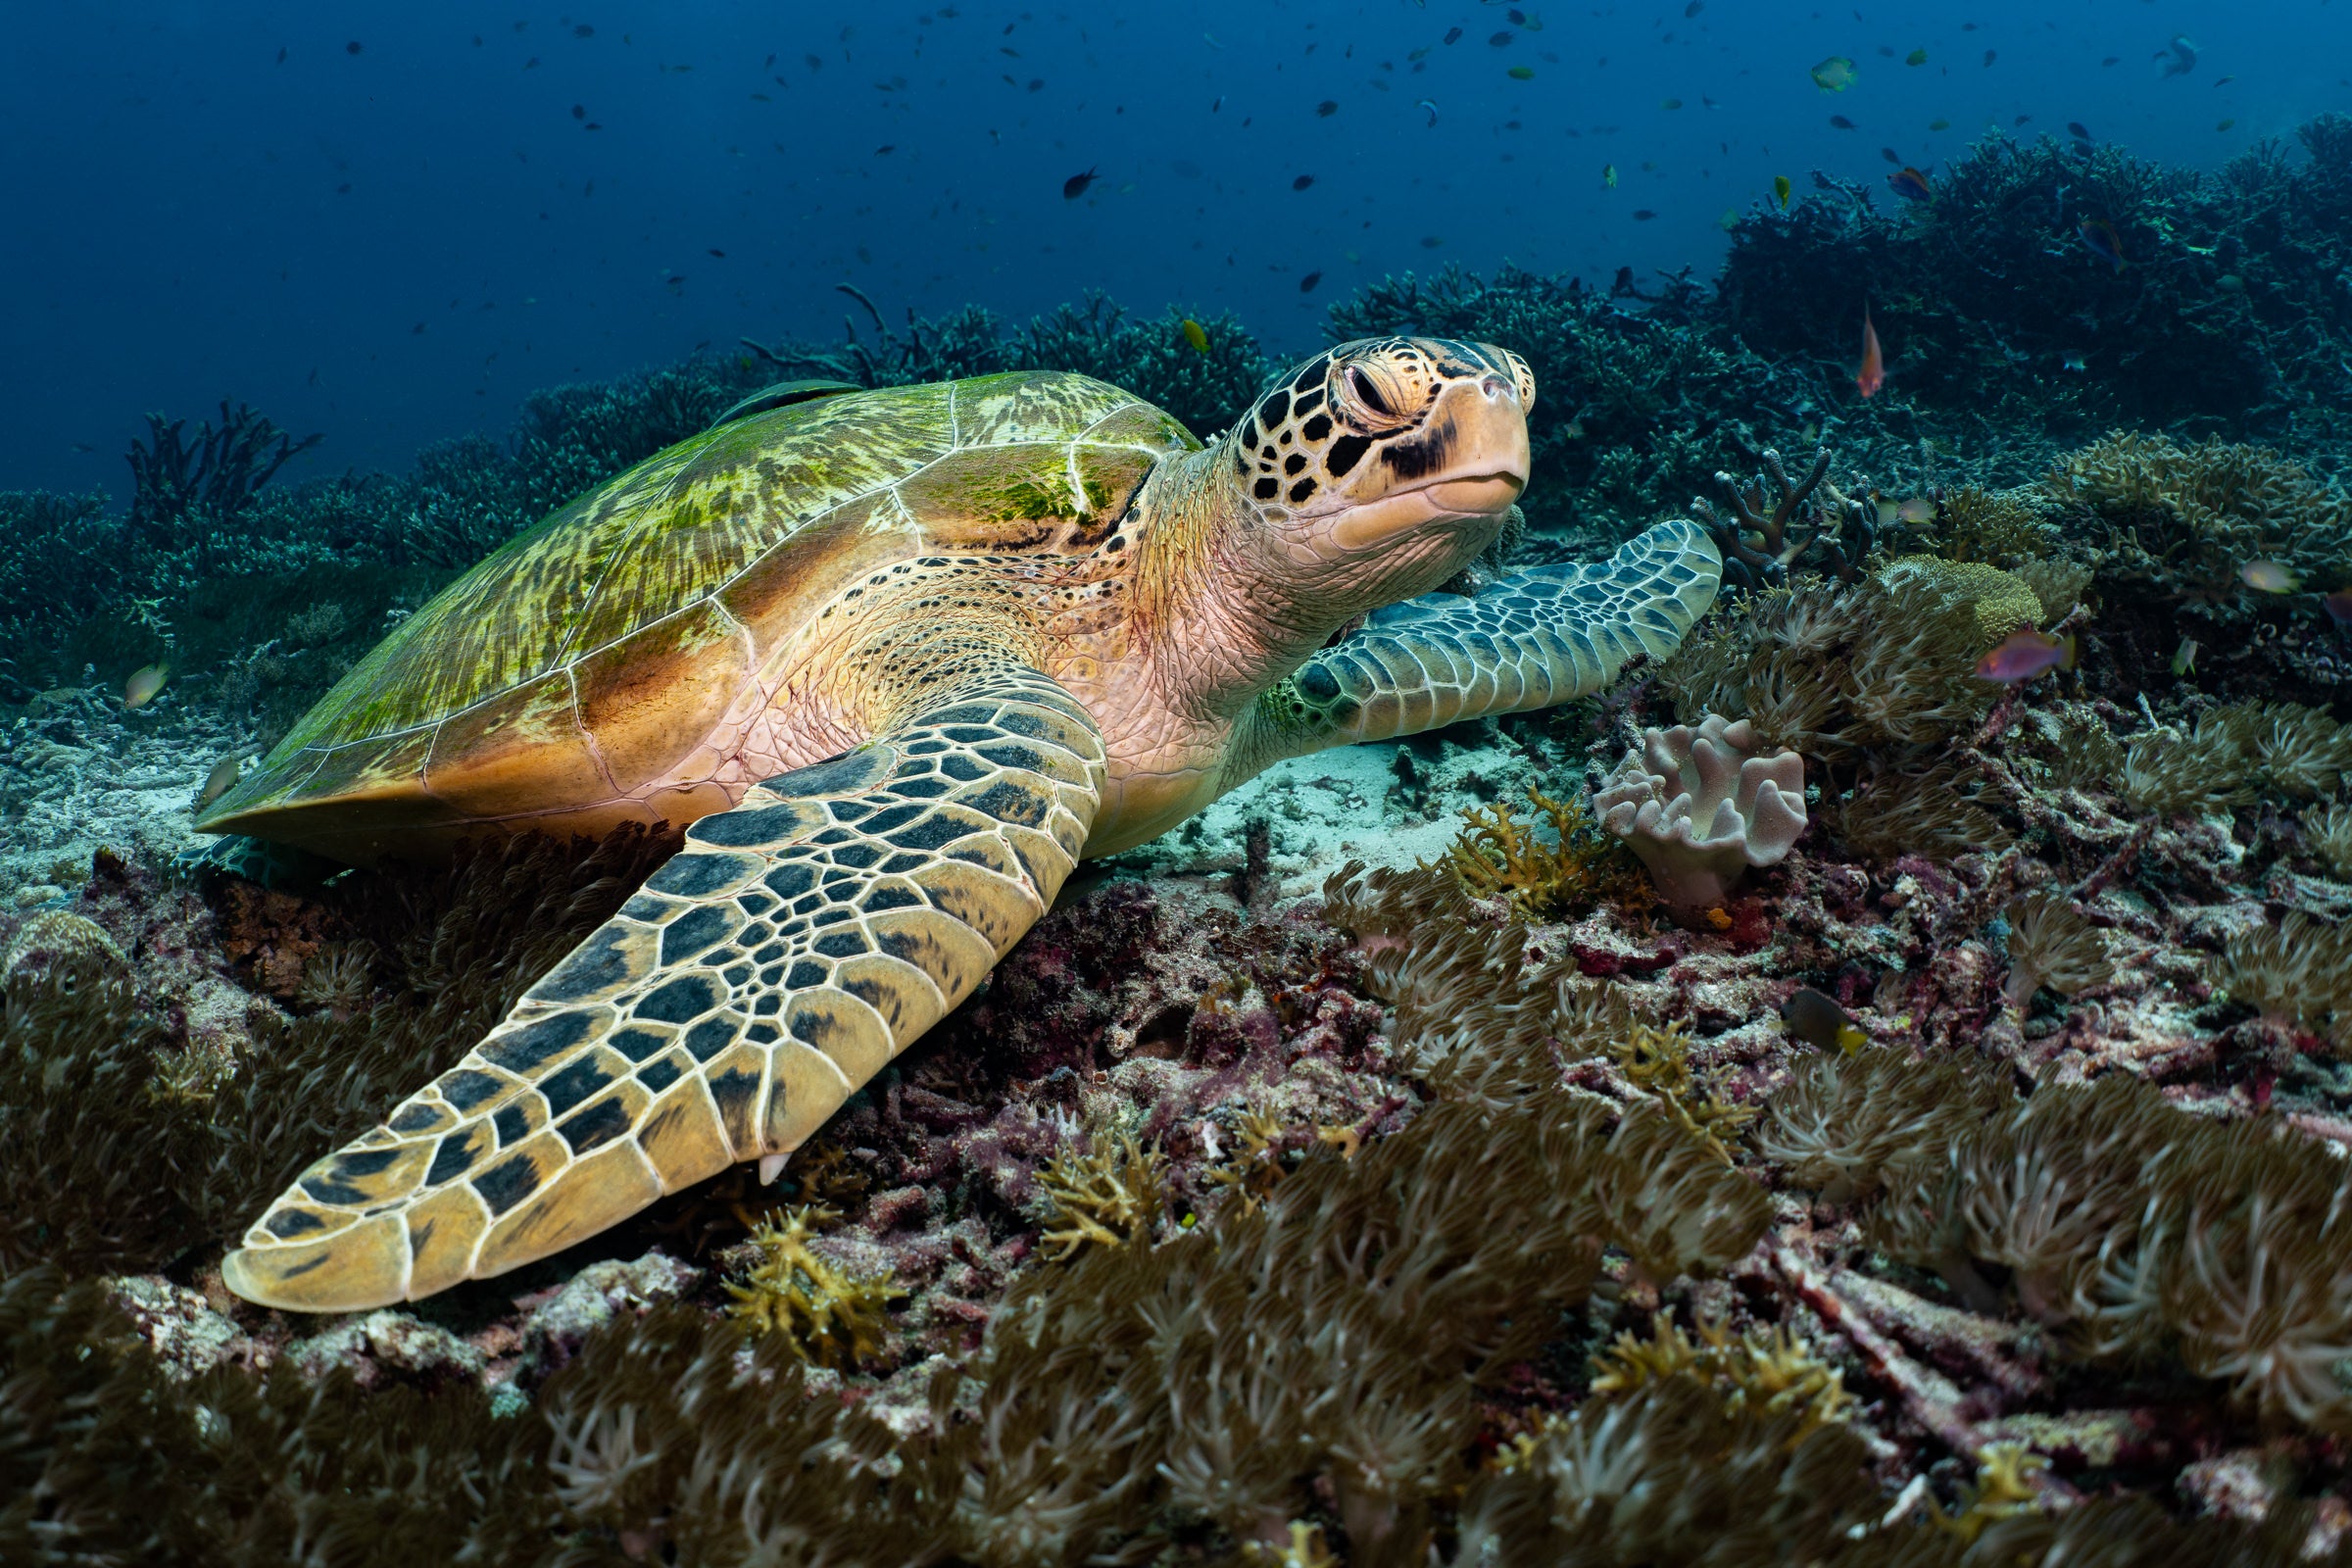
A turtle rests on the reef in Sawandarek. The natural look, incredible 130º field-of-view and ~0" minimum focus distance of the WACP-C make it the best choice for a variety of wide-angle scenes from close focus to landscapes.
As with video, the autofocus system of the A7R V is incredibly customizable and can be tuned to everyone's particular shooting style. For reef scenics and other typical slow-moving subjects, using a simple 'Zone' or 'Spot' focus area with continuous AF-C activated by the 'AF-ON' thumb lever is simple and accurate. Make sure to remove 'AF-ON' from a half-press of the shutter to prevent the camera from refocusing when you take your photo. The speed and precision of the A7R V's focus system is impressive, even in highly backlit or dark situations. The camera also features focus tracking, which allows the user to select a subject and have the camera track it, or even to have the camera select the subject by type such as 'Animal' or 'Insect'. The system's ability to track animal eyes in incredible, especially with cetaceans and turtles. For larger macro subjects with little background clutter such as Rhinopias, the system was easily able to track the animal's eye as it bobbed around the reef. Limited time in the water filming macro meant we didn't have time to deep dive into the accuracy for less well-defined critters.
Still images from the A7R V are exactly what you would expect from the fifth iteration of this high-megapixel full-frame Sony. The extensive and customizable 'Creative Look' feature allows for true fine-tuning of how the image is represented in-camera. The wide dynamic range of the camera captures extensive shadow detail to help with post-processing.

Soft corals cling to an exposed reef on Karang Bayangan in Misool, southern Raja Ampat. The natural look of the WACP-C while maintaining a wide field-of-view is alway evident in reefscapes.
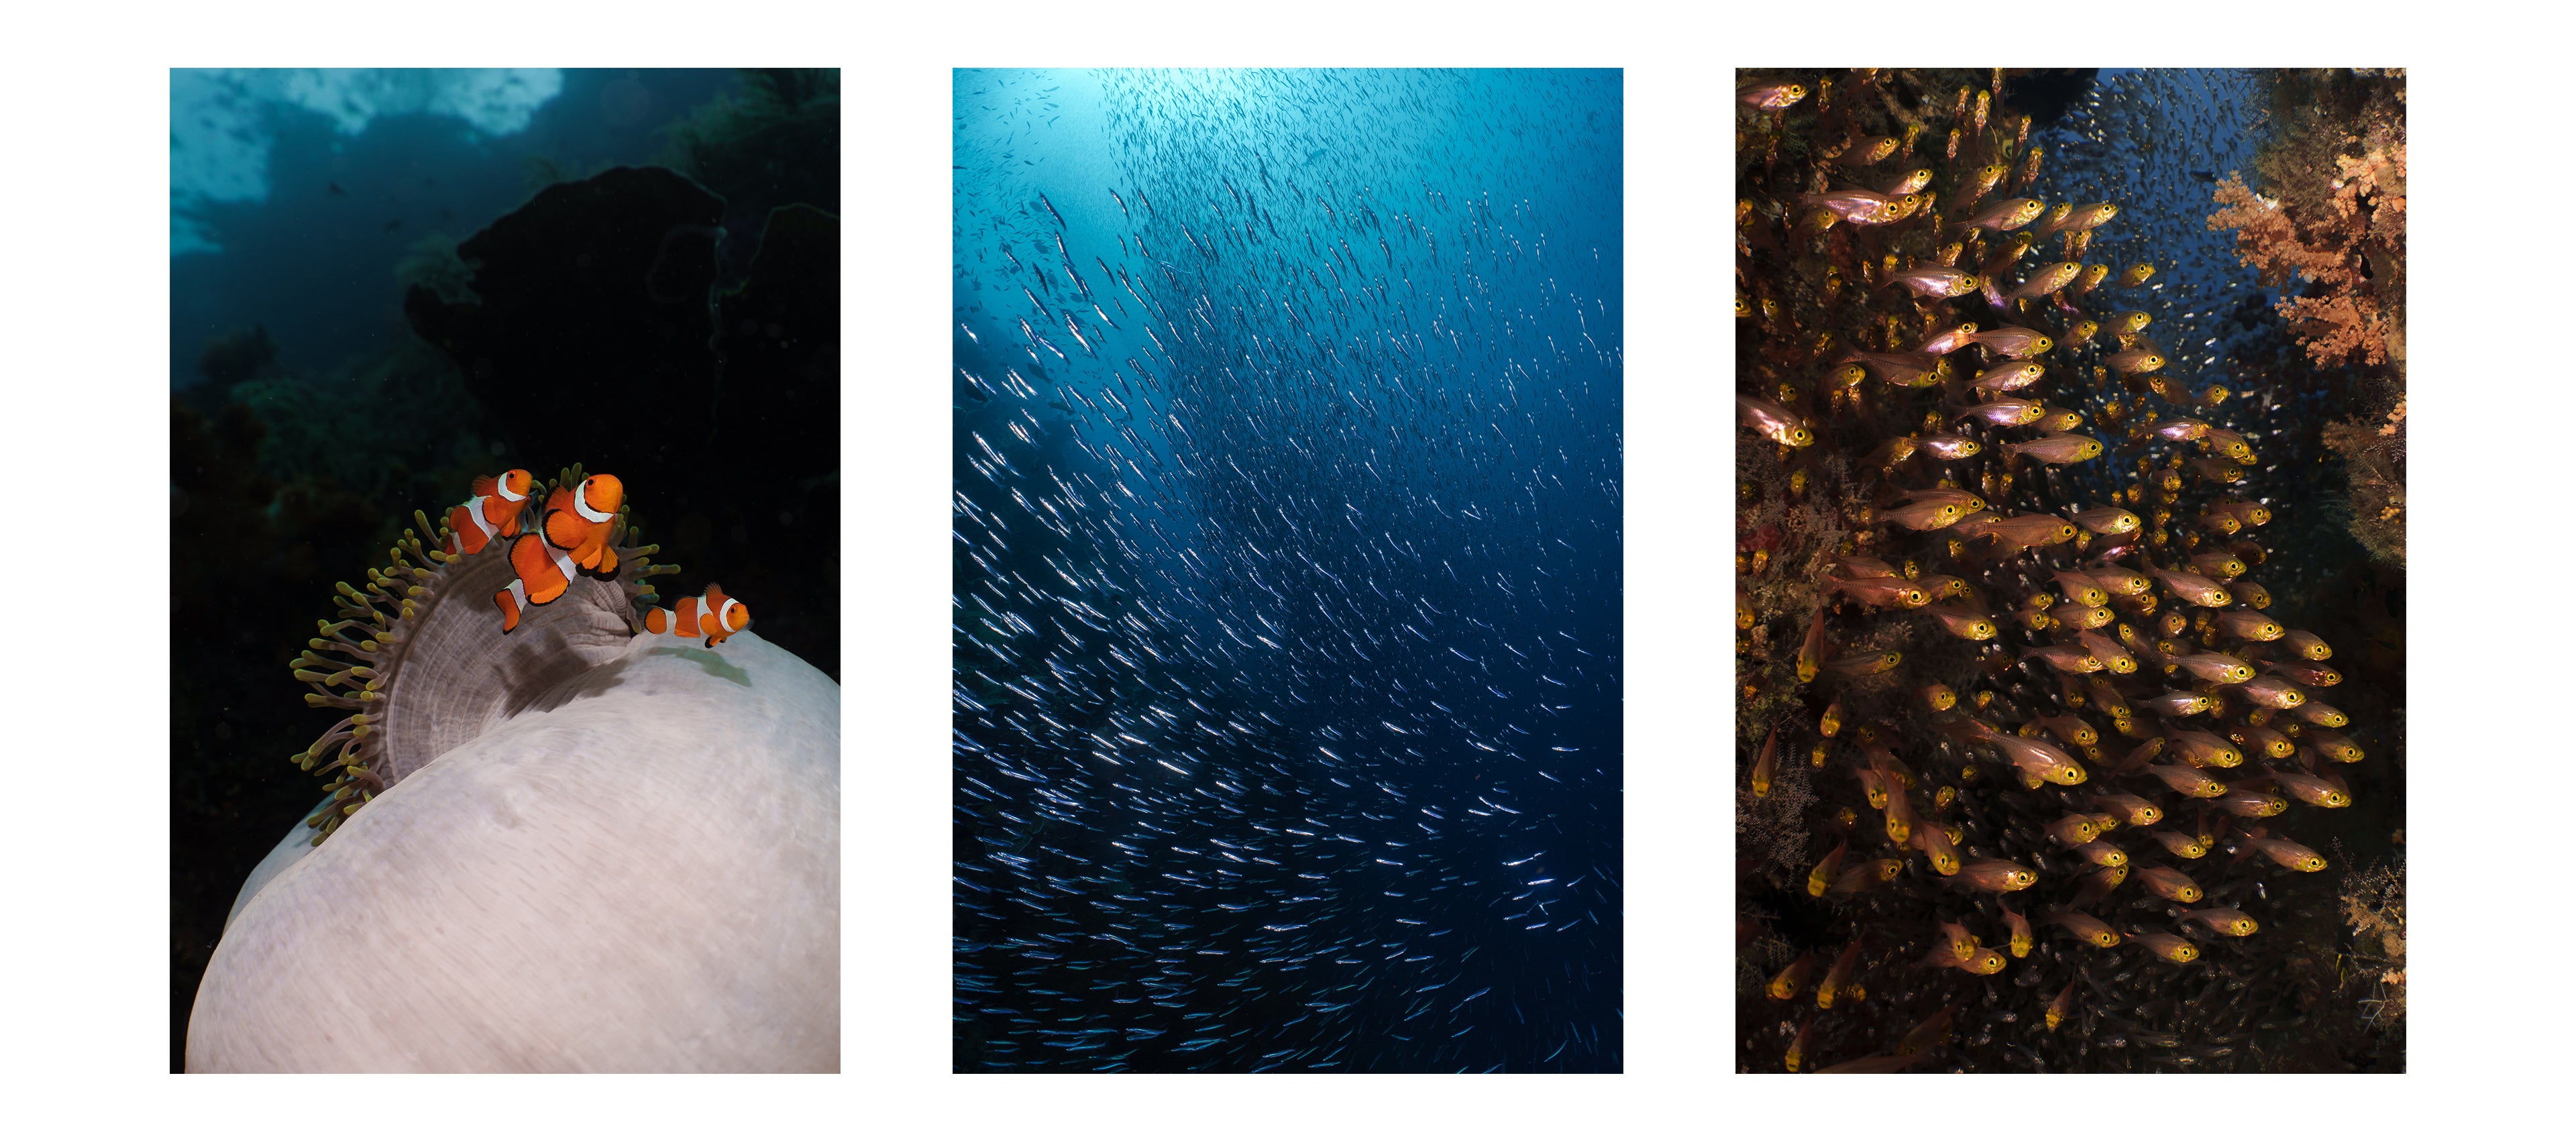 The full zoom-through capability of the WACP-C is highlighted by this image of anemone fish and the bronze sweepers inside a crevice. The A7R V's fast and accurate autofocus was essential when working with the fast moving school of silversides on Four Kings in Misool.
The Nauticam system is more than just a housing and ports. The ability to customize the platform to suit a particular project or shooting style is what makes Nauticam products unique. For the above videos, the NA-A7RV was paired with the NA-NinjaV housing for the Atomos Ninja V monitor/recorder. The NA-A7RV features the large bore M24 bulkhead that supports the HDMI 2.0 standard for connection to monitors or recorders over HDMI. The A7R V does output a clean HDMI signal but the Atomos Ninja V currently does not support recording stop/start using the camera's controls, only the Ninja's dedicated controls. In this case it was used only in the monitoring capacity.
Nauticam's lineup of water-contact optics insure the highest possible image quality, whether its for ultra wide-angle or super-macro. The WACP-C, which was used for these videos and still images provides 130º field-of-view and a ~0" minimum focus distance while maintaining an incredibly natural looking image and incredible corner sharpness.
To get the most from the large 0.6" EVF of the A7R V it's essential to use one of Nauticam's Full-frame Enhanced Viewfinders which are available in either angled or straight configurations for individual shooting preference. The added distance from the rear of the housing allows for unimpeded freedom when composing in even the most challenging conditions. The in-water adjustable diopter and complete coverage give peace of mind that images will be sharp and properly positioned in the frame.
Carbon float arms allow for fine-tuning the buoyancy of the system to get the smoothest possible filming or shooting experience whatever the configuration.

Needlefish hunting over a shallow reef in the mangroves of the Dampier Strait.
]]>In addition to focusing and composition benefits, enhanced viewfinders are more comfortable to shoot with. They offer more clearance for your regulator and allow you to get your mask right up to the eyepiece. Nauticam produces both straight and angled viewfinders. Many photographers find the angled viewfinders to have a more comfortable viewing angle especially when shooting macro close to the bottom. Angled finders rotate in any direction so you can go from shooting horizontals to verticals with a simple twist of the viewfinder
Nauticam enhanced viewfinders have been the industry standard for the past 10 years but with some recently released cameras that have larger EVFs it became apparent that an update was needed. There are four new enhanced viewfinder models all with updated optics. The improvements to the optics bring even sharper viewing to the already stunning line of enhanced viewfinders. All Nauticam viewfinders feature a dioptric adjustment that can be adjusted in the water to the divers eye site. Simply adjust the diopter until the camera information in the viewfinder is sharp. Nauticam viewfinders can be installed and uninstalled within seconds with no tools required. Making them easy and convinealnt to travel with.
To accommodate larger EVFs like the 0.64” EVF found on the Sony a1 and a7S III the new 0.8:1 viewfinders offer edge to edge viewing. They have a 0.8:1 magnification ratio and a 40° angle of view. They can also be used on any camera with a smaller EVF or optical viewfinder. This will allow you to see more of the viewfinder area with slightly less magnification when compared to the 1:1 models. Because they can be used with both older cameras and newer models with larger EVFs the 0.8:1 viewfinders are a great choice for anyone looking to future proof their purchase. The 0.8:1 viewfinders are available in both straight and angled versions.

The 1:1 viewfinders have the most magnification and offer edge to edge viewing on EVFs and optical viewfinders up to 0.5”. They have a 1:1 magnification ratio and a 32° angle of view. These are the same specifications as the original Nauticam viewfinders but now feature the updated sharper optics. The 1:1 viewfinders are available in both straight and angled versions.

The new viewfinders ship with a full frame collar that fits DSLR and most full frame MIL housings. On some smaller MIL housings an easily installed adapter is required. Please see the related products below.
]]>


 ]]>
]]>
Like the WACP-1, the WACP-2 is a dry mount lens design, functioning as both a port and optical lens. It is optimized to work with professional camera lenses up to 14mm and offers an unparalleled 140° angle of view. The WACP-2 is capable of focusing in air, adding the ability to capture over-under images and film in wet topside environments. The WACP-2 can focus as close as the front element and captures images with minimal distortion.

Nikon Z6, 14-30mm @14mm, WACP-2
Dome ports solve many of the issues we encounter when using flat ports but there is still substantial room for improvement. The main problem we contend with is corner sharpness and in some cases, it can be quite extreme. Underwater, a dome port acts as an additional lens element. This lens creates a virtual image of the subject that is smaller and much closer to the camera than the actual subject. The first challenge is that the camera lens must be able to focus close enough to capture the virtual image, but this isn't a common problem with big domes and close focusing DSLR lenses. The issue that can be harder to overcome underwater is that the virtual image is curved. The portions of the subject that are near the edges will appear to be closer to the camera than the center of the subject. When focused at the apparent distance of the center of the image, the corners (that appear closer to the camera) can fall outside of our depth of field range (and out of focus). This is why a smaller aperture improves corner sharpness - it increases depth of field!
For more information on flat ports and dome ports please see WACP-1 Explained.

Nikon D850, 16-35 @16mm, WACP-2
An alternative solution to dome ports are optics corrected for in-water use. The WACP-2 was designed to be the finest underwater optic possible. Not only does it greatly improve the quality available from traditional domes, but it expands on our already excellent water contact optics. It borrows many of the characteristics from the WACP-1, adds additional features and expands the range of compatible professional lenses. The WACP-2 is a conversion lens with in-water correction. It converts a lens designed for use in air to be wider and corrects for in water use. The WACP-2 was designed for large, high resolution image sensors. It is compatible with both video and still photo systems. It increases center sharpness, dramatically increases corner sharpness, and improves contrast. The combination has excellent overall image quality - even at open apertures.

Nikon Z6, 14-30mm @14mm, WACP-2
The WACP-2 is designed to work with several professional lenses including 16-35mm lenses from Nikon, Canon, Sony and Panasonic. It is also compatible with the recently released Canon RF 15-35mm and Nikon Z 14-30mm. There is a 0.57x conversion so at 14mm the WACP-2 produces a field of view of 140°. Compatible zoom lenses offer full zoom-through capabilities. Underwater filmmakers or photographers can capture wide, medium and close-up shots - all with one lens while maintaining optimum optical and close-focus performance. Most ultra wide lenses have a fair amount of distortion. Straight lines will look slightly bowed and objects often look stretched at the edges and corners. The WACP is the most natural looking lens I have ever used and it is creating a wider FOV than any lens you can compare it to!

Nikon Z6, 14-30mm @14mm, WACP-2
The WACP-2 can focus in air. Over-under images, filming in wet environments or just grabbing a quick topside shot without breaking down your system is now possible. The WACP retains the same low distortion corrective optics in air.

The WACP-2 is able to focus in air making over-under and topside shots possible. Alex Tattersall, Nikon D850, 16-35mm @16mm, WACP-2
Having wide, medium and tight shots of a subject is so important when editing your footage to tell a story. The WACP-2 with a zoom lens allows you to get those shots on a single dive. Because the WACP-2 retains sharp corners at wider apertures, footage can be shot at a lower ISO. This produces cleaner images with less noise.
Nauticam WACP-2 Showreel from Nauticam on Vimeo.
It is certainly worth looking at weight and size when considering the WACP-2. The overall dimensions of WACP-2 are not that much different compared to a 230mm dome and extension. Both the WACP-1 and 2 have built in buoyancy collars so underwater they are only slightly negative. Travel weight shows the biggest difference between the systems. (230mm +ext. 5.7lbs, WACP-1 9lbs, WACP-2 15Lbs) For many this will not be an issue, but not everyone has the same needs. The image quality from either the WACP-1 or 2 will be far superior to a traditional dome. The WACP-1 offers many of the same features in a smaller package so I suggest looking at the features of both and then making a decision.

WACP-2 and WACP-1
The WACP features a truly unique shade design. With imaging angles up to 130° and during transport, the shade can remain in the default position that extends past the front element. At wider angles, the shade can be opened wider with a simple knob turn to prevent vignetting.
 |
 |
The WACP-2 with the shade closed and the WACP-2 with the shade open.
For underwater image makers looking for the highest quality optics, the WACP-2 and WACP-1 dramatically improve what is possible from traditional domes.
 Nikon Z6, 14-30mm @14mm, WACP-2


Canon R5, Canon RF 100mm Macro, Nauticam EMWL 130°, 1/250 sec, f/14, ISO 100
The EMWL was built to work with several popular macro lenses and is optimized for both stills and video. It is a wet mount design so the lens can be attached and removed underwater. This increases the versatility of the entire system and other accessories like SMC and CMC macro converters can also be used. It is a modular design with three individual pieces that make up the EMWL, the Focusing Unit, the Relay Module and the Objective Lens. Nauticam has made components optimized to work with different camera manufacturers and their macro lenses, as well as choices for four unique perspectives. Let’s look at the individual parts and dive a bit deeper into the EMWL.

NA-R, Macro Port 94, EMWL with 100° Objective Lens

The EMWL System
Objective Lenses, 60°, 100°, 130° - Relay Lens - Focusing Units

The recently released 160° Objective Lens

Canon R5, Canon RF 105mm Macro, Nauticam EMWL 100°, 1/320 sec, f/9.0, ISO 100
To ensure the best results across a range of cameras, four focusing units were designed and each unit is custom designed optically to work with the recommended primary lenses. You will want to purchase the correct version for the lens you are using. The EMWL is very sharp, and has very good contrast, autofocus works extremely well. This is a significant advantage compared other available relay lenses. You also have the option to add a manual focus gear. Lens adapters such as the Nikon FTZ, EF to EOS R or the Sigma MC-21 can also be used. The focusing unit is the part that is connected closest to your port, it is designed with 6 glass elements in 3 groups and attaches via the Bayonet Mount System.

Focusing Unit - Nikon, Canon, Sony
Compatible lens:

Canon R5, Canon RF 105mm Macro, Nauticam EMWL 130°, 1/80 sec, f/11, ISO 160


Canon 5DSR, Canon EF 100mm Macro, Nauticam EMWL 130°, 1/160 sec, f/9.0, ISO 640
The final piece that attaches to the front of the Relay Lens is the Objective Lens. There are four different versions with varying degrees of angle-of-view. You would choose one based on the look, subject or type of image you would like to produce. These, like the other two parts, can all be put together and disassembled underwater. You could keep all four objective lenses with you and swap out when needed. You can shoot these just like you would any other lens, but the real magic happens when you get up close to your subject. The 160°, 130° and 100° objective lenses will focus as close as the front element and the 60° objective lens can focus as close as 15mm. You could fill up most of the frame with a nudibranch and still have room for a diver in the background! The EMWL is a great tool to boost your creativity.

This is the widest of the four Objective Lenses. It is perfect for larger macro subjects or any image where you want to see more of the background. The small front element offers many creative opportunities.

This ultra wide Objective Lens is designed with 9 elements in 7 groups. The image quality rivals the best wide angle lenses so feel free to shoot it for traditional wide angle shots or macro subjects with background elements.

This is an extremely versatile angle of view. It is the smallest and sleekest in physical size making it a good choice for timid subjects and tight spaces. It is designed with 9 elements in 6 groups. An angle of view of 100° is still a lot of background space for small macro subjects or to shoot wide angle with. A 16mm lens on FF is 107° for comparison.

For a narrower angle-of-view or if you would like the background elements to look more compressed, than the 60° objective lens is the perfect choice. It is designed with 9 elements in 6 groups. There are three focusing ranges that can be set on the lens, ∞-55mm, 55-25mm and 25-15mm. I would suggest setting it to the ∞-55mm setting and adjust to one of the closer settings when working extremely close to a subject. The closer setting work similar to an extension tube by moving the lens further away from the sensor.
|
130° Objective Lens, Click for high res image. |
100° Objective Lens, Click for high res image. |
60° Objective Lens, Click for high res image. |

Nikon D850, Nikon 105mm Macro, Nauticam EMWL 60°, 1/100 sec, f/14, ISO 320
There are three mounting options for the EMWL.
The EMWL focusing unit ships with a bayonet mount attached. You just need to add the appropriate Bayonet Mount Converter to the front of your port. If you wish to use a Super Macro (SMC-1 or SMC-2) or Compact Macro Converter (CMC-1 or CMC-2), they can be attached with an optional Bayonet Mount Adapter.
There is also an optional flip holder for the EMWL. It is a double flip design with one dedicated flip for the EMWL and another available for a SMC or CMC. Please note: Ports shorter than 80mm are not compatible with the flip holder.

The last option is a M67 mount for the EMWL to thread the EMWL directly to a M67 port.
|
Canon R5, Canon 100mm Macro, Nauticam EMWL 100°, 1/250 sec, f/13, ISO 100 |
Canon R5, Canon 100mm Macro, Nauticam EMWL 130°, 1/160 sec, f/10, ISO 160 |
| Laowa 24mm f/14 Probe Lens | Nauticam EMWL | ||
| 37305 N100 to N120 Adaptor | $675.00 | 87222 EMWL 100° Objective Lens | $1,501.00 |
| 16336 Port Adaptor for Laowa 24mm | $872.00 | 87211 EMWL 150mm Relay Lens | $1,735.00 |
| 19155 N120 DSLR Gear Set | $722.00 | 87203 EMWL Focusing Unit for Sony | $1,501.00 |
| 21271 70mm Extension Ring with Focus Knob | $704.00 | 37126 N100 Macro Port 105 | $610.00 |
| Metabones Canon EF to E-Mount Smart Adaptor | $399.00 | 37147 Focus Gear for Sony 90mm f/2.8 | $281.00 |
| Venus Optics Laowa 24mm f/14 Probe Lens | $1,599.00 | 83250 M67 Bayonet Mount Converter II | $114.00 |
| Total | $4,971.00 | Sony FE 90mm f/2.8 Macro G OSS Lens | $1,098.00 |
| Total | $6,840.00 |
| Laowa 24mm f/14 Probe Lens | Nauticam EMWL | ||
| 16336 Port Adaptor for Laowa 24mm | $872.00 | 87222 EMWL 100° Objective Lens | $1,501.00 |
| 19155 N120 DSLR Gear Set | $722.00 | 87211 EMWL 150mm Relay Lens | $1,735.00 |
| 21271 70mm Extension Ring with Focus Knob | $704.00 | 87202 EMWL Focusing Unit for Canon | $1,501.00 |
| Venus Optics Laowa 24mm f/14 Probe Lens | $1,599.00 | 18703 N120 Macro Port 94 | $743.00 |
| Total | $3,897.00 | 19575 Focus Gear for Canon RF100mm f/2.8L | $281.00 |
| 83250 M67 Bayonet Mount Converter II | $114.00 | ||
| Canon RF 100mm f/2.8L IS USM Lens | $999.00 | ||
| Total | $6874.00 |
There are several accessories available for the EMWL, including travel bags, lens shades, strobe mounting options and more.


Canon R5, EF16-35mm f/4L @16mm, 1/125, f/14, ISO 160, Nauticam WACP-2
If you are coming from a NA-5DIV or similar housing than the NA-R5 controls will feel very familiar. Nauticam is known for great ergonomics and this housing is no different. One big control change over the 5D series is that the R5 has three control rings. You now have a direct control wheel for ISO or exposure compensation as well as shutter and aperture. The R5 electronic viewfinder is bright and responsive. Unlike optical viewfinders, EVF’s also allow you to review images and even shoot video with them. This makes them a perfect candid for an enhanced viewfinder. The NA-R5 can accommodate both RF lenses and EF lenses using one of the three Canon RF to EF adapters. EF lenses use the exact same ports and extensions as they would with a DSLR. There is no need to add an extension ring for the adapter. That spacing is designed into the housing. The NA-R5 also an additional control wheel to give access to either the Canon control ring or neutral density adapters. You can assign numerous camera controls to the controls ring. An underwater camera system is only as good as the optics and Nauticam has the largest selection of underwater optics available.

Canon R5, RF100mm f/2.8L Macro, 1/250, f/14, ISO 160, Nauticam EMWL
At the heart of the R5 is a new 45 Megapixel full-frame sensor with superb image quality. This is Canon’s best high res sensor to date. The R5 has 5-axis in-body image stabilization that adds approximately 8 stops of stabilization. This is perfect for dark conditions or shooting topside with longer lenses. The Dual Pixel auto focus has tracking for people, animals and vehicles. The coverage for the AF area is approximately 100%. This means fast precise focusing even when your subject is far from the center of the frame. The AF on the R5 is very impressive in both stills and video this is one of the most noticeable areas of improvement over older bodies like the 5D MKIV. The full line of EF lenses are available along with the impressive new RF lenses.

Canon R5, EF28-70mm f/3.5-4.5 @28mm, 1/8, f/22, ISO 3200, Nauticam WACP-1
As mentioned earlier, the overheating issues with the R5 have been largely solved by the 1.6 firmware update. Record times for 8k Raw have increased to approximately 45min and even longer record times are posable for 4k. This is more than most would need during a dive and the camera should have plenty of time to cool down during a surface interval. The 8k Raw and 4K HQ setting look amazing but you are limited to a maximum frame rate of 29.97. If you are interested in shooting at a faster frame rate and slowing down the footage in post the R5 records standard 4K at both 60 and 120fps. There is also cropped (super 35) 4K 30 and 60 settings. These modes take the 4k footage from an oversampled 5.1K area of the sensor. This gives you similar quality to the 4k HQ mode but up to 60fps! This mode also gives you the option to use the amazing Sigma 18-35 lens with the Nauticam WACP-1 or use the crop mode with any full frame lens for extra reach. Other notable video features are 4:2:2 10-bit Canon C.LOG and C.LOG3 settings. Dual Pixel CMOS auto focus in all modes with tracking and eye tracking for both people and animal.
4K 60fps, Super 35 crop, EF 16-35mm f/4 and Nauticam WACP-1

Canon R5, RF100mm f/2.8L Macro, 1/160, f/11, ISO 160, Nauticam EMWL
The R5 is an impressive stills camera that is also capable of very high quality video. The NA-R5 has great ergonomics and can easily be customized with viewfinders, external monitors and water contact optics. Canon’s new line up of RF lenses continues to grow but we have already received several lenses perfect for underwater, including the 15-35mm f/2.8, 14-35 f/4 and the 100mm f/2.8 macro with a magnification ratio of 1.4x!
 Canon R5, RF100mm f/2.8L Macro, 1/250, f/9.0, ISO 100, Nauticam EMWL
There is plenty to love about most Canon cameras but setting a custom white balance is not usually one of them. Canon’s method on most of their bodies has been to take an image and then assign it to the custom white balance. This is a slow process and typically involves a lot of button pressing, even with custom settings. With the release of the R3 they introduced a new live view method that reduced many of the steps and streamlined the procedure. This method was also added to the R5 and R6 with firmware update 1.5 and later. This method is a huge improvement, but is not without some quirks that are worth covering to avoid any frustration.
First you still need to be in stills mode to register a new custom WB. The R5C has a one touch custom WB in video, but on the R5 we still need to jump back and forth. The R5 and R6 only have one custom WB setting, not multiple banks like the R3 and some of their other high-end models. When you register a new custom WB it will effect both still and video settings that have their white balance mode set to custom WB but will not change any of the custom shoot modes C1 - C3 that have a custom WB set. In stills mode you can use this method to set a custom WB individually to the C1 - C3 modes. In video the only way to register a new custom WB setting to one of the C1 - C3 modes is to use the traditional method of first taking a still image and then registering it to that individual custom mode. The image also needs to be on the same card that you are recording to and playing back video from. This slower method makes the custom shooting modes in video a bit less useful for switching between resolutions and frame rates but you could use them as custom WB banks. No matter how you use them, I suggest setting up the C3 mode to your most used video settings as, by default, the settings from video C3 are what are used if you hit record while in stills mode.
If you are in video mode, set the WB to custom and then pop over to stills by hitting the mode button (top of the NA-R5 or use the mode dial on NA-R6.) Then hit the info button (back of the housing). (Tip: most people can do this with one hand on the NA-R5 using their index or middle finger and thumb.) Once the stills modes are displayed hit the set button or give the shutter a half press to confirm the stills mode.
Step 1: Press the 'Q' button (lower right thumb lever on the housing) and select the custom WB icon. (Tip: once this is set and as long as you don’t move the Q menu to another icon you can access this with a single push.)
Step 2: With the custom WB icon highlighted point the camera at a white balance target or something neutral and hit the 'delete' button (back of the housing). You should see the effect of the new setting.
Step 3: Depress the shutter (index lever right side of housing) to register the setting to the custom WB. At this point you will see a reference image, a histogram and confirmation if the WB settings were obtained. (Note: the exposure needs to be close to standard if the exposure is too off proper WB may not be obtained. Even though you depress the shutter no image is actually taken. This step only registers the settings. If you need to register a new custom WB to one of the video C1 - C3 modes take an image of the WB target.)
Step 4: If you need to get back to video press the 'mode' and then the 'info' button. As long as you are still set to custom WB in video you are all set!

In stills mode, hit the Q button, navigate to the custom WB icon or if it is already set you will see this menu

Point the camera at a white balance target or something neutral and hit the delete button, you should see the effect of the new setting, notice the color change from the image above

Press the shutter to register the setting to the custom WB. At this point you will see a reference image, a histogram and confirmation if the WB settings were obtained.
When everything is set correctly the buttons needed to set a new custom WB from video on the R5 look like this.
'Mode' - 'Info' - Half press Shutter (change from video to stills)
'Q' - 'Delete' (sets a custom WB)
Full Press Shutter (registers the new custom WB)
'Mode' - 'Info' - Half press Shutter (change from stills back to video)
]]>

These field notes focus exclusively on the still imaging capabilities of the camera. For this trip the NA-A7IV housing was paired with INON Z-330 strobes and both the WACP-1 and WWL-1B, both of which use the Sony FE 28-60mm F4-5.6 lens. For macro the Canon EF 100mm f/2.8 Macro IS USM lens with a Metabones Canon EF-mount to Sony E-mount adapter. As using both the WACP-1 and the Canon 100mm require the use of the Nauticam N100 to N120 35.5mm Port Adapter II, it was easy to switch between the setups, swapping only the WACP-1 for the N120 Macro Port.

Flamboyant cuttlefish F3.5, 1/200, ISO 100. Landing critical focus even at F3.5 was easy with the camera's EVF and the Nauticam Angled Full Frame Viewfinder 0.8:1.

Juvenile mimic octopus F5.6, 1/250s, ISO 50. Even with manual focus, focusing on the eye of this fast moving juvenile mimic octopus was easy.

Glossodoris acosti nudibranch f11, 1/200s, ISO 100. When using creative lighting, the image review in the EVF allows for on-the-fly strobe adjustments without removing your eye from the viewfinder.

Ghost pipefish pair F6.3, 1/125s, ISO 100. Shallow depth of field allows the subject to pop from the close background while still allowing that to be a beneficial aspect of the image.
When used with the Nauticam Enhanced Viewfinder 0.8:1 45º model, the A7 IV's electronic viewfinder makes nailing macro focus a snap. The majority of the sample images are shot at F6.3 or below for dramatic depth-of-field with moving subjects and manual focus. The detail, sharpness and refresh rate of the viewfinder were excellent. As with all mirrorless cameras, having instant review of the image in the viewfinder allows for strobe or setting adjustments without removing your eye from the viewfinder, eliminating the need to reacquire your subject.

Juvenile Lionfish F5.6, 1/200s and ISO 100. Reflective silvery fish in the background become balls of light with the bokeh.

Ladybug F18, 1/125s, ISO 100. This uniquely colored amphipod was shot with the SMC-1 at full maginification. The bright and sharp EVF helped immensely with super-macro focus and composition.
The autofocus of the A7 IV when using the Sony 28-60mm with both the WACP-1 and WWL-1B was snappy and accurate, even in poor lighting conditions. For wide-angle, my tendency is to keep the focus area near the center of the frame and use the 'AF-ON' button, which is easily actuated using the dedicated thumb lever on the NA-A7IV, to trigger the autofocus. I can then recompose without worrying the camera will focus on the wrong part of the image. I never found the camera unable to quickly and accurately focus on the subject, even in poor lighting conditions such as these sweetlips at 140' on a rainy day.

Sweetlips F6.3, 1/80s and ISO 320. These sweetlips were at 140' on a rainy day. Being able to get sharp corners at F6.3 is one of the many benefits of the WACP-1. This was at 60mm focal length.

The same sweetlips at the same settings but using the 28mm focal length. The flexibility of the WACP-1 allows for capturing subjects in a variety of compositions.

The reef at Batu Rufus in Raja Ampat F8, 1/60s and ISO 320. The extremely natural look of a WACP-1 image is always most evident in reef scenics with a noticeable lack of pincushion and fisheye distortion.

Barracuda school near Tifore Island F8, 1/100s at ISO 100. The shadow detail of the A7 IV is excellent and helps with scenes like this that have a wide dynamic range.

Back tip reef shark in Halmahera F7.1, 1/125s at ISO 200. Zoomed in to 60mm with the WACP-1 and using F7.1 allows the shark to stand out from it's background.

Manta ray near the surface at Manta Sandy in Raja Ampat. F8, 1/100s at ISO 320. The small diameter of the WACP-1 and WWL-1B are excellent for snorkeling, keeping the surface area to a minimum.

Anemone and anemone fish F8, 1/60s at ISO 160. Dark days are great for creative lighting wide angle. As with macro, seeing the review in the EVF allows for lighting adjustments without having to take your eye away from the viewfinder.

Sea fan at Cape Kri in Raja Ampat F8, 1/60s at ISO 400. Even with part of the fan extending into the corner of the frame, the entire fan is extremely sharp thanks to the WACP-1 and careful focus.
A camera is only as good as the optics it is paired with. The Sony E-mount ecosystem is massive and a variety of lens and port combinations are possible to satisfy almost any shooting situation. For reef-centric imaging the flexibility, lack of distracting distortion and ultra-sharp corners of the WACP-1 and WWL-1B are unbeatable. Sony's FE 28-60mm F4-5.6 lens works with both systems. While both optics provide full zoom-through and a maximum field-of-view of 130º, the WWL-1B is a wet-optic that can be removed underwater and swapped for the CMC-1 or CMC-2 optics to capture both super-macro and larger macro subjects using the bayonet mount system.

Soft corals on a slope in Halmahera. F16, 1/250s at ISO 100. With a ~0" close focus distance, getting as close as possible to these soft corals allows good lighting of the subject by the strobes while maintaining F16, 1/250s and ISO 100 to knock down the sunball.
While we didn't focus on video, the A7 IV is also a capable video shooter, able to capture 10-bit UHD 4K at up to 60fps (with an APS-C crop) or 30p using the full field-of-view.
The A7S III is one of the most anticipated model updates in the full-frame mirrorless space, building on the low-light powerhouse A7S II. The A7S models, as opposed to their high-resolution 'R' counterparts, feature relatively low megapixel count but pack amazing ISO flexibility and strong video specs due to their low pixel density. When filming underwater, especially in environments with little to no natural light or when using color-correction filters, the ability to sacrifice ISO for aperture or shutter speed with little penalty is critical. While the A7S II excels in this arena, its ability to capture an accurate custom white balance underwater was lacking and required using color-correction filters in many situations or relying solely on artificial light.

While the A7S III features impressive internal recording options and excellent LCD/EVF screens, pairing it with an external monitor or monitor/recorder offers easier visualization of composition and exposure or even expanded recording options. In this case, we used the Atomos Ninja V recording monitor in the Nauticam NA-NinjaV housing, connected via HDMI.
Continuous autofocus has always presented a challenge for underwater wide-angle video. More often than not, the camera would shift focus to a distracting foreground intruder such as wrasse or other curious fish in the middle of a sequence thereby ruining the shot. With all the improvements to the autofocus system of Sony full-frame mirrorless cameras I decided to give it another try and was pleasantly surprised. The system chose focus well and maintained it, even in the challenging anthias-filled reefs of Fiji.
To enable switching between continuous autofocus and manual focus easy, reassign the 'AF-ON' button to toggle between AF/MF which gives a hybrid back-button autofocus that didn't require holding the button down to use the autofocus for the entire shot. Toggling it on momentarily gives a similar result to the standard back-button momentary autofocus. Fort many scenes with dynamic action, where the subject to camera distance can change dramatically, a reliable continuous autofocus system can help insure sharp footage throughout a shot.
The A7S III's HDMI output signal can be recorded as ProRes RAW with the Atomos NinjaV/V+ recording monitor in addition to other ProRes or more compressed formats. It's important to note that the RAW output option must be set in camera and cannot be changed while underwater as it requires an on-screen 'touch' confirmation on the NinjaV when changing to or from RAW recording. When shooting in RAW, the camera defaults to the minimum base ISO of 640 and the 'PP10" picture profile which is the 'SLog3/SLog3-Cine' gamma and color profile. It's important to choose the correct monitoring profile in the NinjaV to correctly visualize the image on the screen.
With the Ninja's monitoring function its possible to either upload a commercially available LUT or to choose one of the available standard HDR or Rec709 profiles. Using this monitoring function allows you see an approximation of the final image and judge exposure correctly. Other tools such as the waveform monitor are crucial for preventing over or underexposure. While the ProRes RAW is a very easy to use and pliable format, the size of the files makes it impractical for every shot. When shooting in challenging lighting conditions or when above average amounts of color correction are anticipated, RAW is probably the best option. In most typical shooting situations, ProRes HQ or the camera's internal compression H.264/265 is more than suitable. Simultaneous recording to the camera's memory card and the NinjaV is possible as well and makes for a good backup solution.

It's important to also note that recording in ProRes RAW, especially at 60p, generates significant heat and using the Turbo fan mode becomes necessary. This will, however, reduce operating time on the monitor/recorder due to increased battery usage. If the monitor becomes too hot, it will dim the screen and give a visual warning which can interfere with composition.
The A7S III does a great job of capturing a custom 'one-touch' white balance underwater, significantly better than the A7S II. While it does actually require three button presses, it is still very simple and does not require taking a reference photo beforehand. Assigning the WB function to a custom button (the 'AEL' is most conveniently positioned) allows for quick access. Once this button is pressed, selecting the 'set' button once the camera is pointed at the target is all that is required. There are three custom white balance preset slots available.
Note: When using Ambient Filters on LED lights such as the Keldan AB6/12, best results seem to come from turning the lights off before taking a white balance as they function more as fill lights, not the primary light source in this configuration.
The NA-A7SIII uses the N100 port system and has access to the wide range of corrective underwater optics. For this trip, most footage was captured using the compact Sony FE 28-60mm F4-5.6 lens which can be paired with either the travel-friendly and bayonet mountable WWL-1B or the larger WACP-1. Both provide an ultra-wide 130º field-of-view, full zoom-through, excellent corner sharpness at even wider-open apertures like F5.6, and a near 0" minimum focus distance. In addition to these important metrics, the resulting image from these lenses is the natural look of the resulting image without the extreme barrel or pincushion distortion found in conventional fisheye and rectilinear configurations. An added benefit of the WWL-1B system, in addition to its more compact design, is the ability to remove it underwater and mount either the CMC-1 or CMC-2 macro optics to shoot both standard and super macro in addition to wide-angle all on the same dive.
The A7S III features a larger Electronic Viewfinder (EVF) which benefits from Nauticam's newest Enhanced Magnifying Viewfinders (0.8:1). For those not looking to use an external monitor or even the camera's LCD screen, the 45º or straight viewfinders allow for edge-to-edge viewing of the viewfinder at a comfortable viewing angle. The camera's stabilization and high frame rate options help reduce unwanted image movement when using this more streamlined setup.

This video was produced from a mix of footage recorded in 60p on the Atomos NinjaV in ProRes RAW, ProRes HQ as well as H.265 10-bit 4:2:2 600M recorded internally to a CFexpress card in the A7S III.
]]>
Location images by Tony Land with Dive Operator Divetech, Grand Cayman
By now, it is pretty clear that mirrorless cameras are the future of imaging. There are numerous advantages to the format, not least of which is a more compact form factor relative to sensor size. There have also been traditional shortcomings; particularly in the arena of battery life, autofocus and the electronic viewfinder (EVF) performance as compared to an optical viewfinder. But as technological development has minimized these drawbacks, it is pretty clear where things are going.

The Nikon Z 50 is Nikon's first serious effort for a mirrorless APS-C camera and by all accounts they are offering a lot to like at a remarkable price point. This camera is similar to and in some ways exceeds the specs on Nikon's well respected enthusiast DSLR the D7500. The Z 50 also borrows much that has been successful on the Nikon full frame FX Z series cameras. It shares the same lens mount and is capable of 11 frames per second continuous shooting: Better than a D500 or D850 and into D5 territory (at less than 20% of the price)! How things have changed in a few short years and our expectations have changed to match.
What Nikon has clearly aimed to do with this mirrorless is to provide a very approachable, affordable camera with best-in-class image quality (20.9 MP), excellent video capability and with build quality and feel not usually found below a $1000 price point. Having dual command dials is rare in this price category and a pleasure to find here. Strobe sync speed is higher than on a Sony a6600 for instance and video quality is a notch better than the traditionally strong Canon M6 II entry. 4K footage utilizes the whole sensor. Battery life seems exceptional for a small mirrorless camera.
For underwater photographers, low light auto-focus capability is hugely important and a weak spot on many traditional mirrorless cameras. The Z 50 started out with great specs on paper: Hybrid Phase/Contrast Detect AF with 209 PDAF points. There are also lots of selective focus options. The autofocus has indeed proved solid, and a firmware update for 2020 has improved it further. The Nikon Z 50 also has the lowest light AF capability of any camera in the field - another plus for underwater shooting.
While the APS-C Z Mount lens selection is not huge yet, the optional FTZ adapter for F mount lenses provide extensive possibilities and Nikon has the best macro lens selection of any manufacturer by a fair margin. We can't wait to try out the fast focusing Nikon 85mm Micro-Nikkor on an FTZ adapter with the Z 50 underwater. Fortunately, one of the Z Lenses that is readily available happens to be ideal for underwater use. The Nikkor Z DX 16-50mm f/3.5-6.3 VR is Nikon's smallest DX lens ever and is the perfect compliment lens to the Z 50 when shooting in a housing. Buying this lens with the camera still keeps the whole package under $1000. Thanks to some excellent optical engineering from Nikon and Nauticam, this set up is able to maximize the benefit of using Nauticam's new WWL-C: A water contact wide angle conversion lens designed for lenses with a 24mm full frame equivalent such as the new 16-50 lens. Used with Nauticam's ultra compact port for the 16-50, this combination provides an incredibly versatile and tack sharp underwater imaging system from fish portrait to whale shark and everything in between. With a stunning 130 degree angle of coverage, no vingetting at 16mm and full zoom through, this arrangement should likely be a starting point for anyone taking the Z 50 underwater.

The Nikkor Z 16-50 is also perfectly compatible with Nauticam's superb CMC 1 & CMC 2 so when utilizing Nauticam's quick-release bayonet mounting system, a true "do-everything" camera configuration is well within every user's grasp.
As with every Nauticam housing, the NA-Z50 places ergonomics and functionality foremost. This is obvious the minute you start accessing controls underwater. The same at-your-fingertips feel for the shutter release, menu, info, command dials and thumb focus are all right right where you need them. The playback lever is poised by the left thumb. The patented Nauticam Multi-Controller Pad mimics Nikon's camera control nicely and allows for easy focus point adjustment which we put to good use for macro with the CMC.
Nauticam compatibility has been maintained with the N100 port mount (as found on Nauticam's Sony A7/A9 series housings) which allows a nicely compact form factor that is noticeably smaller than any of the Nikon DSLR housings. The port for the 16-50 lens is equally diminutive and should make this rig a pleasure to travel with. The full set up was easy to get on and off the boat with or clip off on a BC. It is worth noting that smaller housings mean less air space which equals less buoyancy, so we feel some flotation would be recommended. We found either the Nauticam 90mmX170mm Carbon Fiber Float Arms or 70mmX250mm seem like a good match for this set up with strobes.
The NA-Z50 comes set up to utilize the built in flash on the Z 50 which is a great convenience and offers the option of TTL functionality with many fiber optic compatible strobes. If left in this mode, we did experience noticeable flash recycle delays after repeated firings, so, depending on your shooting style, this might be a consideration for more action oriented subjects. Fortunately, Nauticam's optional TTL Converter for Nikon (26308) fits this housing (as well as a manual optical trigger) providing longer camera battery life and zero recycle time on the camera. For many of us, this really enhances the shooting experience.

We have a lot of experience using Nauticam's groundbreaking WWL-1 water contact lens with underwater housings and have come to expect exceptional image quality, zoom through flexibility and focus down to glass performance. All that was promised with the new WWL-C and while we expected no less, it was hard to believe this much more compact and lighter wet lens could deliver the goods on an APS-C zoom lens.

We needn't have worried. The lens was easy to mount and remove underwater, while the built in aluminum float collar is much more friendly than the foam WWL-1 collar and offers a good gripping surface. Most importantly, image quality was all we could hope for. With no vignetting to worry about, we could slam the zoom wide and start shooting the moment the action changed. Angle of coverage is the same as the WWL-1: a full 130 degrees, but distortion seems even better controlled. Sun ball flare was also well controlled and it was easy to get close enough to divers to light pleasingly without worrying about stretching legs or arms unflatteringly as a fisheye lens would do.

The WWL-C woks well for models and provides sharp corners

If moving from a DLSR, the Z 50 AF takes some tweaking to behave more like the way you might be accustomed to. It is plenty fast, but some of the intelligent AF settings can be confused in an underwater environment, though occasionally helpful with special circumstances like fast moving nearby subjects. Using a movable group focus works well for general shooting with the WWL-C whether shooting traditional wide angle or close-focus wide angle zoom-to-frame shooting where the WWL-C also excels. The results with this wide angle set up were consistently in focus and tack-sharp.

Utilizing a Nauticam Bayonet Lens Holder on a Nauticam float arm, it was easy to switch out the WWL-C for a CMC-1 close up lens. By zooming to a 50mm focal length, the macro wet lens offers impressive magnification, but of course a bit more challenging focus. Fortunately, it is easy to adjust the focus point location while viewing through the electronic viewfinder that is a quite sharp 2.36M-dot OLED display. The EVF makes it well worth investing in a Nauticam 45 or 180 Enhanced Viewfinder for easier, higher resolution viewing than the rear LCD screen can provide. As we got comfortable with the CMC and its very shallow range of focus capability, we developed a combination of AF and "lock and rock" aided by the AF-ON lever strategically placed by the right thumb, it was simple to activate and lock focus as needed for these trickier shots and adjust the camera housing. Another benefit of using this mirrorless camera's viewfinder is explained by photographer Tony Land.
"One of the nicest things I found with the Z 50 EVF was the ability to check my image without removing my eye from the viewfinder after my shot. I found this particularly useful for macro photography - something you just can’t do on a traditional SLR. Normally after a few shots, you need to look at your LCD screen to make sure nothing weird is happening with your strobe placement or power settings, and just to get an idea of how your shot is coming out. With the electronic viewfinder, you don’t even need to move. The image will appear automatically or on demand without you ever needing to take your eye away, frightening the subject or moving your composition and focus."


Using selective focus with the CMC-1 on this blenny while viewing through the high resolution EVF produces impressive results.
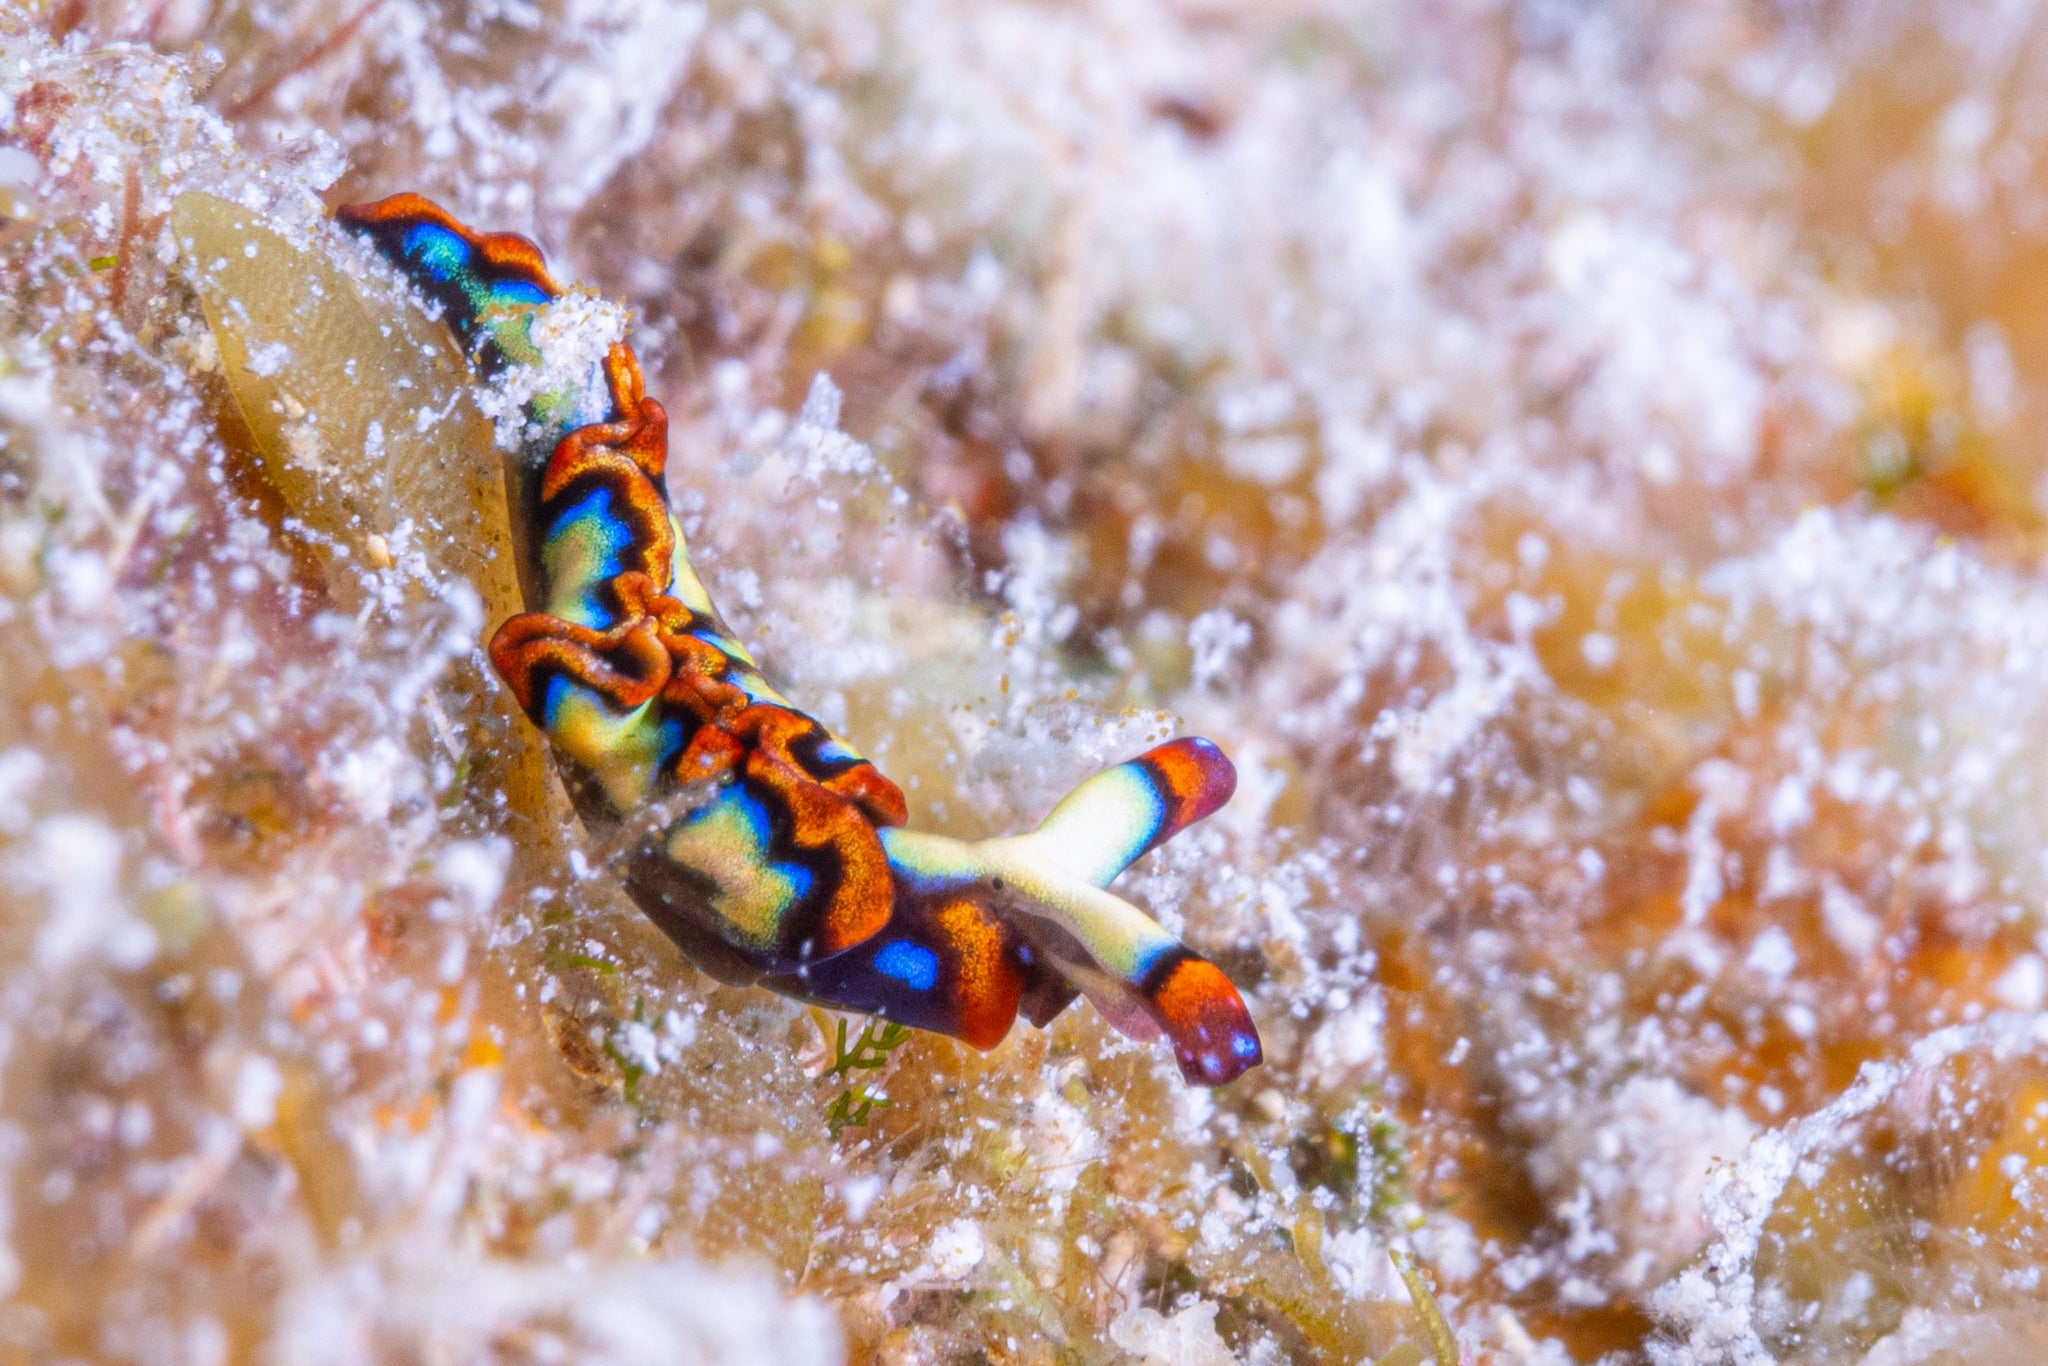
Utilizing AF-ON and EVF playback allows the opportunity for multiple exposures and compositions of a subject without ever looking at the LCD.

Looking at the detail provided by the using the Nikon 16-50 lens with the CMC-1 shows just how edge-to-edge sharp this combination really is.
With only a handful of dives on the NA-Z50, it is clear we haven't explored all the camera and housing are capable of yet. What is clear is what an enjoyable, compact and rewarding system this is. Someone could easily spend years just relishing the versatility of the 16-50 lens and these key supporting wet lenses. Both the camera and the housing perform well beyond what their respective price points suggest we should expect. That makes this a system that is extremely appealing for someone graduating from a compact or older mirrorless camera or a Nikon shooter interested in downsizing, but maintaining some lens compatibility. We look forward to playing with some other lens options - perhaps full macro, perhaps a fisheye, but literally everything else one could ask for has been optimized with the lens configuration we used. It is nice to have another worthy competitor in the very hotly contested mirrorless market for underwater image makers.
Our thanks to Tony Land and Divetech for helping out with first hands-on images produced by this exciting new offering from Nikon and Nauticam.
]]>

With back button focus you can pre-focus were you think the blenny will be and as long as your distance from your subject does not change you can fire off a shot every time the fish shows itself.
Similar to the scenario above, when shooting super-macro it can get frustrating if your lens is constantly hunting. One very useful technique is to pre-focus for the basic composition and magnification and then rock a little back and forth to achieve the sharpest focus. We call this “Lock It and Rock It!”. When the important area becomes sharp, you take the picture. Back button focus is the smart choice for this type of shooting. You can concentrate on composition, rock back and fourth to achieve sharp focus and take a shot whenever you like. You will need to be able to see when your subject is in focus, so an enhanced viewfinder can help with this technique.
Back button focus can also make for faster compositions. We know taking images with your subject dead center in the frame is usually not the most flattering. We can move the auto focus points around in the viewfinder, but this method is usually slower than focusing with the center focus point and then recomposing. If using an index finger focus, you have to refocus, half press and recompose for each additional shot. With back button focus you only need to focus once. As long as the distance from the subject does not change you can fire away at will.

For super-macro you can pre-focus for the basic composition and magnification and then rock the camera a little back and forth to achieve the sharpest focus.
First, if you're planning to use back button focus underwater, make sure your housing gives you easy access to the back focus control and shutter control with your thumb and index finger at the same time. Thankfully the Nauticam engineers have designed easy to use levers on most housings for back button compatible cameras. If the two controls are still a bit of a reach, you can swap out the standard handles for smaller ones. Next, we need to disable the focus function from the shutter release. This will vary slightly depending on camera make and model, but the setting should be found in your custom control menu. After focus is disabled, the camera will meter with a half press of the shutter button and take an image with a full press. If you have a dedicated back focus button, you're ready to start shooting. If not, you will need to program one of the buttons on the back to meter and focus. Make sure this is the same button on your camera that corresponds to the correct control on your housing. This would also typically be found in the custom control menu, but I would suggest doing a search on your particular camera model on how to set up back button focus.
Because the camera will stop focusing any time you are not pressing the thumb button, I typically leave my camera set to [AI Servo] or [AF C]. That way, if you want to continuously focus, just keep your thumb pressed down. You can stop focus anytime by releasing your thumb. You can take photos at any time with the shutter button, regardless if you are holding down the thumb button or have it released. With camera lenses equipped with full time manual focusing like the Canon 100mm macro L and Nikon 105mm macro, you can install a manual focus gear and have manual focus whenever you are not pressing the thumb button.

Back button focus can also make for faster compositions. Focus on your subject using a center point, release your thumb and recompose.

M67 Double Flip Holders with SMC-1 and SMC-2
Flip holders are extremely convenient and are an excellent choice when using one or two macro lens like the CMC-1 and CMC-2 or the SMC-1 and SMC-2. Reinforced single and double flip holders are also available for the MWL-1. When using the double flip, the MWL-1 Macro Wide Angle Lens can be exchanged quickly for the CMC-1 or both can be flipped out of the way to use the original 60mm lens by itself. Flip holders are available for most Nauticam interchangeable macro ports and compact housings. M67 and M77 flip holders feature adjustable positioning pins that prevent the assembly from rotating on the front of the port. The lenses are placed at the optimum position relative to the port and are held in place by a secure locking mechanism that can be quickly released with the easy to reach tab.

Double Flip Holder for MWL-1 with MWL-1 and SMC-2
The Nauticam Bayonet Mount is the most versatile, working with all of the Nauticam wet-mount optics. Lenses are fitted with Bayonet Mount Adapters that mate with the Port Adapter that is secured to the front of the flat port with a custom lightweight tool. The lenses lock into place with a simple clockwise quarter turn and can be removed just as easy by depressing the release tab and turning the optic anti-clockwise a quarter turn. Bayonet mounts allow for clean unobstructed strobe positioning close to the port with or without the accessory lens attached. The Bayonet Mount Converter attaches to the port and is available in several sizes based on the threading of the port. There are also several compact ports with built in converters. There was an update to the design with the release of the WWL-C and the new adapters feature the Bayonet Mount II designation. The updated mounts are easily distinguished by a blue release button compared to the legacy versions that have a red release button. The WWL-C and future lenses will require the updated converter. All older lenses with integrated Bayonet Mounts as well as removable mounts are compatible with the new style. The second part of the Bayonet system is the Bayonet Mounting Ring which attaches to the optic. This comes preinstalled on the WWL-1 and MWL-1 and is integrated into the WWL-C and EMWL optics. To use an SMC or CMC series lens with the Bayonet Mount system you will need a Bayonet Mount Adapter (83214) into which the lens is threaded. Storage of the removed lenses, such as switching between a CMC and the WWL-1 can be attached to a Bayonet Mount Holder. These come in various forms for attachment to standard or carbon float arms.

M67 Bayonet Mount Converter II with EMWL
The WWL-1, SMC and CMC lenses can be threaded directly or with an adapter to some M67 ports. It is a good idea to burp your wet lenses after you enter the water to dislodge any air bubbles between the port and lens. If you decide on direct mounting, make sure you are comfortable removing and attaching the lens underwater.

Bayonet Mount Converter, CMC-2 with Bayonet Mount Adapter and WWL-1
Wet lenses offer us more creative shooting options on a single dive. Having the right mounting solution can help you switch between setups with ease.
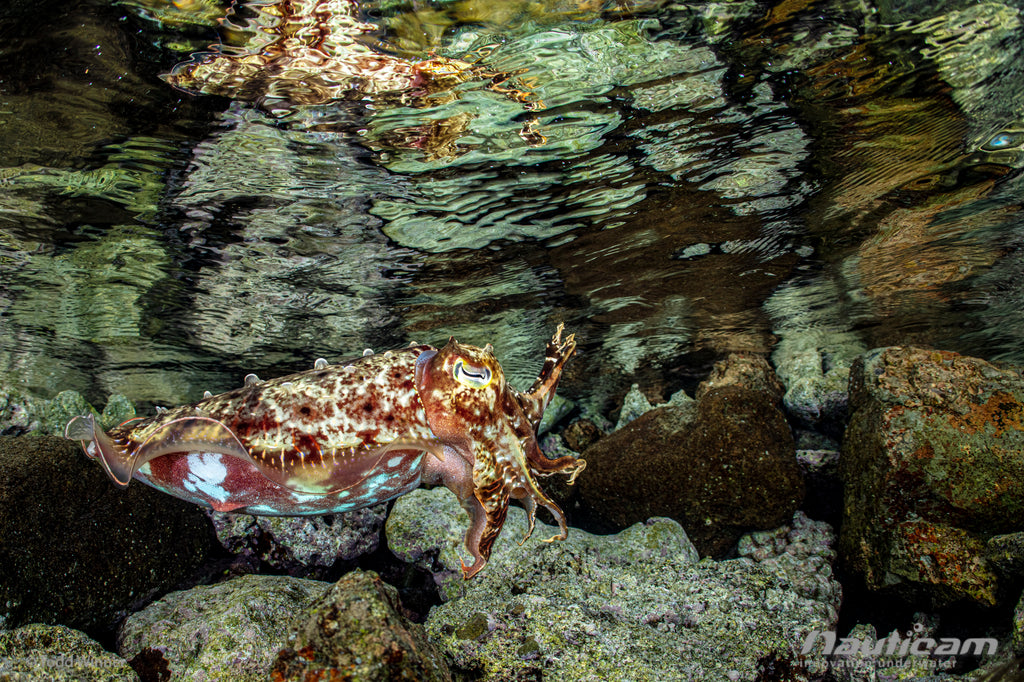
Canon EOS 5DS R, EF28-70mm at 38mm, WACP-1, 1/50 sec, f/8.0, ISO 320

This image shows the pincushion distortion, magnification and reduced field of view when shooting through a flat port.
The solution for many of these problems was to use a dome port. A dome port doesn't refract light as it passes from water to the airspace inside the dome, solving the magnification issue. Wide lenses retain the same field-of-view angle they have in air. Dome ports have much less chromatic aberration and pincushion distortion than a flat port would have, but the issue of corner softness remains (and in some cases can be quite extreme).
Underwater, a dome port acts as an additional lens element. This lens creates a virtual image of the subject that is smaller and much closer to the camera than the actual subject. The first challenge is that the camera lens must be able to focus close enough to capture the virtual image, but this isn't a common problem with big domes and close focusing DSLR lenses. The issue that can be harder to overcome underwater is that the virtual image is curved. The portions of the subject that are near the edges will appear to be closer to the camera than the center of the subject. When focused at the apparent distance of the center of the image, the corners (that appear closer to the camera) can fall outside of our depth of field range (and out of focus). This is why a smaller aperture improves corner sharpness - it increases depth of field!

This diagram shows the light at an angle being refracted as it enters the air space behind the flat port.
 |
 |
| Canon 5DMK IV, EF28mm, WACP-1, 1/200 sec, f/14, ISO 160 | Canon 5DMK IV, EF28-70mm at 28mm, WACP-1, 1/200 sec, f/16, ISO 100 |

Nikon D850, 28-70mm at 28mm, WACP-1, 1/100 sec, f/10, ISO 400
Our goal is to build the very best underwater imaging systems possible. There are lots of great camera choices available, and Nauticam housings for them provide an extremely reliable, ergonomic, and user friendly experience. Our lens port configurations, using the same "old" technology as the rest of our industry, became a glaring performance bottleneck.
Water contact optics like the WACP-1, wide angle conversion port, are not a new concept. Some of the last serious development of underwater corrective lenses was in the late 1940s and early 1950s by Dmitri Rebikoff. Nikon produced dedicated film rangefinder and SLR lenses (Nikonos and Nikonos RS Series) for use in water in more recent times, but modern development was long overdue. Nauticam rose to this challenge.
The WACP-1 is a conversion lens with in water correction. Simply put, it converts an off the shelf lens to be wider and corrects it for in water use. The lens was designed for large, high resolution image sensors. It is compatible with both video and still photo systems. With compatible lenses, WACP-1 increases field of view dramatically, increases center sharpness, dramatically increases corner sharpness, and improves contrast. The combination has excellent overall image quality - even at open apertures.


The WACP-1 can be used with multiple camera systems. It is designed for use with lenses 28mm (full frame equivalent) and narrower. Many prime lenses are available to choose from, but it is also compatible with a number of zoom lenses. WACP-1 is a wide angle conversion in front of an existing camera lens, allowing autofocus, image stabilization, and electronic aperture control from the body to be utilized.
WACP-1 has a conversion factor of 0.36x, meaning it widens the field of view of the lens you put it in front of. A 28mm lens that normally has a field of view of 75° is equivalent to a Full Frame 10mm with 130° field of view when used behind WACP-1. 130° is significantly wider than the field of view possible with ultra wide zooms, but not so wide as to introduce extreme fisheye distortion that can be distracting.
 |
 |
| Canon 5DS R, EF28-70mm at 28mm, WACP-1, 1/100 sec, f/10, ISO 320 | Canon 5DMK IV, EF28-80mm at 28mm, WACP-1, 1/100 sec, f/8.0, ISO 640 |

Nikon D850, 28-70mm at 35mm, WACP-1, 1/60 sec, f/10, ISO 320
Zoom range is another extremely valuable feature. Compatible zoom lenses offer 2.5x-3x zoom range. This is a much wider range than typical wide angle zooms offer, providing a zoom range that covers ultra wide, midrange, and closeup perspectives in one lens.
Below are some of the best zoom lenses for the WACP-1. For a full list of compatible lenses please go to the Port Charts page and click on the WACP-1 link.
Nikon |
Canon |
Sony |
|
Full Frame |
Full Frame |
Full Frame |
|
Nikon AF 28-70mm f/3.5-4.5D |
Canon EF 28-70mm f/3.5-4.5 II |
Sony FE 28-70mm F3.5-5.6 OSS |
|
APS-C |
APS-C and Super 35 |
|
|
Nikon AF-S DX NIKKOR 18-55mm f/3.5-5.6G VR II |
Sigma 18-35mm F1.8 DC HSM | A Canon EF-S 18-55mm f/3.5-5.6 IS STM |

The WACP-1 can focus close. How close? A subject touching the front glass element! That opens a lot of opportunities for creative close focus, especially when combined with a zoom lens. Anyone who has tried lighting a subject that close knows it can be challenging. Large domes tend to cast a shadow. The WACP-1 is actually quite small - the front element is only 145mm. That makes it easier to light close subjects. It ships with an attached buoyancy collar which adds bulk to the lens, but makes it easier to handle underwater. It can be removed if you want a smaller setup, but I don’t recommend that for most users. It can be a bit tricky to reinstall and the lens is pretty negative underwater without the collar. Fisheye lenses can also focus close to the dome, however they usually don't require extension rings. This can often make the housing itself an impediment to getting the most effective strobe position. The added length of the WACP has the added benefit of solving this issue, giving more space around the port to get exactly the right lighting angles.

Great video is about storytelling. Getting wide, medium and tight shots of a subject can help put it all together. A WACP-1 with a zoom lens allows you to get those shots on a single dive. Because the WACP-1 retains sharp corners at wider apertures, footage can be shot at a lower ISO. This produces cleaner images with less noise. The Sigma 18-35mm F1.8 DC HSM | A is an extremely fast and versatile lens to use on super 35 sensor cameras. We make a dedicated version of the WACP-1 (85202) specifically for this lens that includes the necessary extension ring and a float collar.
Nauticam Wide Angle Conversion Port (WACP) Showreel from Nauticam on Vimeo.
Raja Ampat with the Canon C200 in Nauticam NA-C200 and WACP from Hergen Spalink on Vimeo.
The WACP-1 ships with a very nice padded bag. This can be used for extra protection inside a checked bag or as a carry-on. I typically pack mine into a Think Tank, Pelican or similar case. I feel that it is easier to travel with and takes up less room than the 230mm dome and extension rings needed for a 16-35mm.

Cost is something that often comes up when someone is considering the WACP-1.
Let’s compare setups from Canon, Nikon and Sony.
 |
 |
 |
 |
|
|
|
|

Canon EOS 5DS R, EF28-70mm at 70mm, WACP-1, 1/200 sec, f/13, ISO 160

Nikon D500, Nikon 18-55mm @55mm, WACP-1, 1/50 sec, f/10, ISO 100
For a full list of compatible WACP-1 lenses please go to the Port Charts page and click on the WACP-1 link.
If you have questions on these or any other Nauticam products, please contact us here.]]>text and video by Hergen Spalink
The Z Cam E2 cinema camera delivers jaw-dropping specs with an equally jaw-dropping price point in an incredibly compact package. The Nauticam NA-E2 housing for the Z Cam E2 is the smallest cinema camera housing ever produced yet still achieves full access via intuitively placed controls to all the E2 camera functions.
The following video was filmed over several days in Indonesia's Raja Ampat region. A discussion of the camera, housing and the shooting experience are below.
The E2's form factor will be familiar to cinema camera users but may be a bit strange to those coming from a hybrid or DSLR system. Essentially, the E2 is a sensor and processor in a cube with a lens mount, 9 buttons, a tiny LCD display and a variety of connection points. This design approach means that the E2 must be used with an external monitor such as a SmallHD 502B or Atomos Ninja V but allows for an extremely compact package. The NA-E2 has full HDMI 2.0 support with an M28 bulkhead as well as M16 bulkheads for HDMI 1.4. This small form factor, combined with the threaded mounting points and removable handles on the housing, open up the NA-E2 to a variety of confined space or remote usage scenarios.
|
Top threaded mounting area |
Bottom threaded mounting area |
The recording media for the E2 is either an on-board option via a single CFast 2.0 card slot or externally via USB-C connection to a T5 SSD. In either case, the camera's recording options are what really set it apart. The E2 is capable of recording up to 160fps in H.265 or at 60fps in either ProRes 422 or the proprietary partial debayer ZRAW format.
For this video, as the manipulation of ZRAW files can only be accomplished via a standalone program, we filmed all wide-angle footage exclusively in ProRes 422 at a variable frame rate of 60p with a 30p project timebase. The biggest benefit to ProRes, aside from the high quality of the video, is that the lack of strong compression means that the footage will play back quickly on even moderately powered laptops which is what most underwater image makers are working with in the field. To access the higher frame rates requires recording with H.264 or H.265 compression. The macro in this case was recorded in 120fps with H.265 compression. This footage does not play back as well on laptops so we created optimized media when working with it.
The ability to work with higher frame rates, above 30p, allows for dramatic slowdown of the footage. For the macro footage, not having to use a tripod to achieve stable footage makes getting the shot a lot less disruptive to the environment. When shooting at 120fps and displaying in 30p, a 3 second clip of a blue-ring octopus can become a 12 second clip in your timeline and also appear smoother and more cinematic. For those unfamiliar with cinema cameras, shooting at higher frame rates is achieved through VFR or Variable Frame Rate. The Project Timebase is chosen first, which is what your timeline will be in your Non-Linear Editor (24p or 30p for example). The VFR is then set to the frame rate you wish to film at. When added into your NLE, these clips will playback at the project timebase frame rate with no need to change the clip speed.
The controls of the E2 can be customized and individual camera functions assigned to each button. In our case, the forward three buttons were mapped to control AF, WB, and Aperture. Atop the camera (and housing) are the UP and DOWN controls which, after pressing the WB or Aperture button allow for changing of the value.
|
Assignable buttons F1, F2, F3 on the front right side |
Menu, UP, DOWN, and OK buttons on the top. |
The camera is capable of achieving a custom white balance in which the camera is shown a white surface and adjusts color temperature and tint appropriately or the value for each can be entered manually with degrees Kelvin from a value of 2400K to 30,000K and a tint value of -100 to +100. Custom white balance is achieved by assigning the White Balance control to one of the custom buttons. By pressing and holding the button, the camera is ready to be shown the reference slate, after which it will set the white balance and tint.
For this video, we used the Panasonic 8-18mm lens with the Keldan SF2 Spectrum Filter along with two Keldan 8x 13,500 CRI92 LED video lights outfitted with the AF6B ambient filters. This worked well with the E2, as the camera features a dual native ISO function, which means that there are similar noise and dynamic range levels for two different ISO settings, one low and one high. As the SF2 removes 2 stops of light, being able to film at a native ISO of 2500 was helpful to compensate for this lost light without significant penalty. We did find that we were driven, as a result, to use a less-preferred 360º shutter as opposed to 180º to maintain our preferred apertures.
With the Micro Four-Thirds (MFT) lens mount, the E2 can take advantage of the large array of open-source lenses this standard affords. With Nauticam's N85 system for MFT lenses, a wide variety of recommended configurations are available for different lenses. Additionally, via the Canon EF Lens to Micro Four Thirds Speed Booster and the Nauticam N85 to N120 adapter, those working with Canon EF-mount lenses and their corresponding N120 port configurations can use these same setups on the NA-E2 with the added benefit of an 0.71x wider field-of-view and an additional stop of maximum aperture.

Nauticam's line of water contact optics is a natural extension of the NA-E2. With lenses such as the Panasonic LUMIX G VARIO 12-32mm F3.5-5.6 ASPH. MEGA O.I.S and the WWL-C, the camera achieves 130º field-of-view with essentially 0" minimum focus distance and the full zoom through capability of the lens. When using the WWL-1, there are even more supported lens options. Both the WWL-C and WWL-1 provide exceptional image quality in a compact and in-water changeable optic. For macro, adding the CMC-1 to the already 1:1 capable Olympus M.Zuiko Digital ED 60mm f2.8 Macro lens allows for the capture of subjects just 8.5mm across.
]]>


 ]]>
]]>

Olympus TG-6 and WWL-C
The WWL-C was developed as a smaller and lighter water contact wide angle lens tailored specifically for compact camera and some micro-four third and APS-C lenses. Its wet lenses design offers tremendous versatility when paired with a compatible lens. With the addition of an SMC or CMC both macro, super macro and wide angle are available to the underwater photographer on the same dive. These lenses are completely engineered for use in water, providing the highest image quality available today in a wet mount optic. The Olympus TG-6 with the PT-059 housing can also use the WWL-C with an optional adapter.

Sony a6600, 16-50mm F3.5-5.6 and WWL-C
Delivering a stunningly sharp 130º field-of-view with 24mm equivalent lenses, the WWL-C also features zoom-through capable optics.** The WWL-C features a pre-installed metal buoyancy collar and a non-removable metal dome shade.
**= not all camera configurations support full zoom-through

Sony RX100-V and WWL-C
The WWL-C also features an updated quick-release Bayonet Mount. Lenses that feature the new Bayonet Mount II will not be compatible with the previous Bayonet Mount adapters. All Bayonet Mount lenses will be compatible with the new Bayonet Mount II adapters without modification.
Please see the latest WWL-C port chart for compatibility. Port Charts

Olympus TG-6 and WWL-C

Sony RX100-V and WWL-C
]]>
Sony a6600, 16-50mm F3.5-5.6 and WWL-C
We recently had a chance to test the a6600 in the NA-A6600 housing equipped with the Sony E 16-50mm F3.5-5.6 PZ OSS lens and WWL-C. This combination is proving to be incredibly versatile. That lens can also accommodate the CMC-1 and CMC-2 macro lenses. So both macro and super wide angle optics are available to the underwater photographer on the same dive! The WWL-C and 16-50mm provide over a 100 degree diagonal field of view at 17mm with full zoom all the way through to 50mm!
Sony a6600, 16-50mm F3.5-5.6 and WWL-C

Sony a6600, 16-50mm F3.5-5.6 and CMC-1
The a6600 is the best APS-C camera Sony has made to date. It has a nice solid construction and feel. With 3 custom programmable buttons and an in-depth menu, it is easy to program the camera for your individual needs. Please stay tuned for more images coming soon from the WWL-C as well as the CMC-1 and CMC-2!
Sony a6600, 16-50mm F3.5-5.6 and WWL-C

Sony a6600, 16-50mm F3.5-5.6 and CMC-1
 Sony a6600, 16-50mm F3.5-5.6 and WWL-C
 Sony a6600, 16-50mm F3.5-5.6 and CMC-1
Panasonic's full-frame S series of cameras follows a trend that is becoming more and more common of creating several versions of a camera model that meet the ever more diverse needs of the modern image maker. With the S1, a full-frame mirrorless system that is built around the Leica-designed L-mount, Panasonic has to-date released or announced three separate versions. Bearing the unmodified moniker, the S1 is squarely aimed at the hybrid shooter with equally capable 4K 60p video and 24.2MP photo specs. Sharing the same body, the S1R is the 47.3MP high-resolution photo-centric sibling. Announced but not yet released is the S1H which features 6K video recording and is clearly going to appeal to the video shooter.
While the S1H has the most impressive video specs, the S1 can record UHD 4K from a Super35 crop of the sensor at 60p with 4:2:0 chroma subsampling and 8-bit color depth. When paired with a supported external recorder such as the Atomos Ninja V, the S1 will output up to 10-bit 4:2:2 4K at 60p*.
The benefits of using an external recorder are three-fold. In addition to having an a super-bright 1000nit 5" HDR screen and higher color resolution recording, you also get to capture your footage in edit-friendly ProRes or DNxHR format.
The NA-S1R housing, which supports both the S1 and S1R bodies, is equipped with the M28 bulkhead for the HDMI 2.0 cable system. This pass-through configuration allows for the transmission of the full 4:2:2 10-bit 4K at 60p to the NA Ninja V housing.
The video below is a combination of both internally recorded 4K 4:2:0 8-bit 60p H.264 footage and externally recorded 4K 4:2:2 8-bit 60p ProRes. Lighting is provided by a set of Keldan 8x CRI92 13,000 lumen LED torches using the refreshed AF-6B Ambient Filters. These ambient filters work in conjunction with a custom white balance to simulate the color of the available light at a depth of around 6m. Lenses were a mix of the Sigma 18-35mm F1.8 DC HSM | A behind the WACP, a Canon 16-35mm F2.8L III USM, and a Canon 100mm F2.8L IS USM Macro along with the Sigma MC21 EF-L adapter. The NA-S1R is designed to use either native L-mount lenses or EF-mount lenses with the MC21 adapter. When using the system with the MC21, the same port configuration can be used as on native EF-mount systems such as Canon DSLRs as the MC21 is contained within the housing.
]]>
Big-animal action is one of the areas of underwater imaging where mirrorless cameras provide a clear advantage with their ability to show a WYSIWYG rendering of the ever-present blue-water background. While you're still on the hook for nailing exposure of your foreground subject, you at least have a pretty good idea of what the background will look like before you press the shutter release.

Oceanic manta. F16, 1/200 at ISO 200, 28mm. WACP. The Dual Pixel AF of the EOS R helps nail focus on subjects as they rapidly change their distance to the camera.
The Canon EOS-R features a full-frame 30MP CMOS sensor and Canon's amazing Dual Pixel autofocus. The EVF is a 3.69M Dot OLED that features some very intelligent display processing. While most EVF equipped cameras have an Exposure Preview style setting, when working with external flashes the foreground will often appear too dark to allow good composition management. A workaround for Sony cameras was to assign the ability to disable the exposure preview to one of the many custom buttons. After using the Exposure Preview to dial in the ambient exposure of the image (the background), disabling it allows you to compose the foreground subject and make sure focus is correct. With the EOS-R, the Exposure Preview can be momentarily disabled for a preset duration with a half-press on the shutter enables the metering system. This makes nailing foreground composition and background exposure possible without any added button pressing.

This setting is in the Shooting Menu (the camera icon)>Tab 3>Metering Timer
The NA-R housing can be used with either the newer R-mount or more prevalent EF-mount lenses with one of Canon's various EF-R adapters. The adapter is contained within the housing which means those users who either also have or are moving from another N120 Canon DSLR system can use the same port and extension configurations for both systems.

White tip reef sharks on a ledge. F6.3, 1/80 at ISO 200, 28mm. The WACP has excellent corner sharpness, even at F6.3 as compared to a standard lens and dome port combination which, combined with a 0" minimum focus distance allows for creative use of depth of field.
The WACP or 0.36x Wide Angle Conversion Port is a natural fit for capturing great pelagic action. With full zoom-through and extreme corner sharpness even at wider apertures, the WACP is perfect for the variety of both subject size and available light conditions you find in Socorro.

White tip reef sharks. F5.6, 1/125 at ISO 200, 80mm. The full zoom-through of the WACP allows capturing establishing, medium and tight shots of a subject with a single lens.
When snorkeling and freediving with fast-moving mobula ray schools in Cabo San Lucas, the low profile of the WACP makes it easy to get into the right position and move quickly with your subject.

Mobula rays. F22, 1/160 at ISO 400, 28mm. High aperture and a moderately fast shutter speed creates a pleasing sun and freezes the fast moving school of rays.
Below are some additional images, all captured with the Canon EOS R with the WACP in the NA-R housing.

Galapagos shark. F16, 1/200 at ISO 200, 28mm.

The Boiler. F6.3, 1/100 at ISO 200, 28mm. Being able to use wider apertures allows for good foreground separation.

Bottlenose dolphins. F8, 1/125 at ISO 1600, 28mm. Dual Pixel AF and good higher ISO was essential for the often challenging light conditions in Socorro. This was a cloudy early morning dive.

Silvertip sharks. F8, 1/80 at ISO 400, 55mm. When sharing a scebe with multiple photographers, being able to zoom in is invaluable.

Yellowfin tuna. F8, 1/125 at ISO 400, 28mm.
]]>The camera's lens and image sensor also remain the same but the LCD screen on the back gets a major upgrade with a 1.04 million-pixel HD resolution LCD. That is over twice the resolution of the LCD screen on the TG-5. Focusing, image review and even reading the menu is now sharper and easier. In addition to the new LCD, several menu functions have been added. Despite there is still not being a full-manual exposure mode, we have much more control over the pervious model.

Blenny, TG-5 + CMC-1, aperture priority f/18, 18mm
The Nauticam NA-TG5 housing and accessories are fully compatible with the new Olympus TG-6. The cameras are rated to be waterproof down to 15m/50ft without a housing, but with the Nauticam NA-TG5 housing, it is capable of producing images all the way down to a whopping 100m or 330 feet! This makes it ideal for technical divers, rental fleets or anyone looking for great image quality in a small portable system. To really take advantage of the new LCD screen you can add an LCD magnifier (25106) and attachment rails (25123). The magnifier features a dioptric adjustment so you can adjust it to your individual eye sight. The Ring Diffuser (38025) allows shooters to take advantage of the TG-5 and TG-6 microscope modes by providing a ring flash diffuser for the internal flash that delivers even lighting, even when working up close.
The NA-TG5 features an M52 threaded port. Our M67 lenses like the WWL-1 and CMC-1 can be used with the Nauticam M52 to M67 adapter (38024). The Wet Wide Lens, WWL-1, gives up to 130 degrees of wide angle coverage with incredible sharpness and contrast. It also offers full zoom through between 28-100mm equivalent focal lengths.

Banded shrimp, TG-5, aperture priority f/18, 18mm
The most exciting feature of the TG-6 is the new super-macro focusing modes available in the quick menu. We now can focus as close as we could in microscope mode without ever leaving aperture priority. There is still a microscope mode on the TG-6 but like the previous model when you switch to that mode you cede control of the aperture to the camera. TG-5 users can stay in aperture priority and use the CMC-1 to achieve exceptional macro results. You won’t get as much magnification as microscope mode or the super-macro focusing on the TG-6 but you will have more control of your background.

Octopus hunting, TG-5, aperture priority f/13,1/50, 8.99mm. With the new TG-6 we can now set a minimum shutter speed to avoid the motion blur we see in the arms.
With the TG-6 we can now set a minimum shutter speed with settings as fast as 1/500. This gives us even more control over the background compared to the TG-5. To use the new minimum shutter speed settings you do need to be in auto ISO but you can cap the higher limit to ISO 400.

Pike blenny, TG-5 + CMC-1, aperture priority f/18, 18mm
There are several new video upgrades. 4K video can now be shot in aperture priority mode and with the super macro focusing mode we can finally shoot 4K super macro with a TG series camera. For wide-angle shooting, there are three new underwater white-balance presets for shallow, mid and deep water as well.

Oxynoe antillarum, TG-5 + CMC-1, aperture priority f/18, 18mm
Overall the TG-6 offers some fantastic improvements to an already exceptional camera. The Nauticam NA-TG5 offers users durability and features typically only found on higher end DSLR and mirrorless systems.
]]>
The HDMI 1.4 standard allows for transmission of frame rates up to 30p at 4K resolution with the highest quality settings and has long been supported in Nauticam housings using the standard HDMI bulkhead and monitor housings such as the Nauticam Atomos Flame for the Atomos Ninja Flame and Shogun Flame/Inferno monitor/recorders. With cameras such as the Panasonic GH5 offering DCI 4K output at a 60p frame rate, the HDMI 1.4 standard is not capable of handling the bandwidth for the signal with full color-rendering quality.
The HDMI 2.0 standard is capable of supporting faster 60p frame rates at DCI 4K resolution with 10-bit color and 4:2:2 chroma subsampling. The Atomos Ninja V and Shogun Inferno monitor/recorders, when matched with supported cameras can record this 4K 60p 4:2:2 10-bit video in a variety of formats. ProRes RAW recording from the Nikon Z7 and Z6 is currently under development as well for the Ninja V.

|
 |
To harness this jump to HDMI 2.0, Nauticam has redesigned its HDMI interface. The system is built around the new end-to-end HDMI 2.0 cable. With HDMI 1.4, there were fittings at the bulkheads from which a separate cable was used inside the camera and monitor housings to go from the bulkhead to the camera or monitor. With the Nauticam HDMI 2.0 cable system there are no longer fittings at the bulkheads, there is a continuous connection from camera to monitor. The NA-Ninja V housing therefore ships without an included cable. The appropriate length and connector-type cable must be selected based on the camera that will be used. This continuous cable will help to insure signal fidelity from camera to recorder. To support these new cables, we've developed the larger bore M28 bulkhead.

The standard HDMI 1.4 bulkhead on the left and the new M28 continuous HDMI 2.0 cable on the right
The list of currently supported housings and their highest quality output specifications are below:
| Camera Model | Resolution | Frame Rate | Chroma Subsampling | Bit Depth |
| FujiFilm X-T3 | DCI 4K | 60p | 4:2:2 | 10-bit |
| - | ||||
| BlackMagic Pocket Cinema Camera 4K | HD | 60p | 4:2:2 | 10-bit |
| - | ||||
| Panasonic GH5S | DCI 4K | 60p | 4:2:2 | 10-bit |
| - | ||||
| Olympus OM-D E-M1X | UHD 4K | 30p | 4:2:2 | 8-bit |
| - | ||||
| Nikon Z7/6 | UHD 4K | 30p | 4:2:2 and ProRes RAW* | 10-bit |
| - | ||||
| Panasonic S1 | 4K | 60p** | 4:2:2 | 10-bit |
*=planned future release
**=requires a paid firmware update to be released in July 2019
The NA-GH5 and NA-Z7 housings feature the M16 bulkhead which supports an HDMI 1.4 connection. To support the new HDMI 2.0 connection, Nauticam is producing the NA-GH5V and NA-Z7V housings that feature the larger-bore M28 Bulkhead.

Nauticam Ninja V Underwater Housing & Atomos Ninja V: First Look & Installation Guide from Nauticam on Vimeo.
Nauticam NA-GH5SV and Ninja V, by Cristian Dimitrius from Nauticam on Vimeo.
]]>
BMPCC4K_underwater_test from vance burberry on Vimeo.
As a professional cinematographer I am always evaluating new camera technology and tools that help expand my creative process. I have been filming for over 32 years, working mostly on land but also choosing to specialize in underwater imaging, having been diving for 40 years and a certified NAUI Instructor Trainer for 20.
The cinematography world is very demanding with overly ambitious schedules and tight budgets. Working underwater greatly magnifies those pressures. In my career I've filmed everything form feature work to music videos, commercials and documentaries, both on land and underwater.
I have a partnership in a Nauticam Alexa Mini Housing with the shop where I am an instructor in Los Angeles. It’s an incredibly wonderful system, that is beautifully designed. The quality of the Alexa camera's images is exceptional but the size and complexity of this camera system means setup time can be a burden on already tight schedules also the operating costs are fairly high. Because of this, I have long been hoping for a more compact solution that captures beautiful images of similar quality. Enter the Blackmagic Pocket Cinema Camera 4k and the Nauticam NA-BMPCCII.
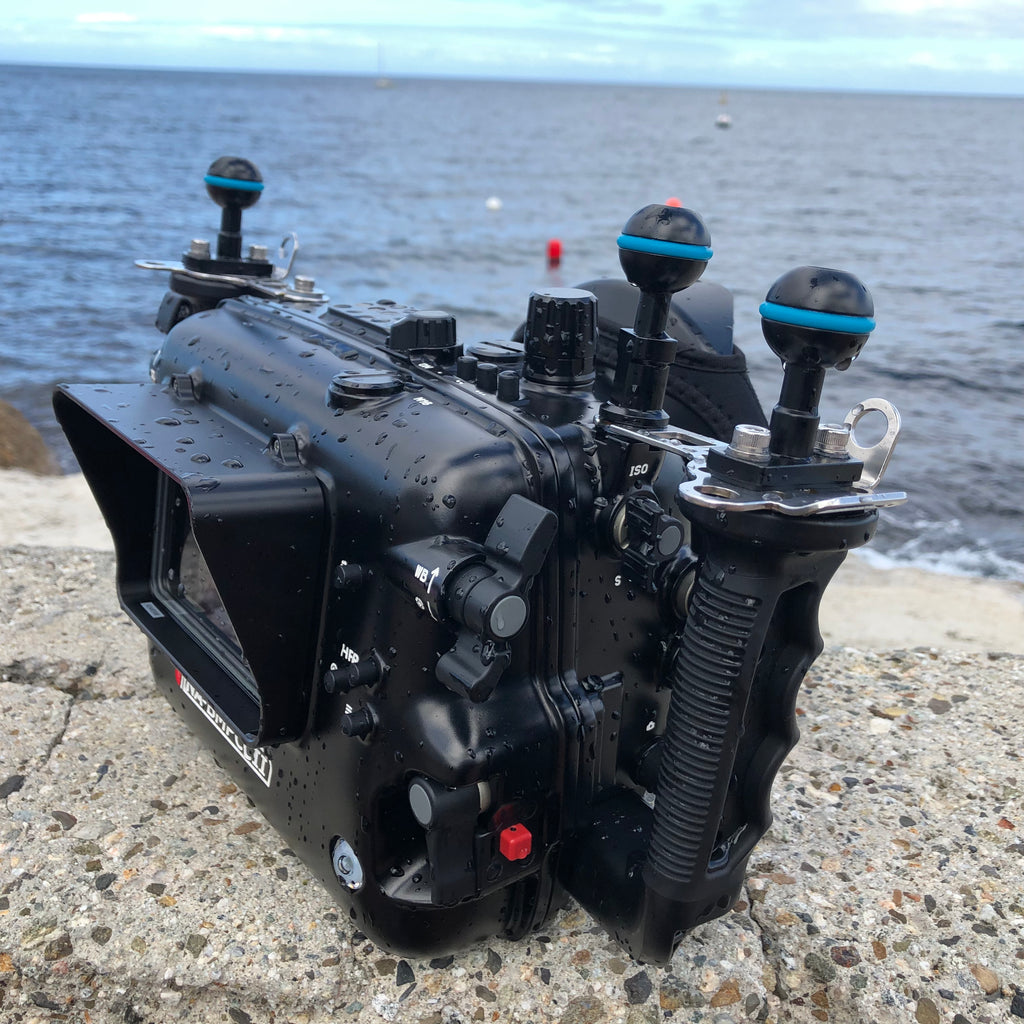
I was fortunate to be able to test a pre-production version of the new Nauticam NA-BMPCCII housing on Catalina Island, California.
I was blown away by the results, finding the NA-BMPCCII with the BlackMagic Pocket Cinema Camera 4K to be an underwater system that fits seamlessly into the professional cinematography toolbox while still being compact, efficient and incredibly cost effective.
The NA-BMPCCII housing, like all other Nauticam products is beautifully designed and engineered. Having owned several Nauticam housings for a variety of cameras, I've found the quality to be consistent across the board including the new NA-BMPCCII. The overall layout of camera controls, the built in external power supply and the internal mount for a Samsung T5 SSD drive highlight the amount of consideration for the underwater shooter's needs that goes into the design.
The test was for a week but weather and water conditions were a challenge throughout. Regardless, I was able to get it in the water during a trip out to the dive park at Casino Point in Avalon on Catalina Island California. Conditions were poor but testing proceeded. I had preset the camera recording format settings during my prep session before my trip. Some formatting settings need to be set beforehand as the touch screen is not accessible underwater. This is not an issue at all as most professional cameras require a similar approach. As I only had access to one N85 dome port for the test, I used a 7-14mm Panasonic Lumix F4 lens with manual focus control. Although the NA-BBMPCCII gives you have easy access to the auto focus of the camera, I personally prefer manual focus as it’s still the standard in the professional cinematography world. Prior to entering the water and throughout the dive, the vacuum system confirms the water-tight integrity of the housing which gives great peace of mind, knowing your camera is secure from water damage due to leaks.
Dropping to about 30' and just hovering a 3 or 4 ft from the bottom, I wanted got a feel for working with the various controls, starting with white balance, a critical element underwater. A lever near the right handle opens up the Color Temperature Menu, which is navigated by a neighboring control wheel below the shutter. For these conditions, I set the camera to a color temperature of 8000k. If you have a white-balance card, pressing and holding the control will create a custom white balance. Tapping the white-balance control lever again exits the menu and the control reel returns to controlling the lens iris, if using electronic lenses.
I had preset the high frame rate on the camera to 60fps to facilitate smooth slow motion for a project setting of 23.98FPS. A dedicated HFR button allows quick switching between the different frame rates. On the other toggle of the white balance thumb lever, you can access the shutter angle. The shutter angle is managed in the same was as white balance, using the control wheel. Precise and simple as I've come to expect from my Nauticam housings.
Custom function buttons (of which there are 3), momentary auto-iris, momentary auto focus, zoom for manual focus, still shooting, camera run/stop, and very critical, ISO adjustments. Everything is clearly marked and easily accessible from outside the housing by a combination of dials, buttons and levers. Within five minutes I'd found committed to memory where everything was just by feel, a testament to the thoughtful design of the housing.
The housing was very well balanced with a very slight negative buoyancy which I prefer. Over the years, I have developed a light touch with the camera to allow for precise control. The well balanced feel of the setup made it feel like the larger cinema camera housings I've become accustomed to in terms of the ease of maintaining stability throughout a shot. Impressive for such a compact underwater system. The NA-BMPCCII was a joy to shoot with, moving through the kelp and terrain and while being able to make adjustments quickly and easily was a dream, especially in what were quite challenging conditions. The housing performed incredibly well and I could not be more pleased and am anxiously awaiting one of my very own. I will have a camera system that can not only be easily taken anywhere to shoot with for fun, but also will serve as another valuable tool in my professional toolbox.
To sum up, the Nauticam BMPCC11 is a must have in my opinion, If you are a recreational diver who is simply passionate about underwater imaging or are a professional cinematographer the NA-BMPCCII is built for you. I believe this setup to be a revolution in underwater cinematography as now anyone can have access to the tools to shoot cinema quality underwater video.

]]>
These are definitely the best wide-angle photos I've ever taken...using a macro lens, that is.

The Macro to Wide Angle Lens 1 or MWL-1 is a wet optic that converts a 60mm full-frame equivalent macro lens into a 150º close-focus wide-angle lens. The optic is wet-mountable and the small diameter allows for getting low and close to enhance perspective.

For this test, the rig was an NA-Z7 housing with the Nikon Z 7 camera and Nikon AF-S Micro NIKKOR 60mm f/2.8G ED lens and the Macro Port 60. The MWL-1 was mounted, along with a CMC-1 on the M67 Double Flip for MWL-1. Strobes were two Sea & Sea YS-D2 and the housing's standard Nauticam Flash Trigger for Nikon.

As the macro capabilities of the Nikon 60mm are pretty well documented I decided to focus on wide-angle. Below is a quick demonstration of the range that can be captured with the MWL-1/60mm/CMC-1 combination.
 |
 |
 |
| 60mm and MWL-1 | 60mm | 60mm and CMC-1 |
For standard scenic images, lighting was not a challenge. The optic adds some length to the system which combined with the 150º field-of-view means the strobes can sit slightly ahead of the handles as opposed to standard fisheye lighting. The small diameter meant less chance of casting shadows on the foreground with larger subjects or scenics.


For close-focus wide-angle shots, lighting the subject without causing shadows from the dome shade or over-exposing everything surrounding the subject requires some odd placement as the MWL-1 will focus almost on the front glass element. The double flip also slightly limits strobe positioning in the 10:00 and 2:00 positions depending on your chosen orientation. The technique below I've used with other wide-angle lenses in the past but always above the level of the lens, especially in poor visibility, but after much trial and error this proved to be the best way to isolate the subject.

 |
 |
When the strobes are placed in a more standard forward-facing orientation, despite lighting the subject well it also lights the surrounding area and causes hot spots to either side of the subject as well as increasing the possibility of backscatter in poor visibility.
 |
 |
When the strobes are placed facing each other and behind the lens, the subject is isolated. Strobe power level in both images is the same, highlighting the need for more strobe power when using this technique to compensate. The strobe position underwater can be more similar to the original white-background image above as the light has a greater beam spread in-water. Position was altered sightly for the demonstration images to highlight the effect; by angling the strobes up, a more natural top-to-bottom fall-off on the subject can be achieved.

The MWL-1 performs best at higher apertures such as F16 and above. Operating at higher apertures generally means using higher ISO, especially when working with natural light. The higher ISO capabilities and ability to easily disable the flash in the quick menu of the Z 7 was especially convenient when combining a natural light snorkel with a dive that required artificial light.

 |
 |
 |
The combination of the 60mm macro lens, the MWL-1, and the CMC-1 allows for capturing wide-angle, macro and super macro images on the same dive with a full-frame DSLR setup. The flip mount means switching between perspectives in simple and insures that positioning of the wet optics relative to the port is always correct. The small size of the MWL-1 means that when space and travel weight are at a premium, a system that can capture a wide variety of image styles with a single lens is now a possibility for the full-frame DSLR user.
While not necessarily a replacement for dedicated wide-angle lenses and ports, the MWL-1 is another tool for the underwater shooter's toolbox that will allow them to expand their creativity and versatility.
For a list of currently supported lenses see the MWL-1 Port Chart.
]]> 
MWL-1 with all three mounting options.
Nauticam's bayonet system, consisting of the Bayonet Mounting Ring for MWL-1 and M67 to Bayonet Mount Converter (83213) are included with the MWL-1. Simply attach the Bayonet Mount Converter to a compatible Nauticam 67mm port with the provided tool and you will be ready to shoot.

Nauticam's bayonet system is included with the MWL-1.
There are two available flip holders for the MWL-1, the M67 Flip Holder for MWL-1 (86221) or the Double Flip Holder for MWL-1 (86222). Other flip holders are not compatible. The MWL-1 can be quickly engaged, disengaged or even swapped for a wet macro lens, going from wide angle to super macro in seconds. Please note, not all lenses compatible with the MWL-1 are able to use wet macro lens. Please see the MWL-1 compatibility chart for more info. To mount the MWL-1 onto one of the flip holders, first remove the Bayonet Mounting Ring from MWL-1 and replace with the mounting ring that is included with the flip holders. Use the same screws to attach the flip holder mounting ring.

Double Flip Holder for MWL-1 (86222) shown with a SMC-2 on the lens.

M67 Flip Holder for MWL-1 (86221)
When using the bayonet system you may want to consider using a bayonet holder on your strobe arms. It is a convenient place to store your bayonet accessory when not attached to the lens.

Bayonet Mount Double Lens Holder for Arms (83223)
]]>The EOS R is Canon’s first full frame mirrorless interchangeable lens camera. It is built around a 30.3 MP Full Frame CMOS sensor similar to the 5DMKIV. The EOS-R uses the new RF lens mount. It features the same large 54mm diameter as EF lenses but the rear lens elements are much closer to the sensor, allowing increased corner and outer edge sharpness. The new RF lenses can also be more compact than equivalent coverage area EF-mount lenses. Canon also added more communication pins for expanded lens functionality. In addition to the native RF lenses, EF and EF-S lenses can be used with the Canon EF-EOS R adaptor or the EF-EOS R adaptor with control ring. The customizable adapter control ring can be assigned to various exposure settings including ISO. This control is accessible in the housing with an optional control ring gear (19561).

EF 100mm f/2.8L Macro IS USM and SMC-1, 1/200. f/18, ISO 100

EF 8-15mm f/4L Fisheye USM, 15mm, 1/200. f/10, ISO 100
The EOS R uses Canon’s proven Duel Pixel Auto Focus system. I found it to be one of the best performing mirrorless cameras for auto focus that I have used. The 4K video uses a 1.8 crop from the sensor, similar to the 5DMKIV. This often gets a lot of criticism in reviews but in actual shooting situations the video looks quite good. Unlike the 5DMKIV the EOS R is capable of using the EF-S lenses with an adapter so this opens up a lot of wide angle video options with the 1.8 crop. The EOS R can also output a 10 bit 4K UHD (3840 x 2160) 30p video signal over HDMI to an external recorder.

EF 100mm f/2.8L Macro IS USM, 1/200. f/11, ISO 100
The Nauticam NA-R underwater housing embodies Nauticam's drive for innovation. You have access to all essential controls and it is extremely ergonomic. I really appreciated the easy to use lever for switching between the EVF and LCD, a crucial and much used control with mirrorless systems underwater. For many, the EOS R is a move from a full-frame Canon DSLR. To support both the legacy and native lenses, Nauticam has integrated the NA-R into the N120 port system. Canon's EF to RF mount adapters can be affixed to the camera before insertion into the housing. When using the EOS R inside the housing with the adapter and a supported EF lens, the port and extension ring arrangement will be identical to the same setup on a Nauticam Canon N120 DSLR. As the RF lens lineup emerges, dedicated port and extension ring combinations will be listed on the Port Chart. Two lens release buttons, one for RF and one for EF lenses used with the optional Canon adapter, are located on the front of the housing to make lens removal through the port opening simple.

EF 100mm f/2.8L Macro IS USM and SMC-1, 1/200. f/14, ISO 100
Flash triggering is achieved via one of two optional Flash Triggers, a manual LED trigger (PN 26301) or a TTL Flash Trigger (PN 26321) that use the built-in fiber optic bulkheads with optional fiber-optic cables to trigger supported strobes. For controlling strobes that do not support fiber optic flash triggering, a variety of legacy hot-shoe flash control bulkheads are available. When using a manual trigger most cameras don't recognize that a flash is connected. Make sure not to increase your shutter past the maximum sync speed of 1/200 on the EOS R. Another control you may want to disable when using a manual flash trigger and shooting macro is exposure simulation, it is in camera menu 3. This will allow you to still see the image with typical macro settings but it will no longer give you an exposure simulation.

EF 8-15mm f/4L Fisheye USM, 15mm, 1/100. f/9.0, ISO 100

EF 8-15mm f/4L Fisheye USM, 15mm, 1/80. f/11, ISO 100

EF 8-15mm f/4L Fisheye USM, 15mm, 1/60. f/6.3, ISO 640
]]>


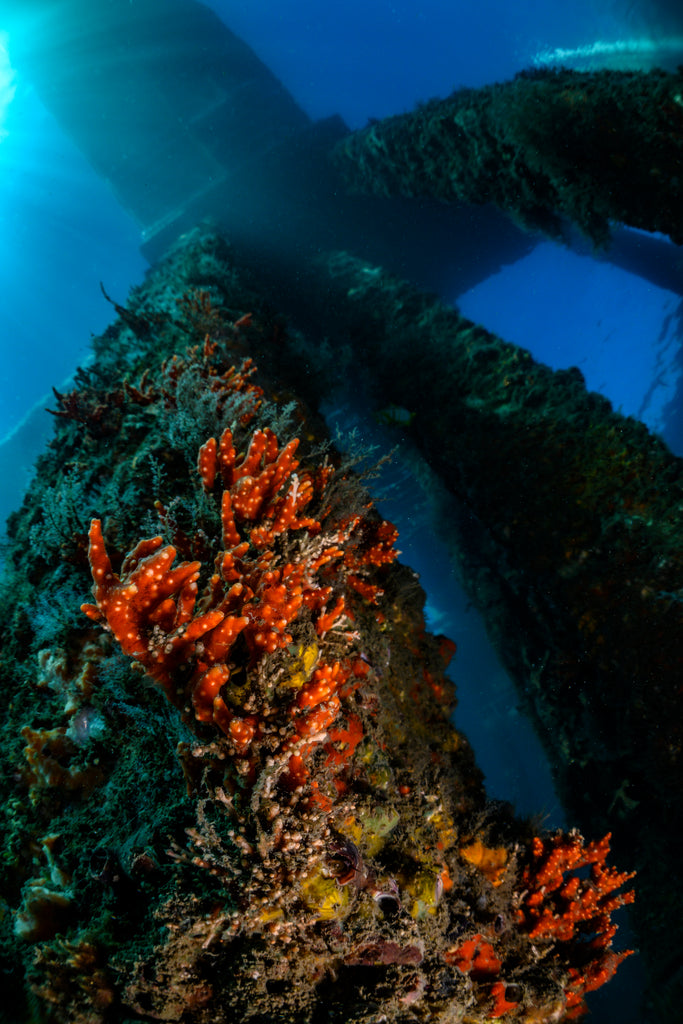

 ]]>
]]>
With Nikon's release of their first full frame mirrorless cameras this year, the Z7 and Z6, I was excited to get one in the water and see how it performed. Sony has dominated the full frame mirrorless market for several years now. They are on their third generation of the A7 line and have made many refinements from one generation to the next. So the question was, could Nikon's first FF mirrorless compare to what Sony has been releasing?

Z7 with the 60mm macro and MWL-1
I'm happy to report that I think they have. Yes, there are some things that could probably be improved, but if you are a long time Nikon shooter that has been waiting for a FF Mirrorless, I don't think you will be disappointed. The Z7 and Z6 share the same button layout and both will fit in the Nauticam NA-Z7 housing. The Z7 is the high resolution model with 45.7 MP and the Z6 has 24 MP with a faster max frame rate.

Z7 with the 60mm macro
I was able to make three dives to test out the Z7 with the FTZ mount adapter and a AF-S Micro 60mm f/2.8 lens. I also got a chance to try out the new Nauticam Macro to Wide Angle Lens 1 (MWL-1). This awesome wet mounted lens converts your 60mm macro lens into a 150° wide angle lens! To round things off I had the Super Macro Converter 2 (SMC-2) with me as well. So in theory I would be able to shoot wide, macro and even super macro all on the same dive!

Z7 with the 60mm macro and MWL-1
The menu system, button layout and feel of the camera is typical Nikon, well built and simple to use. The image quality to me looks fantastic. The auto focus system is not as sophisticated as the D850 or D500. There is no 3D focus tracking but there are more autofocus points, especially on the Z7. 493 phase detection points compared to the D850 153 points. I used back button focus with a single point set on Continuos-Servo AF (C). I also had a manual focus gear that I used to fine tune the super macro shots. I thought the auto focus system, the way I was using it, worked well but this is one area that may need some improvement. A few times I thought the camera hunted more than it should. I was using it with an F mount lens and an adapter so a native Z mount lens may perform better.

Z7 with the 60mm macro and MWL-1
The Nauticam NA-Z7 gives you access to all the controls and is extremely ergonomic. I really appreciated the easy to use lever for switching between the EVF and LCD, a crucial and much used control with mirrorless systems. The housing was designed not only to use the new Z mount Nikon glass, but also the F mount lenses with the Nikon FTZ Adapter. The NA-Z7 comes with Nauticam's self powered manual flash trigger preinstalled. The flash trigger plugs into the hot-shoe of the camera and uses LED lights recessed into each of the two optical bulkheads to trigger supported underwater flashes when used with the correct fiber optic connection. The flash trigger can be upgraded to support TTL triggering (PN 2638 TTL Converter for Nikon). I used the system with an electronic bulkhead installed and two ikelite DS160 strobes. When using a manual trigger most cameras don't recognize that a flash is connected. Make sure not to increase your shutter past the maximum sync speed of 1/200 on the Z7. Another control you may want to disable when using a manual flash trigger and shooting macro is "d8: Apply settings to live view", in the custom settings. This will allow you to still see the image with typical macro settings but it will no longer give you an exposure preview.

Z7 with the 60mm macro and MWL-1
The Macro to Wide Angle Lens 1 is Nauticam's latest underwater optic and it is amazing! It is a wet-mounted ultra wide lens (meaning it can be attached and removed underwater) designed to be used with a 60mm full frame equivalent macro lens that results in an ultra-wide 150º field of view. The MWL-1 can focus from the lens' front element to infinity. Because of it's compact design it is easy to light subjects close to the front element. Never again do you need to miss out on a wide angle opportunity on a macro dive. You can also capture unique close focus wide angle images of macro subjects. This technique works best when a macro subject can be placed very close to the lens where exaggerated perspective makes it pop out from an ordinary background. The MWL-1 excels at smaller apertures and full-frame shooters will get optimal results at F16 or higher.

Z7 with the 60mm macro

Z7 with the 60mm macro and MWL-1
The 60mm macro lens on its own offers a life size 1:1 maximum magnification. It has a short minimum focusing distance so most diopters don't work well with it. The high magnification of both the SMC-2 and CMC-1 allow for a bit more magnification from the 60mm macro, approximately one third more.

Z7 with the 60mm macro and SMC-2

Z7 with the 60mm macro

Z7 with the 60mm macro and MWL-1
]]>


